How to Cut Baseboard Corners: 5 Brilliant Tips 2025
Why Knowing How to Cut Baseboard Corners Matters
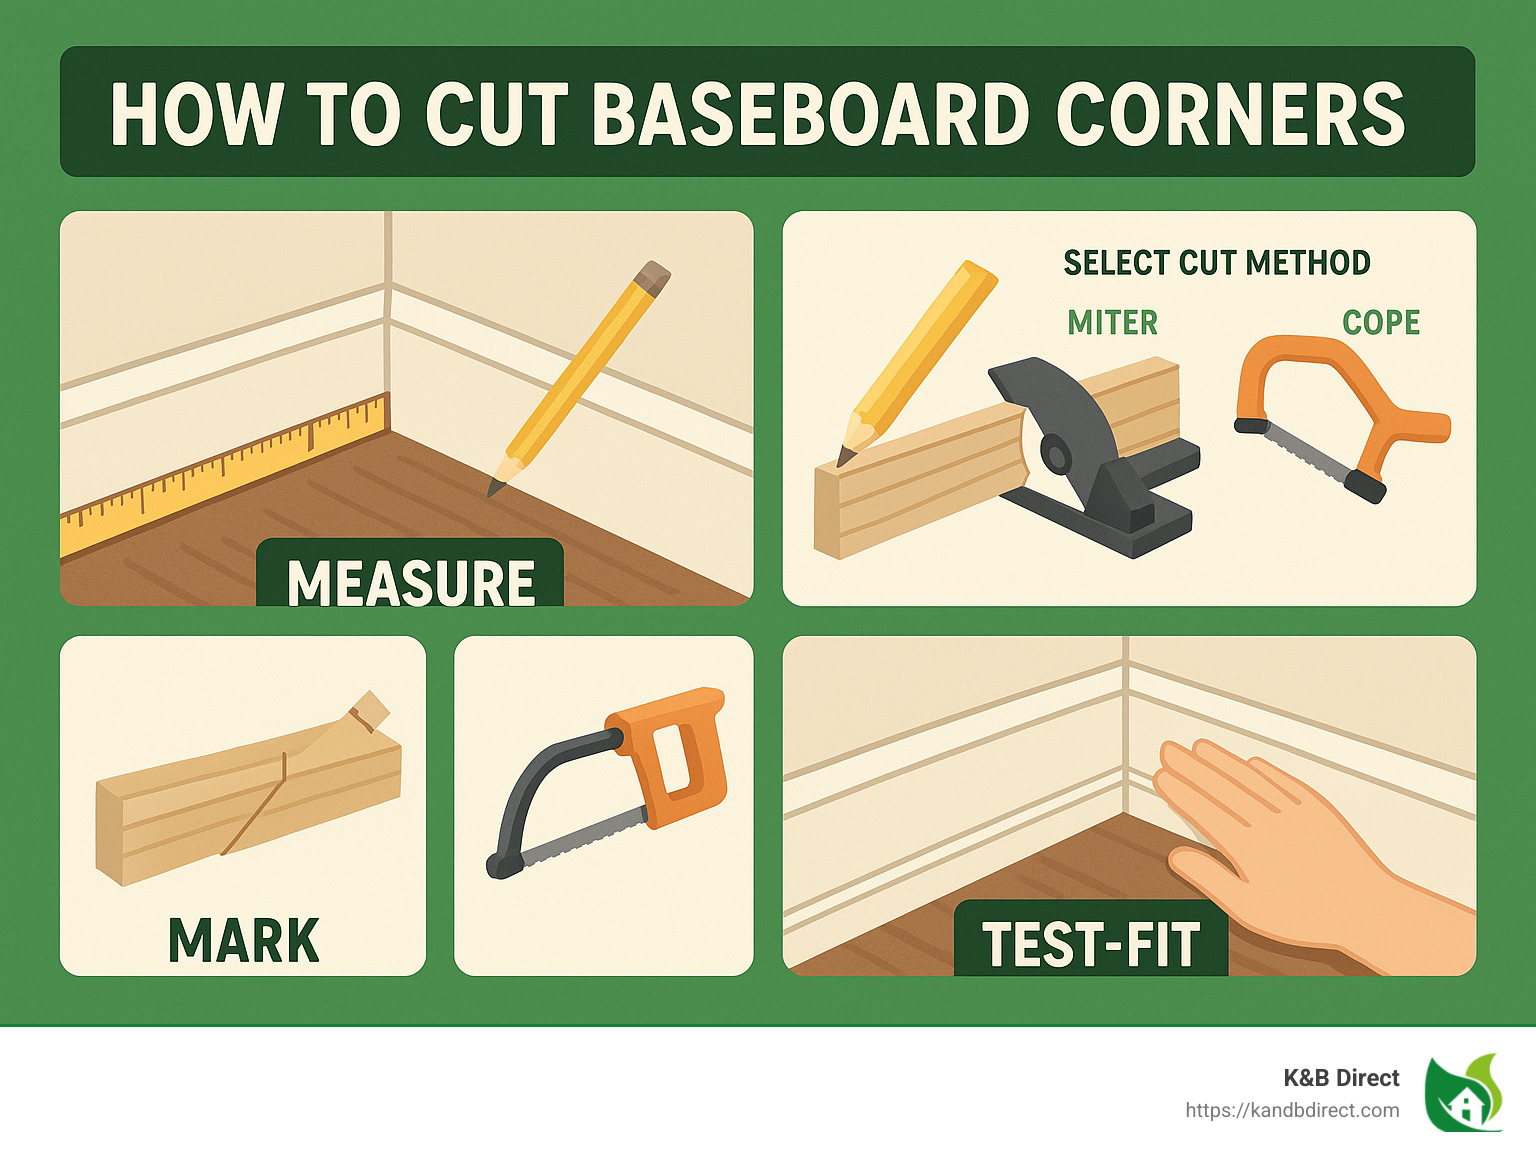
How to cut baseboard corners involves these simple steps:
- Measure and mark: Accurately measure the length of the wall and clearly mark your baseboards.
- Select the right method: For inside corners, choose between a 45-degree miter cut or the coping method; for outside corners, use precise 45-degree miter cuts.
- Cut carefully: Use a miter saw for clean, accurate cuts; if unavailable, a handsaw with a miter box or a jigsaw can also work.
- Test-fit and adjust: Always test-fit pieces before attaching to ensure tight, gap-free corners.
Let’s face it: baseboards are a small detail, but they make a huge difference in the look of your home. Crisp, perfectly aligned corners can lift your space from amateur DIY to professional craftsmanship. As the old carpenter’s adage goes, “Measure twice, cut once”—never more relevant than when you’re tackling baseboard corners.
I’m Eryk Piatkowski from K&B Direct, and I’ve been guiding homeowners and professionals through home improvement projects since 2011, specializing in topics like how to cut baseboard corners. I’m here to help you smoothly tackle this task without frustration or wasted materials.
Understanding the Types of Baseboard Corners
Before you dive into learning how to cut baseboard corners, it’s important to get familiar with the different types of corners you’ll run into around your home. Each corner type has its own quirks, challenges, and techniques. Knowing exactly what you’re dealing with upfront will help you create those crisp, professional-looking corners that make a room truly shine.
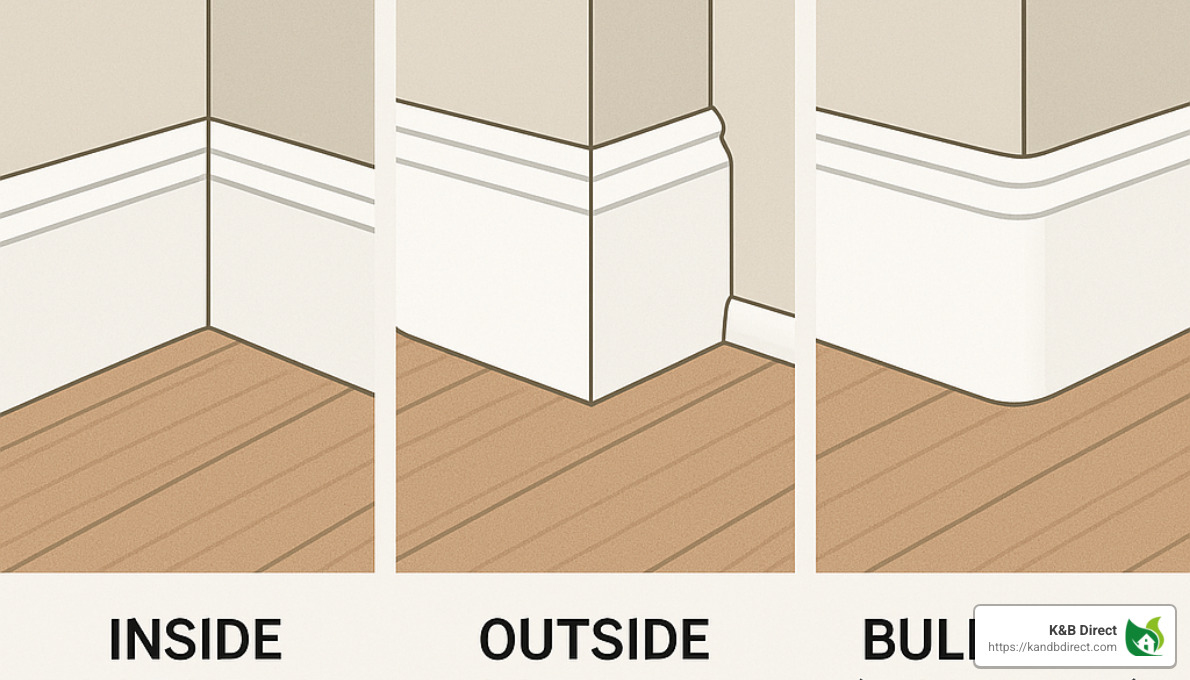
Let’s break it down into the three main types: inside corners, outside corners, and bullnose (rounded) corners.
Inside Corners
Inside corners are by far the most common type you’ll encounter. These are the corners formed when two walls meet, creating an inward-facing angle, usually at about 90 degrees.
Now, you’d think cutting baseboards for inside corners would be straightforward (just two nice, neat 45-degree cuts, right?). But the reality is a bit trickier. Most walls, especially in older homes, aren’t perfectly square, making true 90-degree corners surprisingly rare.
Because of this, you’ll often use one of two reliable methods: the miter cut or the coping method.
The miter cut involves cutting two baseboard pieces at matching 45-degree angles. When placed together, these create a neat and tidy joint. It’s straightforward, but if the walls aren’t square, you’ll likely end up with visible gaps that need filling.
That’s why many pros prefer the coping method. In this method, one piece of baseboard is cut straight, fitting flush against the wall. The second piece gets a special cut: you carefully shape the edge using a coping saw to match the exact profile of the first piece. It’s a bit more effort, but the result is a tight, gap-free joint—even on uneven walls.
Veteran carpenter Gary M. Katz shares a handy rule: “For inside corners, the long point is always against the wall and the fence.” Keep this tip tucked in your toolbelt, and you’ll minimize mistakes.
Outside Corners
Outside corners, sometimes called exterior corners, are created where two walls meet and form an outward-facing angle. Since they’re highly visible, these corners need extra attention to detail.
Typically, outside corners require two baseboard pieces cut with 45-degree miter cuts. These angled cuts come together to create a clean, sharp-looking joint. Sounds simple, but even slight measurement mistakes here really stand out.
A good rule of thumb from experienced carpenters is: “Cut it long and cut it twice—or even three times if necessary.” It’s always better to gradually trim your baseboard down than to accidentally cut it too short and have to start fresh.
And remember, older houses rarely play by the rules. If your walls aren’t exactly square, you might find 44 or 46 degrees gives you a much tighter fit than exactly 45 degrees.
Bullnose (Rounded) Corners
Bullnose corners are those rounded wall corners commonly found in newer homes or modern renovations. They look stylish and smooth but present a unique challenge when installing baseboards.
A regular 45-degree miter cut doesn’t quite work here. To smoothly wrap around bullnose corners, you’ll usually need several smaller pieces cut at precise angles—typically 22.5-degree cuts. You’ll pair these angled pieces together on each side of the rounded corner, with a small center piece, usually between ⅝” and ¾” wide, positioned right at the curve. This combination allows your baseboard to flow gently around the corner, beautifully complementing the rounded look.
As one DIY enthusiast explains clearly, “For bullnose corners, you cut the pieces at 22.5-degree angles so that two pieces together form the required 45 degrees for each side of the corner.” If you want to dive deeper into this method, check out this handy guide on DIY custom rounded or bullnose corners for baseboards.
No matter what type of corner you’re working on, taking your time to understand these differences is key to mastering how to cut baseboard corners. With this foundational knowledge, you’ll save yourself headaches, avoid wasted material, and end up with baseboard corners that look like they were installed by a seasoned pro.
Essential Tools for Cutting Baseboard Corners
When learning how to cut baseboard corners, having the right tools on hand can save you from frustrating setbacks. With a few essential tools, you’ll create precise cuts and achieve a professional finish that you’ll be proud to show off.
At the heart of any trim project is the miter saw, widely considered the gold standard for baseboard cutting. A compound miter saw with a fine-tooth blade will deliver clean, precise cuts effortlessly. Trust us—once you experience the smoothness of a quality miter saw, you’ll wonder how you ever lived without it.
But even if you’re using a miter saw, you’ll likely still need a good coping saw. This handheld tool is essential for creating tight-fitting inside corner joints using the coping method. Look for a coping saw with at least 15 teeth per inch, which helps produce smoother, cleaner cuts.
Measuring and marking accurately are just as critical as cutting itself. A reliable measuring tape with clear, easy-to-read markings is indispensable. Pair this with a sharp pencil—carpenters often prefer pencils with harder lead (such as a 2.5 hardness), so markings remain sharp and precise, ensuring your lines are easy to follow.
A speed square is another handy tool you’ll appreciate. It helps you quickly mark accurate, straight lines and ensures your cuts are always square. After each cut, some sandpaper or a file comes in handy to smooth out any rough edges, ensuring your baseboards fit together seamlessly.
And don’t forget to prioritize safety! Always wear eye protection and hearing protection whenever you’re using power tools—your future self will thank you.
If you’re looking to tackle more challenging corners, a digital angle finder can quickly become your best friend, especially when dealing with non-standard wall angles. For intricate coping jobs, a specialized attachment like the Collins Coping Foot (an attachment that makes coping easier if you’re using a jigsaw) can significantly streamline your workflow. Likewise, a Dremel tool with a drum sander attachment is fantastic for fine-tuning coped joints, particularly those with decorative profiles.
Here at K&B Direct, we often advise homeowners planning multiple trim projects to invest in quality tools that will last a lifetime. However, we also know not everyone has a fully equipped woodworking shop at their fingertips. If that’s you—don’t worry! Let’s look at practical alternatives for cutting baseboard corners without a miter saw.
Cutting Baseboard Corners Without a Miter Saw
You don’t necessarily need a fancy miter saw to achieve beautifully fitted baseboard corners. Alternative tools can deliver excellent results too, and you probably have at least one of these sitting in your toolbox already.
If you have a circular saw, you can use corner blocks or clamps to secure your baseboard and guide your cut. Measure and mark clearly, and take your time cutting slowly to ensure accuracy. Pro tip: drill pilot holes every 15 inches along the board to make it easier to attach with finishing nails once your cut is complete.
A jigsaw is another excellent option for cutting baseboards without a miter saw. After measuring and marking your cut line, use your trusty speed square to draw a straight guiding line. Secure the baseboard firmly, start the saw at full speed before cutting, and carefully guide it along your marked line. Slow and steady wins the race with a jigsaw!
Lastly, don’t underestimate the classic simplicity of a hand saw with a miter box. It’s an affordable and straightforward solution that will help guide your cuts accurately. Secure your baseboard in the miter box, follow the guide slots carefully, and use steady strokes for a clean finish.
“For inside corners,” as one DIY expert notes, “a coped joint often yields a tighter fit compared to miter cuts, as they’re more forgiving of slight misalignments.”
For more detailed step-by-step guidance, check out our handy article: How To Cut Baseboard Corners Without A Miter Saw.
Whichever method you choose, patience and careful measuring are your best allies. Soon enough, you’ll be confidently cutting beautiful baseboard corners like a seasoned pro!

Measuring and Marking Baseboards for Accurate Cuts
Getting your measurements spot-on is the secret ingredient behind perfect baseboard corners. If there’s one golden rule professional carpenters swear by, it’s the timeless advice: “Measure twice, cut once.” Trust me—you’ll thank yourself later!
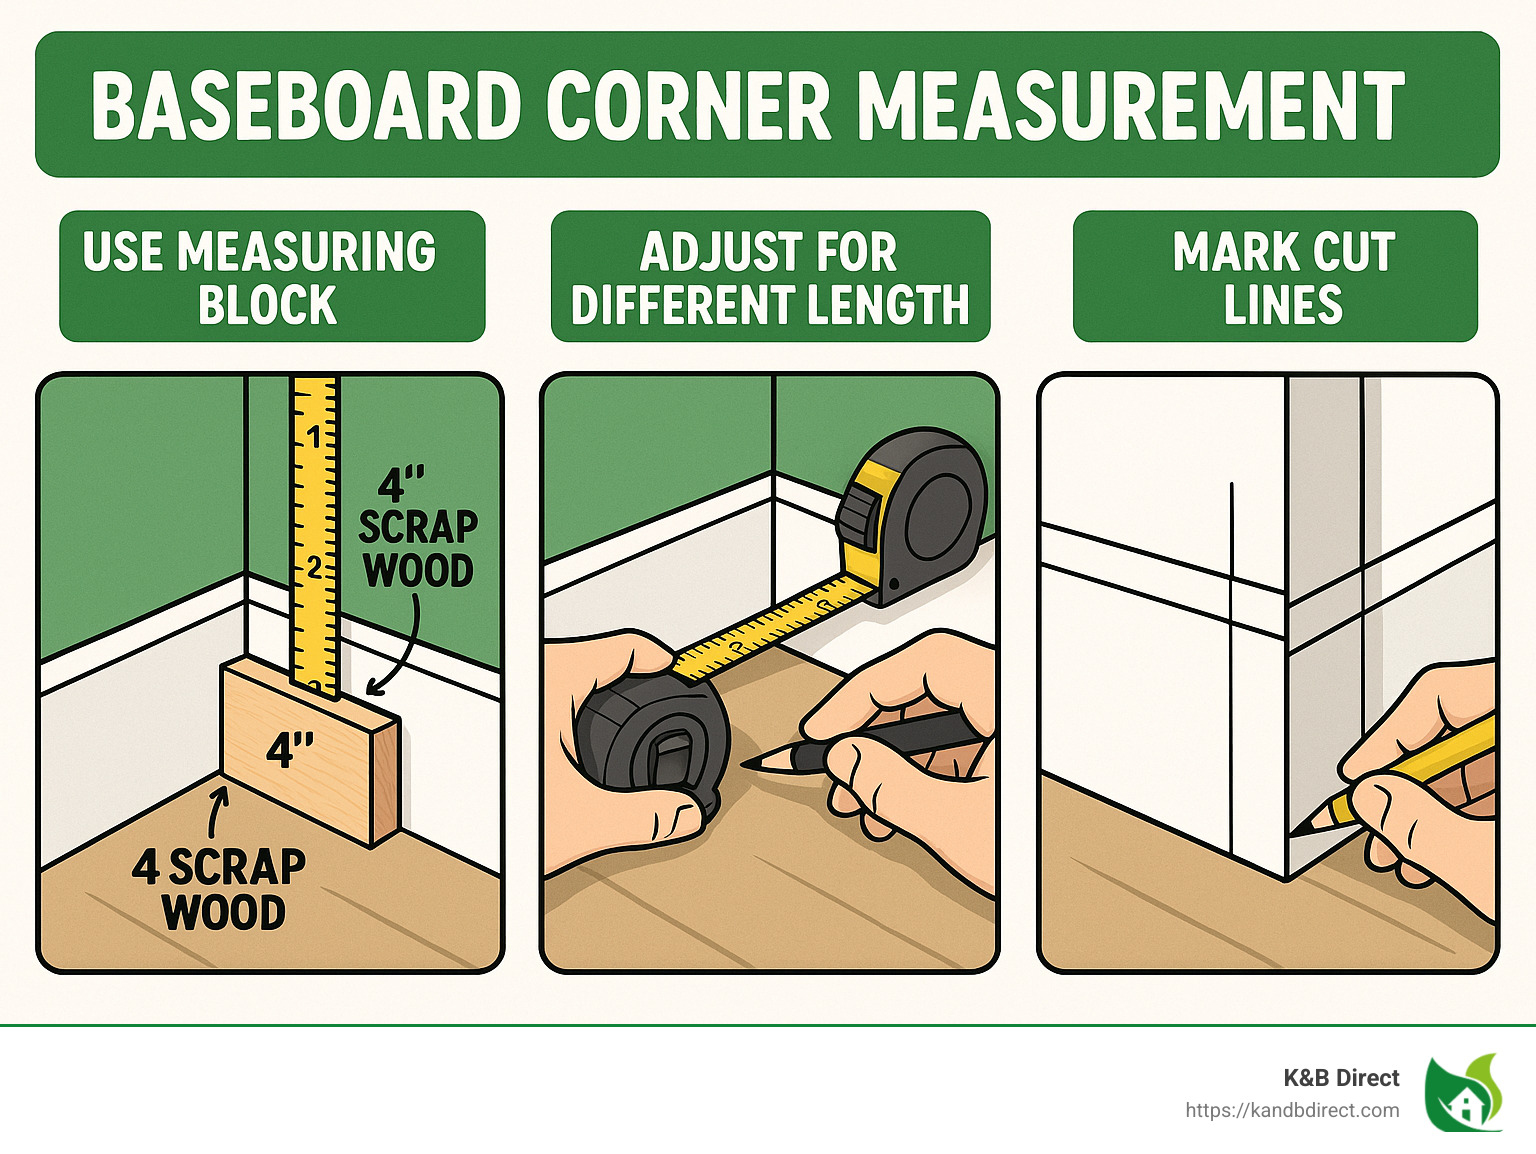
A popular trick among seasoned pros is the measuring block technique. This involves using a small piece of scrap wood—usually about 4 inches long—as a stable reference tool. Simply place the measuring block in the corner, slide your tape measure against it, and you’ll avoid those uneven measurements that happen when you force a tape measure into a tight corner.
Another handy tip from experienced carpenters involves adjusting measurements based on the length of your baseboard pieces. For example, if your baseboard is longer than 6 feet, it’s wise to add about 1/8 inch to your measurement. This extra bit ensures a snug fit. Conversely, if you’re dealing with shorter pieces—under 6 inches—subtract just a smidge to help them fit comfortably into place without forcing.
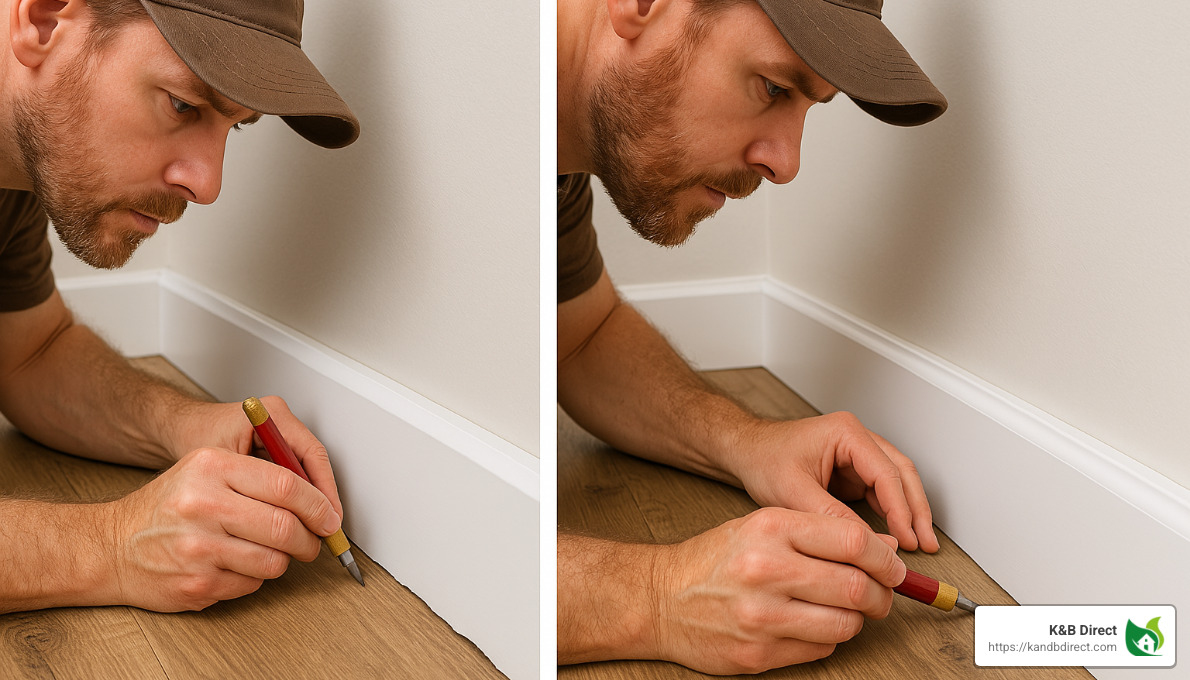
When it comes to marking cuts, clarity is essential. Here’s how you mark your baseboards to avoid confusion later: Hold the baseboard firmly against the wall exactly where it will be installed. For inside corners, carefully use the wall as a guide to mark the back side of your board. For outside corners, let the piece extend beyond the corner edge slightly before marking.
Once the placement is right, draw a clear, angled line (typically around 45 degrees for standard corners) to indicate exactly where you’ll cut. Don’t forget to label your pieces clearly, noting which end belongs where—this simple step will save you from a puzzle-solving headache later on!
Learning how to cut baseboard corners with precision begins with careful measuring and marking. Taking these extra steps upfront guarantees seamless, professional-looking results every time.
How to Cut Baseboard Corners: Essential Techniques
Now that we’ve covered the types of corners and the tools you’ll need, let’s step into the specific techniques on how to cut baseboard corners like a pro. Mastering these fundamental methods will make your trim work look clean and professional—without frustration.
Cutting Angles for Perfect Corners
When tackling standard 90-degree corners, your miter saw is your best friend. To start, set your saw to a 45-degree angle. Position the baseboard on the saw exactly as it will sit against the wall, making sure the bottom edge is flat on the base of your saw. Let your saw reach full speed and carefully follow your marked line for a clean cut.
Pro tip: Since walls in most homes aren’t perfectly square (especially in older houses), cutting exactly at 45 degrees might leave gaps. Many seasoned carpenters suggest setting your saw slightly under 45 degrees—around 44 or 44.5 degrees—to get that snug, gap-free fit.
If you have non-standard angles, don’t worry! Simply use a digital angle finder to measure your corner’s exact angle. Divide this number by two, and that’s your new miter saw angle. Always practice first on some scrap pieces to make sure everything lines up perfectly. As renovation expert Lee Wallender wisely notes, it’s far easier to recut fresh baseboard pieces with adjusted angles than to wrestle with ill-fitting cuts later.
How to Cut Baseboard Corners with the Coping Method
Many professionals swear by the coping method for inside corners. Why? It allows for tighter joints even if the walls aren’t perfectly straight or square.
Here’s how you do it: Install one baseboard piece straight against the wall at a simple 90-degree cut. Then, take your second piece and cut it at a 45-degree angle. Now comes the coping saw magic—carefully follow the profile (the detailed curved edge) of the angled cut, trimming away the backside at a slight inward angle. The aim here is to create a shaped edge that perfectly fits against the first, straight piece already installed.
When using your coping saw, less force means more control. Let the saw do the work by gently guiding it up and down, rather than pushing forward aggressively. You can make small “relief cuts” in tight curves to avoid splintering or chipping.
A handy trick from professional carpenters: If you want an even cleaner coping cut, cut your 45-degree miter first, then adjust your saw to 22.5 degrees. Turn the baseboard upside-down and trim straight down until you reach the detailed profile—this gives you a neat starting point for your coping saw. Finish by carefully following the profile with the coping saw, then test-fit, make adjustments if needed, and sand slightly for a perfect fit.
How to Cut Baseboard Corners for Bullnose and Rounded Walls
Bullnose corners are rounded, neat, and add a modern touch to any home design. They also require a slightly different approach because of their smooth curve.
The secret? Multiple smaller pieces cut at precise angles. Typically, you’ll need four separate pieces cut at 22.5-degree angles, and one small center piece—usually about ⅝”–¾” wide. When joined together, these five pieces create a smooth, rounded corner that perfectly contours to your bullnose wall.
Start by measuring each wall and preparing four angled cuts at exactly 22.5 degrees. Then cut your tiny center piece. Tape all the pieces together temporarily with painter’s tape and gently test-fit around your bullnose corner. This step is crucial—don’t skip it! Once you’re confident everything looks great, nail the pieces into place with a brad nailer, and finish gaps with wood filler.
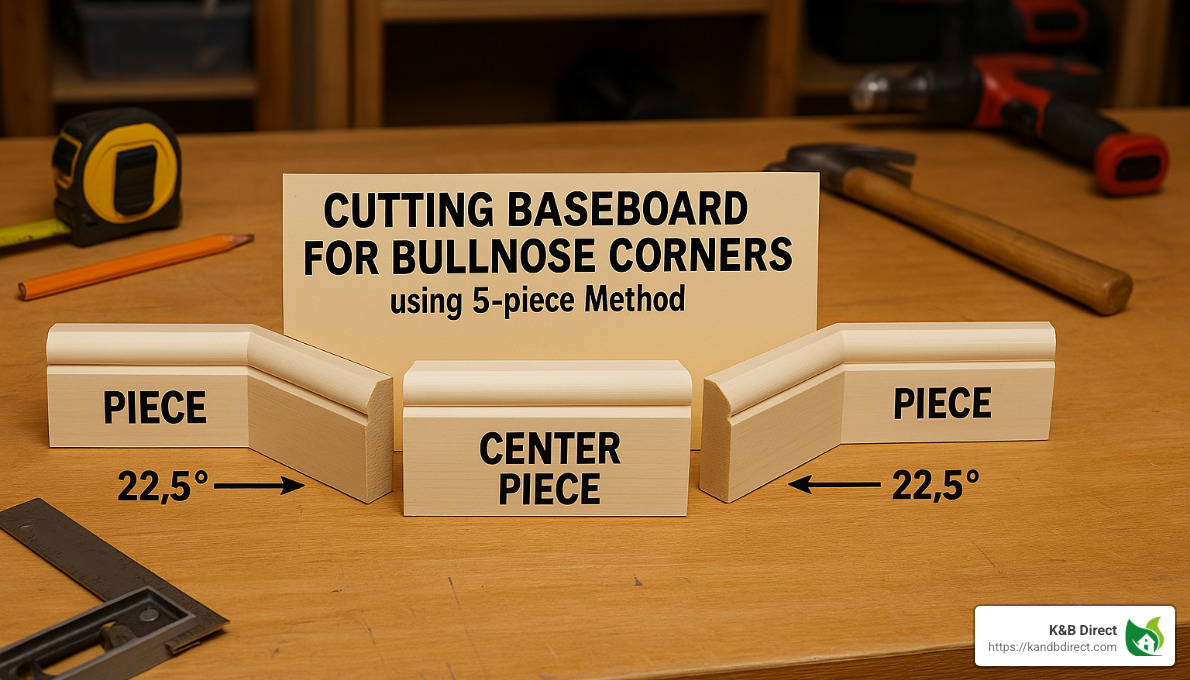
“Cutting baseboards for bullnose corners involves precise angled cuts to create a smooth, modern look. The math is simple: four cuts at 22.5 degrees plus a center piece equals a perfect 90-degree corner with a beautiful rounded appearance.”
If your corner angle isn’t exactly 90 degrees (it happens!), simply measure the exact angle with your digital angle finder, divide the result by four, and adjust your saw accordingly. For those who want even more detail on this process, Designing Parkside offers a fantastic DIY guide on creating DIY custom rounded or bullnose corners for baseboards.
Patience and practice pay off when learning how to cut baseboard corners. Soon enough, you’ll be tackling your baseboard projects with the confidence of a seasoned pro.
Handling Floor Transitions and Uneven Walls
We all dream of a home renovation project where every wall is straight and every floor perfectly flat. But let’s face it—real homes aren’t always so cooperative! Uneven floors and walls can present unique challenges when you’re figuring out how to cut baseboard corners. The good news? With a few simple tricks, you’ll be ready to handle these bumps (literally!) like a seasoned pro.
Floor Transitions
When installing baseboards across areas where flooring heights change, you need a careful, professional approach to keep everything looking smooth. Start by using a level and chalk line to mark out a consistent height on your wall. This gives you a clear reference point to keep things neat, even as the floor shifts.
Next, you’ll want to “scribe” your baseboard to follow the shape of the uneven floor. Hold the baseboard against your marked line, and find the largest gap between the bottom of the baseboard and the floor. Set your compass to that measurement, then run it gently along the floor, transferring the floor’s contour directly onto the baseboard.
Once your contour line is marked, use a jigsaw to carefully cut along it. Slide your baseboard into place, and you’ll see how nicely it hugs the floor’s shape. For areas where the flooring height difference is significant, you might also want to use special transition molding or create a custom-cut return to smoothly bridge the gap.
Uneven Walls
Even newly-built homes can have walls with slight curves or bumps, and older homes often have even more noticeable irregularities. Luckily, uneven walls don’t need to derail your baseboard installation plans!
First, use a straightedge or long level to pinpoint any high points or dips along the wall. If the irregularities are minor, you can usually secure the baseboard tightly with finishing nails, gently pulling the trim snug to the wall.
But what if the gaps are too big to bridge by simply nailing? That’s where shimming comes in handy. Insert small wooden shims behind your baseboard at the stud locations, gradually bringing the board flush against the wall.
For larger, trickier gaps, consider “scribing” the backside of the baseboard. By marking the uneven wall’s contour on the baseboard and carefully removing material from the back, you’ll achieve a tighter, more professional fit.
In extreme cases, a supporting wood block or extra backing may be needed behind the baseboard. It’s a little extra effort, but trust me—it beats staring at unsightly gaps!
As one experienced carpenter renovating a 115-year-old house once joked, “When walls won’t cooperate, just scarf out that stubborn corner and gently sand back the edge until everything fits snugly. Wood filler and caulk can hide a multitude of sins!”
With a bit of patience and these practical tips, handling uneven floors and walls while learning how to cut baseboard corners doesn’t have to be intimidating. Instead, consider it part of your home’s unique charm. After all, every home has its quirks—why not celebrate them?
Common Mistakes to Avoid When Cutting Baseboard Corners
Cutting baseboard corners isn’t rocket science, but even seasoned DIY-ers sometimes make slip-ups. After helping homeowners through countless projects at K&B Direct, I’ve noticed a few common hiccups that can easily be avoided. Here are the usual suspects—and how you can steer clear from them.
1. Incorrect Measurements
The most frequent misstep? Incorrect measurements. It’s easy to do—measuring from the wrong reference point or forgetting to account for the shape and profile of the baseboard. Resist the urge to eyeball or rush through measurements. Always double-check your tape measure placement and measure from the longest part of the angled cut. Remember our friendly carpenter’s adage: “Measure twice, cut once,” so always take a second look before making your cut.
2. Cutting at the Wrong Angle
Another common pitfall is cutting at the wrong angle. Walls in our homes rarely form perfect 90-degree angles, especially if your house has some years under its belt. Setting your saw exactly at 45 degrees every time can get you corners that just don’t fit snugly. Instead, make a habit of test-cutting some scrap pieces first. You may find you need to tweak your angle slightly—maybe 44 or 46 degrees—to match your unique walls perfectly.
3. Cutting the Baseboard in the Wrong Orientation
Have you ever made a cut and realized, “Oh no, I cut it upside down!”? You’re not alone. Cutting the baseboard in the wrong orientation happens more often than you’d think. Always place your baseboard against the saw fence exactly as it will be installed on your wall. If you’re ever unsure, take a quick second to visualize the final installation—or mark the top edge clearly—to avoid confusion.
4. Cutting Too Short
Here’s another classic scenario: you measure precisely, cut exactly on your mark, and suddenly your baseboard is too short. How frustrating! But don’t worry, there’s a simple solution: always cut your piece just a little long at first. You can easily trim it down bit by bit until you have a perfect fit. It’s always easier to shave off a little extra length than it is to stretch wood (spoiler alert: you can’t!).
5. Not Test-Fitting Before Installation
One of the easiest ways to avoid headaches and wasted time is to test-fit your pieces. Skipping test-fitting is a common mistake because we all want to get the job done fast. Still, taking an extra minute to dry-fit your corners before picking up your nail gun will save you frustration in the end. You’ll catch small adjustments now rather than noticing them later, after the baseboards are already attached to the wall.
6. Safety Oversights
Cutting baseboard corners isn’t dangerous—as long as you’re careful. Yet, one of the most critical mistakes is overlooking basic safety precautions. Avoid unsafe practices like cutting cross-handed (reaching across the saw) or neglecting safety gear. Always wear eye protection and hearing protection, and position yourself comfortably and safely behind your saw. It’s a simple habit, and your future self (and your eyes and ears) will thank you!
7. Forcing Misaligned Joints
Finally, there’s a temptation to cover up poorly fitting joints with excessive caulk or filler. While these products are your friends for small gaps and nail holes, they shouldn’t be used to force misaligned joints into appearing perfect. If a joint doesn’t align correctly, take the extra time to recut and adjust the pieces. Trust me—taking a few extra minutes to get it right is worth it. You’ll achieve a smoother finish and a more professional look.
Avoiding these common mistakes will give you beautifully crafted corners and prevent frustration down the road. After all, knowing how to cut baseboard corners is one thing—but knowing how to dodge common pitfalls makes you a DIY hero in your own home.
Finishing Touches: Filling, Sanding, and Caulking
You’re almost there! Once you’ve mastered how to cut baseboard corners, measured precisely, and nailed each piece securely, there’s just one step left—those final finishing touches. These last steps take your project from good to great, helping you achieve a polished, professional look.
When to Use Wood Filler vs. Caulk
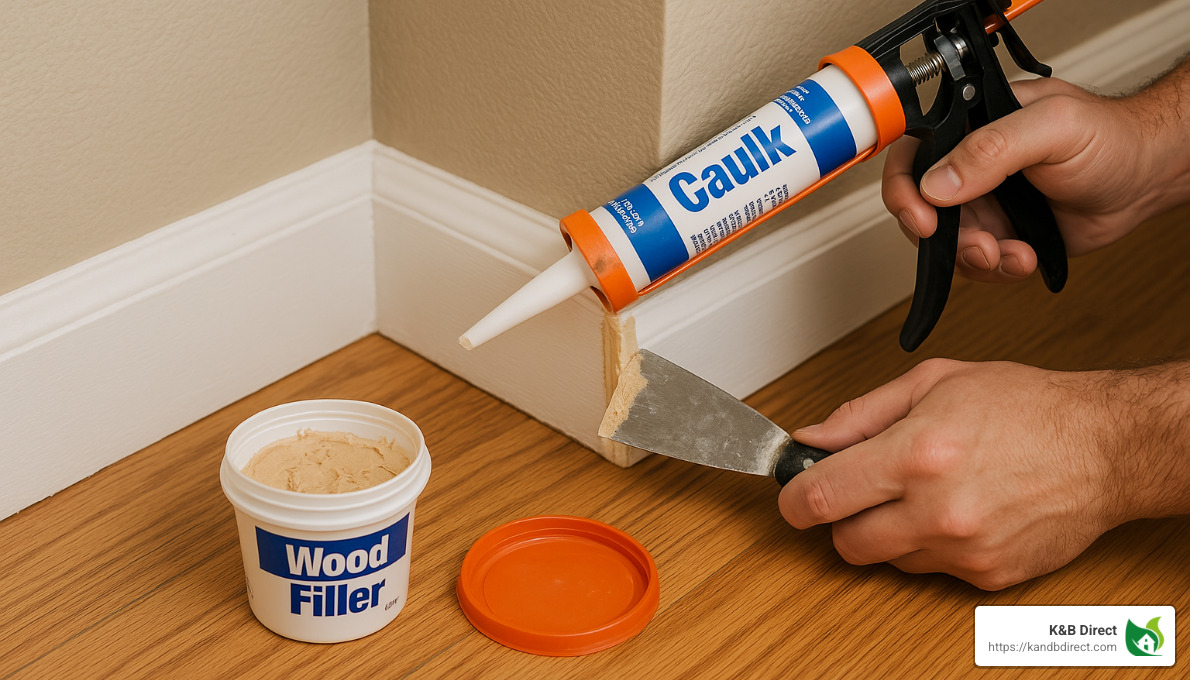
Wood filler and caulk both help you achieve tidy, seamless baseboards—but they serve different purposes. Knowing when to use each is key to professional-looking results.
Wood filler is your best friend for filling nail holes, wood-to-wood joints, or small chips and imperfections in the baseboard itself. Because wood filler dries hard, it sands easily to create a perfectly smooth finish that blends right in with your trim.
Caulk, on the other hand, is flexible and perfect for sealing gaps between your baseboard and another surface—especially where the baseboard meets the wall. It easily handles surfaces that tend to shift slightly over time due to temperature and humidity changes.
As one experienced DIYer puts it:
“Wood filler is great to fill nail holes or where two pieces of wood meet… I use caulk where wood meets another product like the wall.”
Step-by-Step Finishing Process
Ready to give your baseboards that flawless finish? Here’s how to tackle it, step-by-step:
Start by filling nail holes and wood joints with wood filler. Use your finger or a small putty knife to gently press filler into each hole, slightly overfilling them. Let it dry completely (check the manufacturer’s instructions—usually around an hour or two).
Once the wood filler is completely dry, it’s time to sand. Take a piece of fine-grit sandpaper (180-220 grit) and gently sand until the surface is smooth and flush. After sanding, use a barely damp rag to wipe away any dust.
Next up, caulk those gaps along the top edge of your baseboard where it meets the wall. Cut the tip of your caulk tube at a slight angle—this will give you better control. Apply a thin bead of caulk along the joint, then lightly smooth it out with your finger (pro tip: wet your finger slightly to prevent sticking). Make sure you wipe away any excess with a damp cloth before it dries.
Finally, apply a fresh coat of paint or touch-up paint as needed. Use a small artist’s brush to cover those filled nail holes or wood fills. Two thin coats usually produce the best results, blending perfectly with the rest of your trim.
At K&B Direct, we recommend using a high-quality, paintable acrylic caulk for most baseboard projects. For bathrooms or other areas with higher moisture, opt for a silicone-based caulk to handle humidity better. Trust me—your future self will thank you!
These finishing touches might seem small, but they’ll give your space a crisp, professional finish. So, take your time, enjoy the process, and admire the beautifully finished baseboard corners you’ve created.
Frequently Asked Questions about How to Cut Baseboard Corners
When it comes to home renovation projects, we know there’s always a handful of questions floating around. Cutting baseboard corners is no exception—so let’s cover some of the most common questions homeowners ask about how to cut baseboard corners.
Do I Need a Miter Saw to Cut Baseboard Corners?
A miter saw is like the trusty best friend of DIY trim work—it makes the job easier, faster, and more precise. But the good news is, you absolutely don’t need one to get great results.
If you’re tackling a smaller project or just a room or two, simpler tools like a hand saw with a miter box can work wonders. It’s budget-friendly, easy to use, and perfect for occasional DIYers.
A jigsaw with a sturdy guide can help you achieve both straight and coped cuts, ideal when working on more complex baseboard profiles. Alternatively, a circular saw paired with a cutting guide can handle miter cuts nicely, though it does require some careful setup and attention.
If you really want the benefits of a miter saw without the permanent commitment (trust us, tools take up space!), consider renting one for the day from your local hardware store. It’s often a cost-effective solution for one-time projects.
What Angle Should I Cut for Baseboards?
For standard corners in most homes, baseboards are typically cut at a 45-degree angle. This applies to both inside and outside corners. However, bullnose (rounded) corners require you to shift gears a little—these corners often call for cuts at 22.5 degrees.
But here’s a pro secret: most walls aren’t exactly perfect 90-degree angles. Older homes, or even newer builds that have settled slightly, may have corners that aren’t precisely square. To get a perfect fit, you might need to adjust your miter angle slightly. If your inside corner is slightly larger than 90 degrees, try cutting at around 44 degrees to create a snugger fit. Conversely, if your corner is a bit less than 90 degrees, bump your saw setting up to about 46 degrees.
For those tricky, non-standard angles—whether in quirky old homes or creative modern spaces—a handy digital angle finder can be your best friend. Measure the exact corner angle and divide the reading by two to determine your ideal miter angle. Easy!
For inside corners, many professional carpenters swear by the coping method instead of straight miters. It’s a bit more work, but this puzzle-like method provides a tighter fit, especially if your walls aren’t perfectly straight.
How Do I Cope Baseboard Corners Without Gaps?
Mastering the coping technique can feel tricky at first, but with just a bit of practice, you’ll achieve incredibly neat, professional-looking corners.
Start by making a clean 45-degree cut on one piece of baseboard—this clearly shows the profile you need to cut along. Next, use your coping saw held at about a 30-degree back angle, carefully following and slightly undercutting that profile. This back-bevel ensures that only the front edge touches the adjoining piece, creating a seamless joint.
Make small relief cuts (little perpendicular cuts) at sharp curves. These help prevent chipping and breaking while working through tight turns. And don’t rush—take your time to get it right.
Test-fit your coped piece frequently against a scrap of the same trim profile. Removing material gradually is always better than taking off too much at once. For fine-tuning, a small round file or sandpaper is perfect for removing tiny bits of excess wood.
Pro tip: Many professionals now use a jigsaw with a Collins Coping Foot attachment. It’s quicker and often more accurate than traditional coping saws. If coping by hand feels intimidating, this might be a worthwhile investment.
The beauty of a coped joint is its adaptability—it naturally accommodates uneven walls, creating a tight fit even in imperfect spaces. As one carpenter happily explains, “Coping creates a puzzle-like fit between two pieces of trim, magically hiding any imperfections and gaps.”
By answering these common questions clearly, our goal at K&B Direct is to give you the confidence you need for perfect baseboard corners—every time. We’re always here to support your home renovation journey with professional guidance, expert tips, and quality products you’ll love.
Conclusion
Learning how to cut baseboard corners might feel intimidating at first, but trust me—it’s a skill you can absolutely master with some careful planning and a bit of practice. At K&B Direct, we’ve guided countless homeowners through this very process, and we’ve seen how professional-quality corners can lift any room.
The secret to achieving those picture-perfect results lies in understanding your corner styles—whether it’s inside corners, outside corners, or those sleek, modern bullnose rounded corners. Each type of corner presents its own unique challenges and calls for specific cutting techniques, like the coping method for tricky inside corners and precise miter cuts for sharp outside edges.
Of course, no matter how well you understand corners, you’ll only succeed by measuring accurately. An old carpenter’s wisdom—”Measure twice, cut once”—holds true. Consistent measuring techniques and careful double-checking will save you headaches down the line.
Before you nail your finished piece into place, always take a moment to test-fit. Dry-fitting your baseboard corners first allows you to make any needed adjustments without the frustration of pulling out nails and starting again. You’ll thank yourself later, trust me.
Finally, don’t overlook the importance of finishing touches. Using the right combination of wood filler (ideal for nail holes and wood-to-wood joints) and caulk (best for sealing baseboards to walls) makes all the difference. A careful finish transforms your DIY job into professional craftsmanship.
At K&B Direct, we’re not just here to sell you products—we’re here to help you bring your renovation vision to life. With showroom locations in Schiller Park and Chicago, IL, we offer a friendly, experienced team, plus a wide selection of beautiful baseboards and trims that suit any style.
Whether you’re renovating one room or your whole home, carefully cut baseboard corners give your space that polished, professional look—something you’ll proudly show to guests and admire for years to come.
For more information and inspiration, be sure to visit our Mouldings & Millwork section or stop by our showroom to see our products firsthand. We’re excited to help make your home renovation project a great success!