how to install base cap moulding: 7 powerful tips for flawless 2025 results
Transform Your Space with Base Cap Moulding
How to install base cap moulding is simpler than you might think. Here’s a quick guide for DIYers:
- Measure walls and add 10% extra for mistakes
- Cut the moulding using a miter saw (45° for outside corners; coped for inside corners)
- Apply wood glue to both top and bottom surfaces of the base cap
- Attach to baseboard (not the wall) using 23-gauge pin nails
- Fill nail holes with wood putty and caulk any gaps
- Sand and paint for a professional finish
Base cap moulding is that neat decorative trim that sits on top of your baseboard, creating a more sophisticated profile and visual connection between your walls and floors. For just $2.50-$3 per linear foot installed, this small addition can dramatically transform your room’s character.
As Tom Silva, master carpenter, notes: “Despite their lowly position along the floor, baseboards are one of a house’s defining features.” The right base cap can lift plain baseboards into an architectural statement.
I’m Eryk Piatkowski, and at K&B Direct, I’ve guided countless homeowners through how to install base cap moulding with our quality trim products since 2011, ensuring both durability and style while keeping costs manageable.

How to install base cap moulding terms to know:
– base cap moulding
– panel cap molding
What Is Base Cap Moulding & Why Use It?
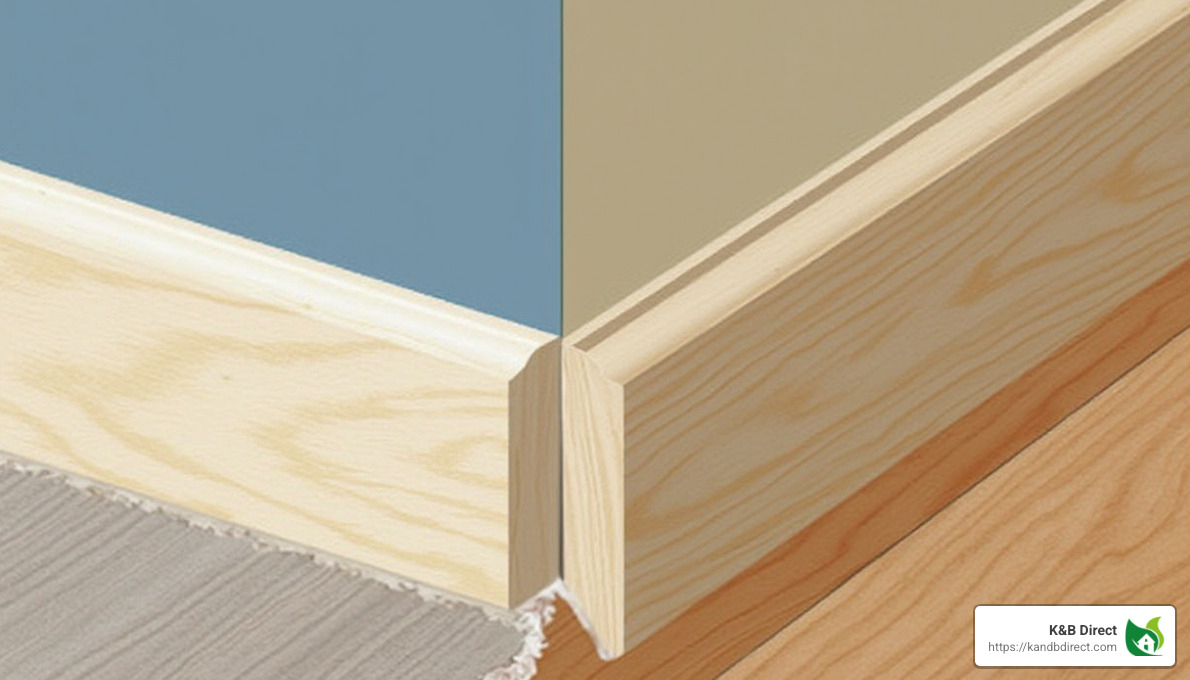
Ever walk into a room and feel something’s missing, but can’t quite put your finger on it? Often, it’s those subtle finishing touches – like base cap moulding – that make all the difference. This decorative trim sits atop your baseboard, changing a plain flat board into an architectural feature with character and depth.
In homes built before mass production took over, baseboards weren’t just single pieces of trim. They were carefully crafted three-piece assemblies: a solid plank against the wall, a decorative cap on top, and usually a shoe moulding at the bottom covering any floor gaps. This wasn’t just decorative fussiness – it was practical architecture that created visual weight where your walls meet the floor.
“In old houses, you often see the fanciest baseboard in the front room downstairs,” notes Tom Silva. This wasn’t random – these details signaled importance in traditional architecture, with more elaborate trim work in spaces meant to impress visitors.
Today’s most common base cap size runs about 11/16″ thick by 1 3/8″ wide, though you’ll find countless variations. At K&B Direct, we’ve noticed a delightful trend: homeowners refinding multi-piece baseboards to add character to post-WWII homes that typically featured thin, uninspiring one-piece trim.
Material Considerations
When choosing base cap moulding, you’ll encounter three main materials, each bringing different benefits to your project:
| Material | Pros | Cons | Best For |
|---|---|---|---|
| MDF | Pre-primed, budget-friendly, consistent, no knots | Can be damaged by moisture, not ideal for high-humidity areas | Indoor dry areas, painted applications |
| Solid Wood | Natural beauty, can be stained, durable, repairable | More expensive, may have knots, requires more finishing | Traditional homes, stained applications, long-term durability |
| PVC | Waterproof, won’t rot or warp, consistent | More expensive, limited finishing options, environmental concerns | Bathrooms, kitchens, exterior applications |
Here’s a crucial tip many enthusiastic DIYers miss: acclimation matters. All wood and wood-composite mouldings should rest in your home for at least a week before installation. This isn’t just being fussy – it allows the material to adjust to your home’s unique temperature and humidity, preventing future warping, shrinking, or expansion that could ruin your beautiful trim work.
Different Profiles at a Glance
The profile you choose dramatically affects your room’s character. Each style tells a different design story:
Ogee Profile creates neat S-shaped curves that cast beautiful shadow lines. It’s wonderfully versatile, complementing everything from traditional to transitional homes.
Beveled Profile offers clean, angled lines perfect for contemporary or craftsman aesthetics. Its simplicity brings sophistication without fussiness.
Colonial Profile delivers those ornate details that instantly evoke traditional American architecture – perfect for historic homes or creating that timeless feel.
Low-Profile options provide a finished look without drawing too much attention – ideal when you want polish without making a statement.
Panel Cap Molding serves a specialized purpose, perfectly capping wainscoting or other panel details with a refined edge.
Your home’s architecture should guide your choice. A Colonial profile would look oddly formal in a sleek mid-century modern space, while a simple beveled profile might seem underwhelming in a Victorian-style home with other ornate details.
As design blogger Kristi Linauer enthusiastically puts it: “Base cap molding is my single favorite trim. Seriously, the possibilities with this trim are limitless.” She’s found creative uses beyond baseboards – framing wall murals, enhancing crown molding, and even crafting custom picture frames.
When selecting your profile, think about how it will interact with your existing architecture. The right base cap doesn’t just finish a room – it ties everything together in a way that feels intentional and complete.
How to Install Base Cap Moulding: Step-by-Step Guide
Ready to transform your room with some neat trim work? Installing base cap moulding is totally doable for a weekend warrior like yourself. With a systematic approach, you’ll get professional-looking results without the professional price tag.
Golden rule of carpentry: “Measure twice, cut once.” I can’t tell you how many pieces of trim I’ve saved by following this simple advice! And while we’re talking about saving material, always buy about 10% more than your measurements indicate. Trust me on this—you’ll thank yourself when you make that inevitable mistake or find your walls aren’t as straight as you thought.

Tools & Materials for How to Install Base Cap Moulding
Before diving in, let’s gather everything you’ll need. Think of this as your mise en place—having everything ready makes the whole job flow better.
For tools, you’ll want a compound miter saw (though a miter box with backsaw works for smaller projects), a coping saw for those inside corners, and a 23-gauge pin nailer. If you don’t have a pin nailer, a finish hammer and nail set will do just fine—it’ll just take a bit longer.
Don’t forget your measuring and marking tools: stud finder, tape measure, pencil, level (or laser level if you’re feeling fancy), and a chalk line. Add some 220-grit sandpaper, a putty knife, and safety gear (your eyes and ears will appreciate the protection).
As for materials, you’ll need your chosen base cap moulding (like our Base Cap GM400), some wood glue (the quick-setting kind saves time), 23-gauge pins or 1½” finish nails, wood putty that matches your trim, painter’s caulk, and whatever paint or stain you’re planning to use.

Interesting fact: research shows that those tiny 23-gauge pins are actually ideal for thin mouldings like base cap. They’re less likely to split the wood while still holding everything in place when paired with adhesive. Science in your trim work—who knew?
Measure, Plan & Buy with Confidence
Let’s start with good planning. Grab your tape measure and notebook to record the length of each wall where you’ll install base cap. Add these measurements for your total linear footage, then multiply by 1.1 (that’s your 10% buffer).
Next, find all your wall studs and mark them lightly with a pencil at baseboard height. This step might seem tedious, but knowing where your studs are will make installation much smoother.
For a truly professional look, establish a level reveal line around the room. This is especially important in older homes where floors can wave like the ocean! Here’s how:
Find the lowest spot on your floor (usually in a corner). Place a scrap piece of baseboard there and mark your desired height. Using a level, extend this mark around the entire room, then snap a chalk line to connect them all. This simple step ensures your trim looks perfectly level, even if your floors aren’t.
Cutting Corners the Right Way
Corners are where the pros shine and amateurs struggle. For those outside corners (where the wall projects into the room), cut both pieces at 45° angles so they meet to form a 90° corner. I like to cut them slightly long—about 1/16″—and then fine-tune with a block plane or sandpaper for that perfect fit. A little wood glue between the mitered edges adds strength before nailing.
For inside corners (where the wall recedes), I recommend cutting the first piece square (90°) to fit tightly into the corner. For the second piece, cut a 45° bevel, then use your coping saw to cut along the profile’s inner edge. Slightly undercutting with the coping saw creates a tighter fit.
A carpenter friend once told me, “Perfect 90° corners exist only in geometry textbooks, not in houses.” So true! If your corners aren’t perfect squares (and they rarely are), try adjusting your miter angles slightly. Sometimes a 44° or 46° cut works better than the standard 45°.
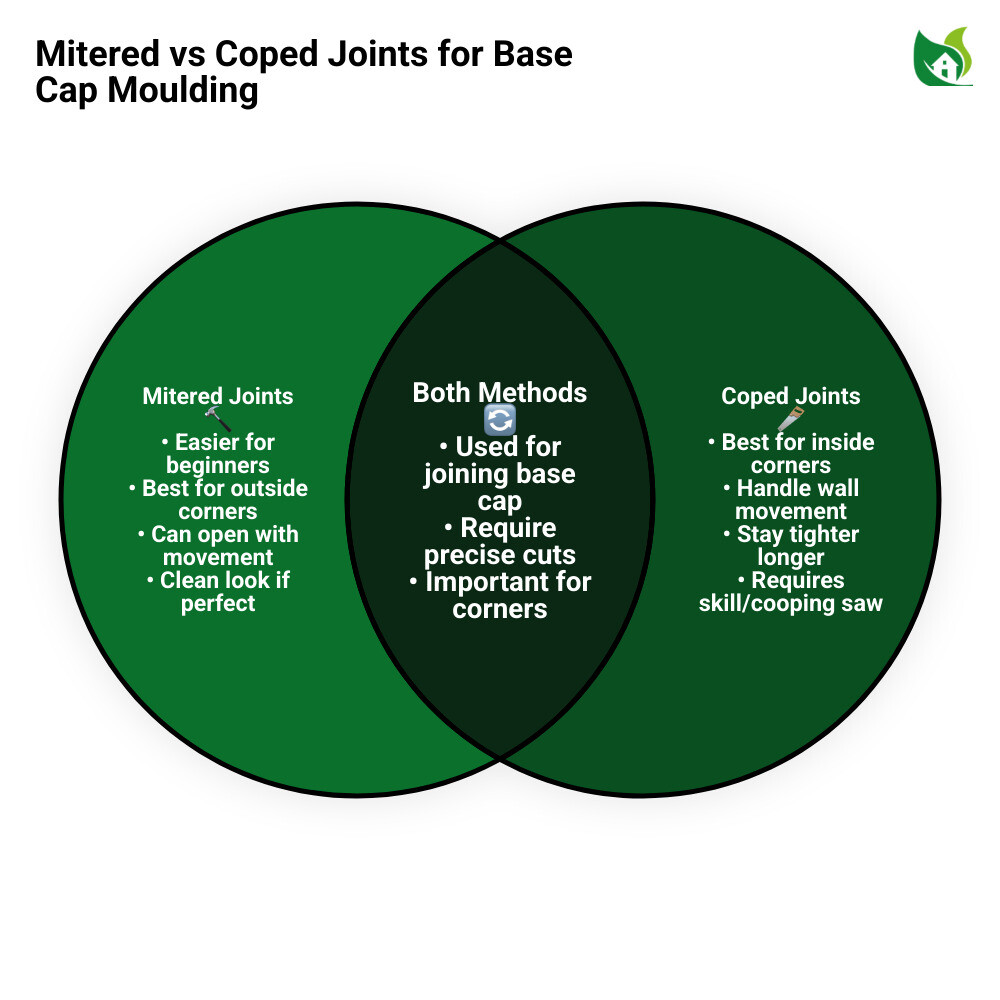
Mitered vs Coped Joints—When & Why (how to install base cap moulding)
The great debate of trim carpentry: to miter or to cope inside corners? Each has its place.
Mitered joints look clean when perfectly executed and are generally easier for beginners. They’re perfect for outside corners and for joining two pieces on a long wall (called scarf joints). The downside? They can open up over time as your house settles and the wood expands and contracts with seasonal changes.
Coped joints take more practice but are worth mastering for inside corners. They accommodate house movement better and stay tight longer. The technique involves cutting a 45° miter first, then using a coping saw to cut along the profile line, removing material behind it so the piece fits perfectly against the adjacent trim.
As Tom Silva wisely notes, “Rarely are inside or outside corners 90 degrees.” This fundamental truth explains why professional trim carpenters often prefer coping inside corners—it forgives these imperfections.
Nailing & Adhesive—Baseboard vs Wall
Here’s a crucial tip that many DIYers miss: nail your base cap to the baseboard, not to the wall. Nailing to the wall often leads to splitting and poor adhesion.
The right approach is to apply wood glue to both the top and bottom surfaces where the base cap contacts the baseboard. Position it carefully, ensuring proper alignment. Then secure it with 23-gauge pins or finish nails, driving them through the thickest part of the base cap into the baseboard. Space your nails about 16″ apart, and stagger them to prevent splitting.
If you’re using hand nails instead of a pin nailer, try this old carpenter’s trick: slightly dull the nail point with your hammer before driving it. A sharp point acts like a wedge, splitting the wood grain, while a duller tip breaks the fibers and punches through cleanly.
Remember to leave a small expansion gap if you’re also installing shoe moulding at the floor. Wood needs room to breathe with seasonal changes, and this little gap prevents buckling.
Long Runs & Splicing Like a Pro
Most moulding comes in 8′ to 12′ lengths, but many walls are longer. The solution? A scarf joint—the professional way to splice two pieces together almost invisibly.
Cut the end of your first piece at a 45° angle, with the long point facing into the room. Then cut the beginning of the second piece at a matching 45° angle, with its long point facing the wall. Apply glue to both cut surfaces, slide them together to create an overlapping joint, and nail through both pieces where they overlap. A light sanding ensures everything stays perfectly flush.
Try to position these joints over studs for added strength. Also, place them away from where people naturally look—nobody needs to admire your splices!
Solving Uneven Walls & Floors
In perfect houses, walls are plumb and floors are level. In real houses—especially older ones—not so much. Here’s how to handle these challenges:
For uneven floors, find the lowest point in the room first. Establish your baseboard height from this point. Then use a compass to scribe the bottom edge of the baseboard to match the floor’s contours. Cut along this scribed line with a jigsaw or circular saw set at a slight bevel.
For wavy walls, install the baseboard accepting that there may be small gaps where the wall recedes. Gaps less than 1/8″ can be filled with caulk before painting. For larger gaps, push in some backer rod before caulking to prevent cracking later.
I once worked in a century-old farmhouse where the floors had settled so much that we had to scribe and custom-cut every single piece of baseboard. It doubled our installation time, but the results were worth it—perfectly level trim with no gaps. Sometimes the extra effort makes all the difference between an amateur and professional-looking job.
Finishing Touches for a Seamless Look
The magic of professional-looking trim work happens in those final finishing steps. While anyone can cut and nail base cap moulding, it’s the attention to detail that separates DIY projects that look, well… DIY, from those that look like you hired a pro.
Let’s transform your installation from “nice try” to “wow, who did your trim work?”
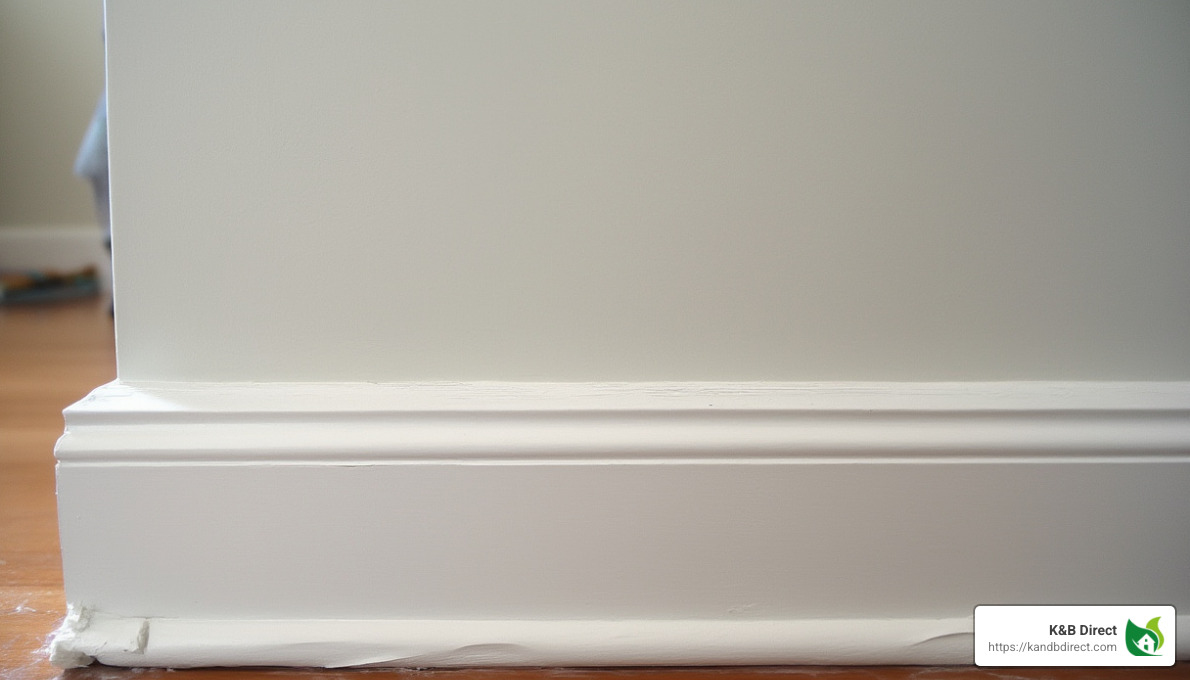
After you’ve nailed your base cap in place, grab your nail set tool to gently tap each nail head just below the surface of the wood. This creates a tiny dimple that can be filled for an invisible finish. It’s a small step many DIYers skip, but it makes a world of difference in the final appearance.
Filling those nail holes properly is your next mission. For painted trim, a good-quality paintable wood filler works beautifully. If you’re going with stained wood, you’ll want to use a color-matched filler or wax stick that complements your stain shade. Apply it with a small putty knife, slightly overfilling each hole.
Once your filler is completely dry (patience pays off here!), grab some 220-grit sandpaper and lightly sand the filled areas until they’re perfectly flush with the surrounding wood. No need to sand aggressively – just enough to create a smooth, unified surface that won’t show bumps under paint or stain.
“The caulking step is where amateurs often rush, but professionals know it’s where the magic happens,” shares one of our installation experts at K&B Direct. Apply a thin bead of painter’s caulk where your base cap meets the wall and where it meets the baseboard. The key word here is thin – you want just enough to fill the gap, not so much that it squeezes out and creates a mess.
Immediately after applying caulk, run a slightly damp finger along the bead to smooth it out. This pushes the caulk into the gap while removing excess, creating that seamless transition that eliminates telltale shadow lines. Keep a damp cloth handy to wipe your finger between sections.
Many homeowners wonder about the best painting sequence. While you can certainly paint after installation (as most do), pre-finishing your trim before installation can yield superior results, especially with our Base Cap GM400-2, which is designed specifically for excellent paint adhesion and crisp detail definition.
If you choose to paint after installation, protect your walls and floors with good-quality painter’s tape. Apply two thin coats rather than one thick one for the most durable and attractive finish. A small foam roller often works well for the flat areas, while an angled brush helps you get into the detailed profiles of the base cap.
For stained finishes, consider applying a pre-stain wood conditioner before staining, especially if using pine or other woods that can absorb stain unevenly. This extra step helps prevent blotchiness and ensures a rich, consistent color.
How to install base cap moulding is as much about these finishing touches as it is about the installation itself. The nail holes you fill, the gaps you caulk, and the care you take with your final finish will be what people notice (or ideally, don’t notice) when they admire your beautiful trim work.
Beyond the Baseboard: Creative Uses for Base Cap
Base cap moulding isn’t just for baseboards anymore! This versatile trim piece can transform your home in ways you might never have imagined. When I first started working with trim, I was amazed at how this simple profile could be repurposed in so many creative ways.
Wainscoting frames might be my favorite alternative use for base cap moulding. The delicate profile creates neat panel outlines on walls, instantly adding architectural interest to plain rooms. One of our customers in Oak Park used our base cap to create a stunning grid pattern in her dining room, turning an ordinary space into something truly special.
Crown moulding build-ups are another brilliant application. By adding base cap below standard crown moulding, you create a more substantial, custom-looking crown that would cost a fortune if purchased as a single piece. This layering technique is a designer secret that delivers high-end results on a modest budget.
Have you ever priced custom picture frames? They’re incredibly expensive! With some base cap moulding and a miter saw, you can create beautiful custom frames for a fraction of the cost. The profile catches light beautifully and gives artwork a sophisticated presentation.
Base cap also works wonders when added to plain door and window casings. This simple addition creates shadow lines and visual depth that make standard openings look decidedly more upscale. I’ve seen homes where this small detail made an enormous difference in the overall impression of quality.
For outdoor spaces, PVC base cap is perfect for adding detail to porch columns. Since PVC won’t rot or warp with exposure to the elements, it maintains its crisp profile for years while traditional wood might deteriorate.
“The texture it added completely changed the feel of the room,” reported one Chicago customer who used our Mouldings & Millwork base cap to create decorative wall panels. “What was once a plain box is now a showpiece that looks like it belongs in a design magazine.”
I particularly love the story from a Schiller Park homeowner who framed her hand-drawn butterfly mural with base cap moulding. “The base cap gave it the perfect finished look, like a giant piece of framed art,” she told us. This creative thinking transformed a simple wall painting into a focal point that guests always comment on.
When you’re learning how to install base cap moulding, these techniques work just as well for these creative applications as they do for traditional baseboards. The same mitering, coping, and finishing principles apply—you’re just thinking outside the baseboard, so to speak!
The design possibilities truly are endless. I’ve even seen base cap used to create custom furniture details, neat shelf edging, and decorative mirror frames. Once you start looking at this versatile trim piece with fresh eyes, you’ll find countless ways to add character and charm throughout your home.
Common Mistakes & Troubleshooting
Let’s face it – even the most careful DIYers hit a few bumps when installing trim. After helping countless customers through their base cap projects, I’ve seen the same issues pop up time and again. The good news? Most are easily preventable or fixable!
1. Measuring Errors
Nothing’s more frustrating than cutting a beautiful piece of base cap only to find it’s too short when you hold it up to the wall. I still remember the first time I installed trim in my own home – I rushed through measuring and ended up with a pile of too-short pieces that couldn’t be used.
Always measure twice and cut once – it’s an old saying for good reason! For inside corners especially, cut your pieces slightly long (about 1/16″) and then make micro-adjustments as needed. This tiny bit of extra material gives you wiggle room to achieve that perfect, gap-free fit.
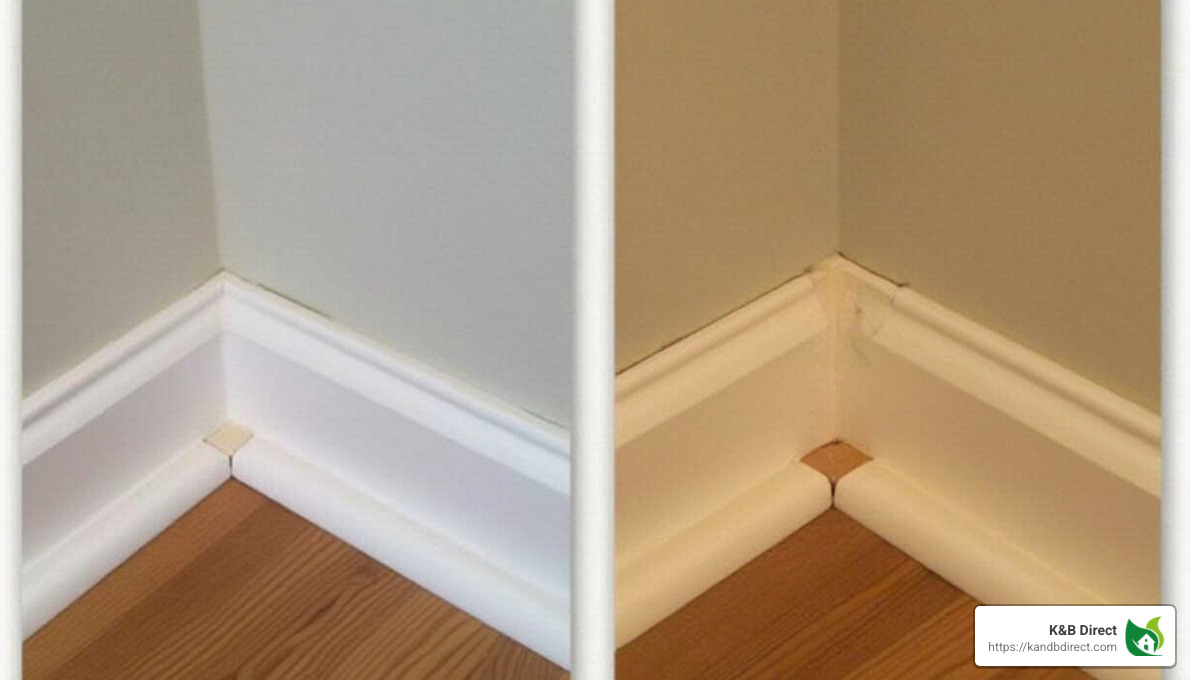
2. Inside Corner Gaps
Those pesky inside corners have a way of revealing themselves as anything but 90 degrees once you start working with them. Many homeowners struggle when they try to use mitered cuts for inside corners, only to find unsightly gaps appearing weeks later.
The professional solution? Use coped joints instead of miters for inside corners. If you must use miters (some profiles are challenging to cope), try adjusting your saw to 44° or 46° instead of the standard 45° to account for out-of-square corners. This small adjustment can make a world of difference in the final appearance.
3. Splitting Trim
Base cap moulding is relatively thin, making it prone to splitting when nailed – especially if you’re working with hardwood varieties. Nothing ruins a beautiful piece of trim faster than an ugly split running through it.
To prevent splitting, pre-drill holes when using traditional finish nails, or invest in a 23-gauge pin nailer which leaves tiny holes that barely need filling. Another carpenter’s trick is to slightly dull nail tips by tapping them gently with your hammer before driving them in. This breaks the wood fibers rather than wedging them apart, reducing the chance of splits.
4. Skipped Acclimation
“I just want to get this project done!” – I hear this all the time from eager DIYers who unpack their trim and immediately start installing. While the enthusiasm is admirable, skipping the acclimation step is setting yourself up for disappointment.
Wood is hygroscopic, meaning it absorbs and releases moisture based on its environment. When you bring trim into your home, it needs time to adjust to your home’s specific humidity and temperature. Always allow wood moulding to acclimate in your home for at least one week before installation. This patience prevents the post-installation shrinking or expanding that leads to gaps, buckling, or even popped nails.
5. Over-Caulking
There’s a fine line between properly sealed trim and a caulking disaster. I’ve seen beautiful base cap installations ruined by excessive caulk that filled in all the delicate profile details that make the trim special in the first place.
Less is more when it comes to caulk. Apply a small, controlled bead where the base cap meets the wall and where it meets the baseboard. Immediately wipe away excess with a damp finger, leaving just enough to seal the gap without obscuring any of the profile’s character.
One of our customers in Arlington Heights shared her experience: “I rushed and didn’t let my wood acclimate. Within two months, I had gaps at every joint. I had to remove it all and start over. That week of waiting would have saved me a weekend of rework.”
Interestingly, recent research on coping accuracy from Installation Advice suggests that using a backsaw for the initial 45° cut before switching to a coping saw results in more precise fits than using only a coping saw. This small technique adjustment can significantly improve your inside corners and is worth incorporating into your how to install base cap moulding process.
Frequently Asked Questions about How to Install Base Cap Moulding
Do I need to cope every inside corner?
The age-old trim carpenter’s debate: to cope or not to cope? While coping inside corners generally gives you the best long-term results, it’s not a must for every situation.
If you’re working in newer construction with reliably square corners or using a simple profile, mitered joints might serve you perfectly well. But here’s the reality I’ve seen after years in the business—homes settle, wood moves, and those perfectly mitered inside corners can develop noticeable gaps over time.
For older homes or when using ornate profiles, I strongly recommend taking the extra time to cope. Your future self will thank you when those corners still look tight and professional years later. As one of our customers in Oak Park told me, “I spent the extra hour learning to cope my corners, and five years later they still look perfect while my neighbor’s mitered trim is showing gaps everywhere!”
Still on the fence? Try both methods on your first few corners and see if the coped joints look noticeably better in your specific situation. The visible difference might make your decision easy.
Should I pre-paint or finish after installation?
Both approaches have their merits, and many of our customers ask this exact question. I’ve seen beautiful results either way, but here’s what you should consider:
Pre-finishing your base cap before installation offers several advantages. You’ll get complete coverage without worrying about paint splatters on your walls or floors. It’s also much easier to evenly coat all sides of the trim while it’s laid out on sawhorses. Many of our professional installer partners swear by this method for a time-saving, clean installation.
On the flip side, finishing after installation lets you fill all nail holes and caulk all gaps before painting, giving you that seamless, built-in look. You can also make color adjustments if needed once you see how the trim looks in place against your walls.
What I recommend to most DIYers is the hybrid approach—prime and apply a first coat before installation, then do a final coat after you’ve installed, filled nail holes, and caulked the edges. This gives you the best of both worlds: good coverage during handling and a perfect final appearance.
How do I join pieces on walls longer than 12 feet?
When you’re working with walls longer than your available moulding lengths, the professional solution is the scarf joint. Unlike butt joints that call attention to themselves, a well-executed scarf joint practically disappears.
Here’s how to create one: Cut your first piece at a 45° angle with the long point facing into the room. Then cut your second piece at a matching 45° angle, but with the long point facing the wall. When you slide these together with a bit of glue, they create an overlapping joint that’s both strong and virtually invisible.
The key to success? Place these joints over wall studs whenever possible for added strength, and try to position them away from eye level and natural focal points in the room. One of our contractor partners uses this clever trick: “I always plan my scarf joints to fall above a doorway or behind where furniture will be placed—somewhere people aren’t likely to be staring.”
After painting, a properly executed scarf joint should be your little secret—you’ll know it’s there, but guests will never notice. That’s the mark of quality how to install base cap moulding work that looks professionally done.
Conclusion
Isn’t it amazing how something as simple as base cap moulding can completely transform your space? After guiding countless homeowners through this process, I’ve seen how this weekend project can turn ordinary rooms into something truly special – all while saving hundreds compared to hiring a pro.
Installing base cap moulding strikes that perfect balance – accessible enough for DIY beginners yet offering enough craftsmanship challenges to satisfy those who love working with their hands. The satisfaction of stepping back and admiring those crisp, neat lines you created yourself is truly rewarding.
If there’s one thing I’ve learned in my years at K&B Direct, it’s that success comes down to a few key principles:
First, patience truly pays off. Allow your wood to acclimate in your home for at least a week before installation. I know it’s tempting to dive right in when those beautiful trim pieces arrive, but this simple step prevents frustrating gaps and warping down the road.
The old carpenter’s wisdom of “measure twice, cut once” has saved me countless times. And always, always buy about 10% extra material – it’s insurance against the inevitable learning curve and mistakes. Trust me, nothing’s more frustrating than being one piece short on a Sunday evening!
Remember to nail to the baseboard, not the wall – this single tip separates professional-looking installations from amateur ones. And when it comes to those tricky inside corners, taking the time to cope them rather than mitering will give you that seamless look that stands the test of time as your home naturally settles.
Finally, don’t rush the finishing details – they truly make all the difference. Those extra minutes spent carefully filling nail holes, sanding smooth, and applying clean caulk lines will lift your project from “nice DIY attempt” to “wow, who did you hire for that?”
At K&B Direct, we’re genuinely proud to offer high-quality base cap moulding and trim options for homeowners throughout Chicago and beyond. Whether you’re refreshing a single room or changing your entire home, our team in Schiller Park is always happy to help you select the perfect profiles to bring your vision to life.
Ready to start your base cap moulding project? I’d love to help you explore our full range of options in our Mouldings & Millwork collection. With the knowledge you’ve gained from this guide and quality materials in hand, you’re well-equipped to create trim work that will improve your home’s beauty and value for years to come.