Window Trim: 10 Powerful Tips for Flawless Results 2025
Beyond Plain Windows: Creating Architectural Interest
Window trim is the decorative framing that surrounds windows, serving both functional and aesthetic purposes. It covers gaps between windows and walls, improves insulation, and adds architectural character to any room.
Quick Guide to Window Trim:
– Purpose: Covers gaps, improves insulation, adds visual interest
– Main Components: Casing, stool, apron, head casing, jamb extensions
– Popular Materials: Wood (pine, poplar, oak), MDF, PVC, polyurethane
– Standard Widths: 2-¼”, 3-¼”, and 3-½” are most common
– Installation Time: 1-2 days for professionals, longer for DIY
Builder-grade windows often look incomplete without proper trim. Like a picture frame improves artwork, well-chosen window trim transforms ordinary windows into architectural focal points while improving energy efficiency and protecting your walls.
The right trim style can dramatically change your home’s character – from classic colonial with entablature details to sleek modern with flat stock. Whether you’re updating a single window or trimming out an entire home, understanding the basics will help you achieve professional results.
I’m Eryk Piatkowski, and at K&B Direct, I’ve spent over a decade helping homeowners select and install the perfect window trim for their renovation projects, ensuring their spaces balance both functionality and visual appeal.
Window Trim 101: Function Meets Style
When you look at a beautifully finished window, what you’re admiring isn’t just the window itself—it’s how the window trim frames it, much like the perfect frame improves a cherished photograph. But window trim does far more than just look pretty.
At its core, window trim serves as the essential bridge between your windows and walls. This isn’t merely decorative—it’s a functional necessity that covers unsightly gaps while creating a weather-tight seal. Those gaps might seem small, but they’re significant entry points for drafts, moisture, and even tiny unwelcome critters looking for a warm home.
What many homeowners don’t realize is that properly installed window trim actually improves your home’s energy efficiency. Research highlighted in Pretty Handy Girl’s window trim tutorial shows that well-sealed trim can reduce air leakage around windows by up to 20%—a difference you’ll notice both in comfort and on your utility bills.
“I always tell my customers that windows are essentially planned holes in your home’s thermal envelope,” says our installation expert. “Quality window trim with proper sealing behind it creates another crucial barrier against energy loss.”
Beyond the practical benefits, window trim is one of the most defining architectural elements in your home. The profile you choose instantly communicates your home’s character—whether that’s traditional Colonial with its formal, wider casings and decorative headers, or sleek Modern with clean lines and minimal profiles.
The shadow line created by the reveal (that small setback between trim and window frame) adds dimension and visual interest to your walls. While a ¼-inch reveal is the classic standard, playing with different reveal widths can dramatically change the look of your windows.
Historical homes often feature very specific trim profiles that were popular during their construction era. We’ve helped many Chicago homeowners restore their vintage properties with historically accurate window trim that maintains the architectural integrity while providing modern performance.
One of our Schiller Park customers put it best: “My windows looked so unfinished before—like they were wearing pants but forgot their shirts! The new trim completes the look and somehow makes the whole room feel warmer.”

Whether you’re building new or renovating, the window trim you select will influence both how your home looks and how it performs for years to come. It’s that rare home improvement that delivers equal measures of style and substance.
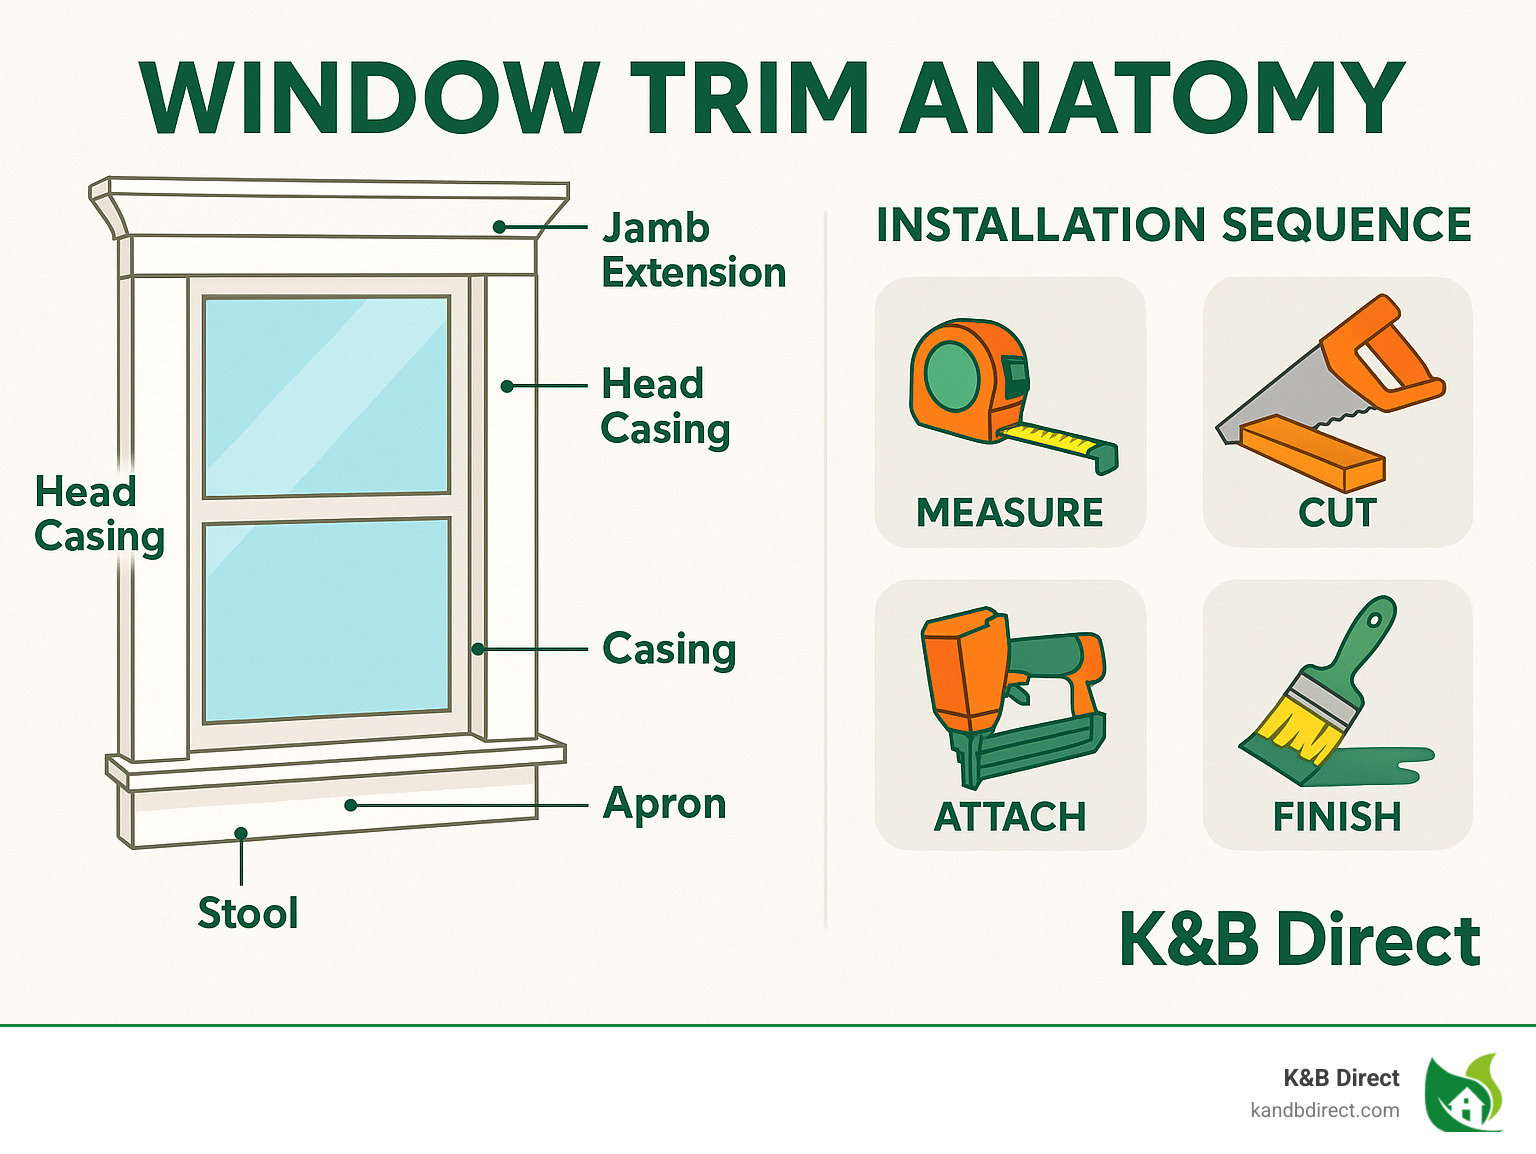
Types & Anatomy of a Window Trim Package
When customers visit our showroom in Schiller Park, they’re often surprised by how many pieces make up a complete window trim package. Understanding these components is like learning the parts of a car before driving—essential knowledge for any DIY project or renovation.
Casing forms the frame around your window opening. The vertical pieces run along each side, while the head casing spans across the top. Our Casing 356 MDF is a customer favorite for its clean lines and versatility—it works beautifully in both traditional and transitional homes.
The stool is that shelf-like piece at the bottom of the window that everybody seems to put plants on! It extends beyond the width of the window frame and often features decorative “horns” that project past the side casings, adding visual interest and a finished look.
Beneath the stool sits the apron, a horizontal piece that visually supports the stool and completes the bottom portion of your window trim assembly. Think of it as the stool’s best friend—they always work together.
“Last week, a customer from Chicago brought in photos of her 1920s bungalow windows,” shares our trim specialist. “She had no idea those little projections on her window stools were called horns. Now she tells everyone about her ‘window horns’ at dinner parties!”
Jamb extensions are the unsung heroes of window trim. When your window isn’t flush with the drywall (which is common in older homes or with thicker walls), jamb extensions bridge that gap, creating a surface for attaching the casing. Without them, your casing would awkwardly float in mid-air.
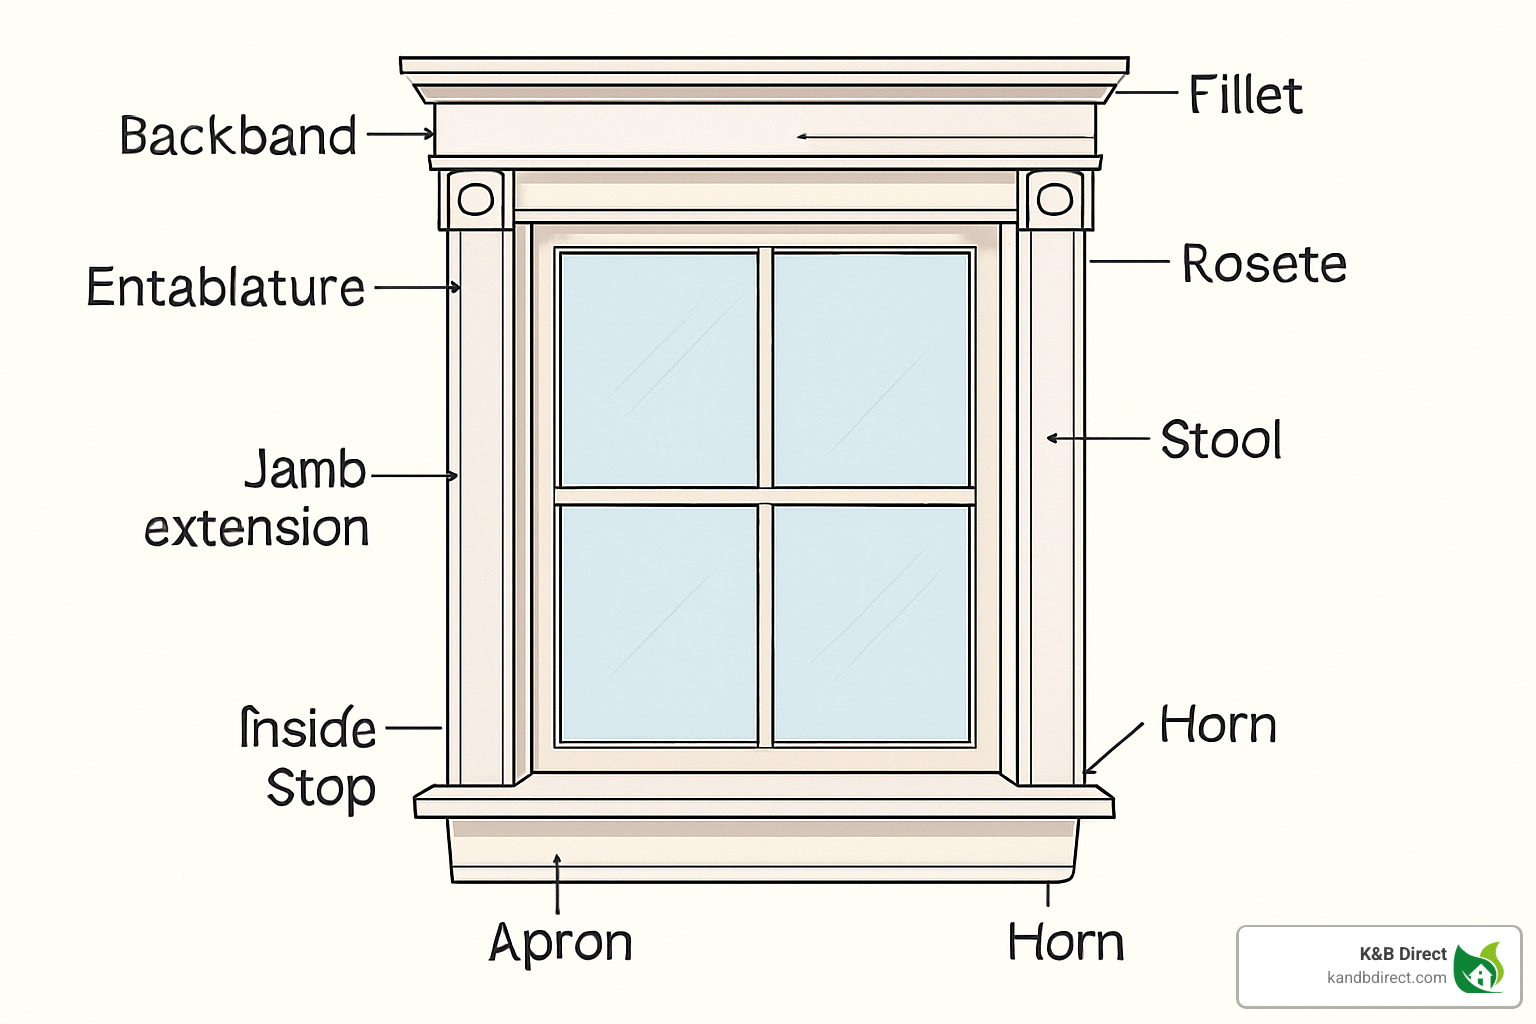
For those looking to add extra flair, a backband is an additional molding applied to the outer edge of casing that adds depth and dimension. In more formal or traditional spaces, an entablature might crown your window—this classical element consists of a frieze board, crown molding, and cap.
Small but mighty, the fillet is a narrow, flat molding used to separate larger profiles, while rosettes are those decorative corner blocks you might see at the upper corners of window trim in Victorian or traditional homes. They eliminate the need for mitered corners—a blessing for DIYers who struggle with precise angle cuts.
Lastly, the inside stop is a thin strip that holds the window sash in place. It’s removable, allowing you to take out the sash when repairs are needed.
“I always tell our customers that understanding these components is like learning the alphabet before writing a sentence,” says our trim specialist. “Once you know the parts, you can create any style you want.”
Interior vs. Exterior Window Trim
While they might look similar at first glance, interior and exterior window trim face very different challenges and serve distinct purposes.
Exterior window trim works hard for a living. It functions as a weather barrier, standing up to Chicago’s notorious wind, rain, and snow. For this reason, it requires truly durable materials—PVC, fiber cement, or properly treated wood. Our exterior trim options include special features like drip edges (those little projections that direct water away from your walls) and integrate with flashing systems to prevent water infiltration.
“I had a customer use interior pine trim on his exterior windows to save money,” our installation manager recalls with a chuckle. “By the next spring, it looked like driftwood. We helped him replace it with proper PVC trim that’s still looking perfect five years later.”
Brickmould is a specific exterior trim profile designed to transition between windows and masonry—a common need in Chicago’s brick bungalows and two-flats. It features a curved outer edge that creates a graceful transition from window to brick.
Interior window trim, on the other hand, focuses more on style and finish quality. It can use a wider range of materials like MDF, pine, or decorative hardwoods without worrying about weather exposure. Inside your home, the trim includes those distinctive components like stools and aprons that aren’t typically used on exterior applications.
While interior trim doesn’t need to stand up to snowstorms, it should still be moisture-resistant in bathrooms and kitchens. One of our Schiller Park customers learned this lesson when her MDF window trim in her steamy master bathroom began to swell after just a year—we helped her replace it with moisture-resistant PVC that looks just like painted wood but can handle the humidity.
Understanding the different demands placed on interior versus exterior window trim helps ensure you select the right materials for a beautiful, lasting finish that performs as good as it looks.
Selecting Materials, Profiles & Sizes
When customers visit our showroom at K&B Direct, they often feel overwhelmed by all the window trim options. I always tell them not to worry—choosing the right materials and styles is much easier once you understand the basics.
Let’s talk materials first. Each has its own personality and purpose in your home:
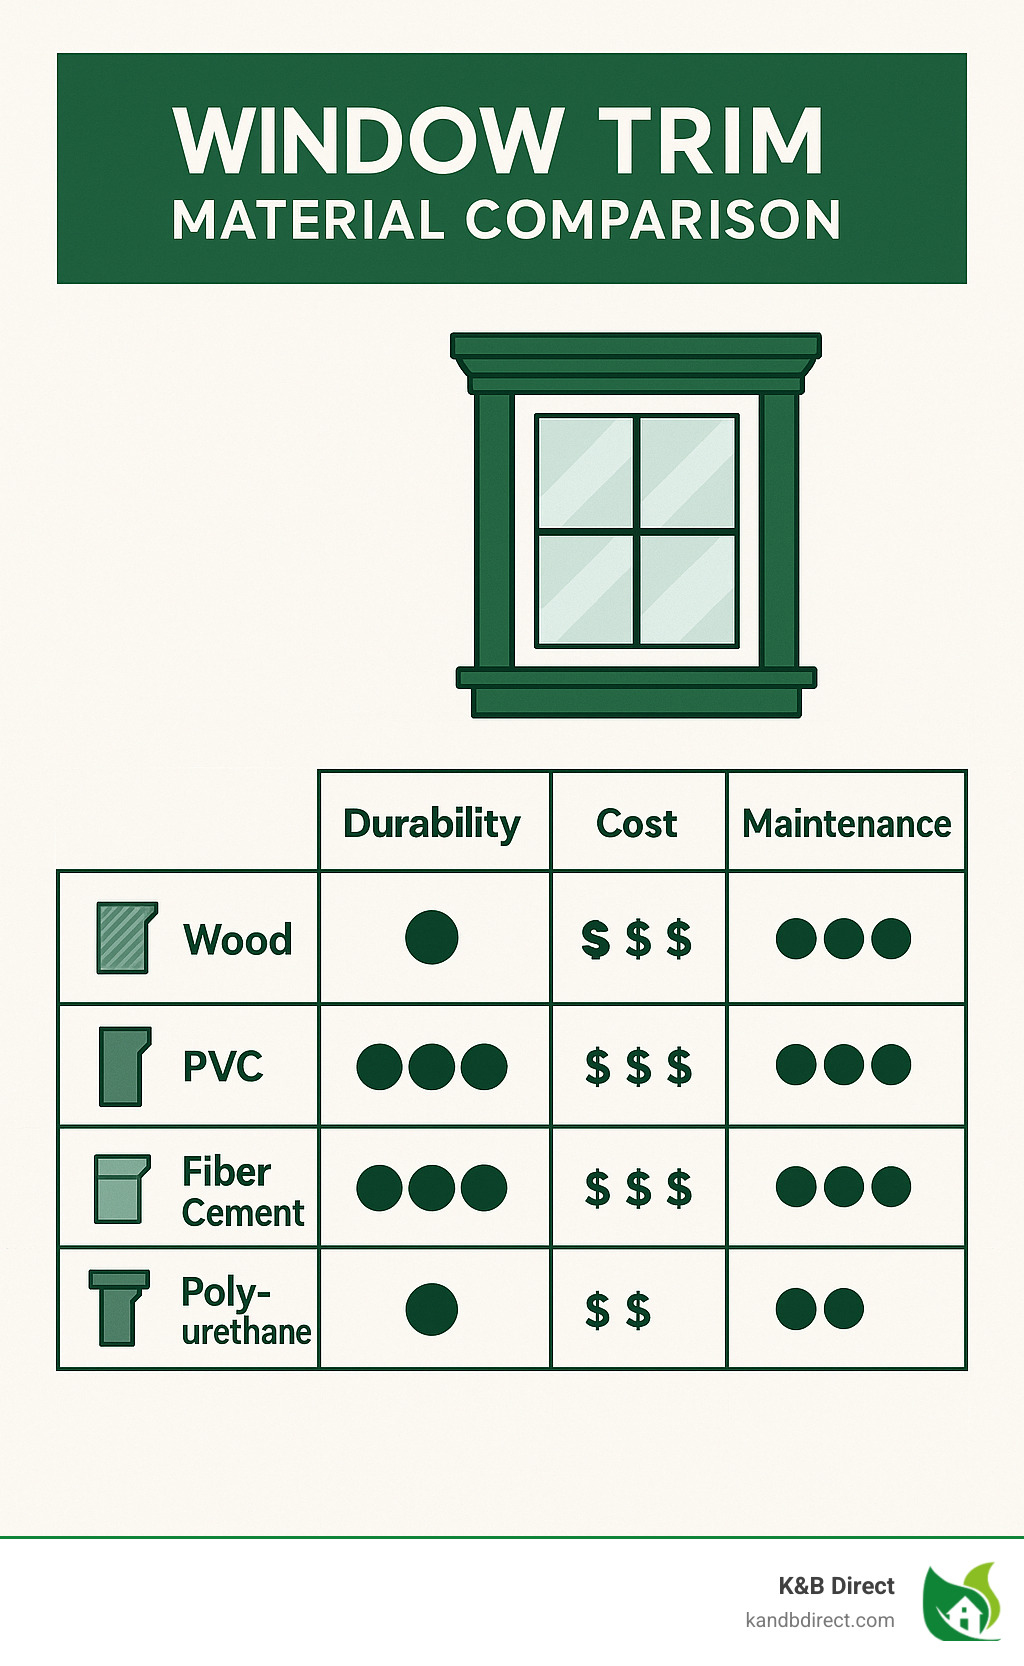
Wood trim remains the classic choice, offering warmth and character you can’t quite replicate. Pine is our budget-friendly bestseller that takes paint beautifully, while poplar gives you a smoother finish with fewer knots. For those special rooms where you want to showcase natural grain, oak, cherry, and maple create stunning stained finishes—though they’ll increase your budget accordingly.
MDF (Medium Density Fiberboard) has become incredibly popular among our Chicago customers. It comes pre-primed, has no knots to worry about, and maintains its shape better than wood in our fluctuating Midwest humidity. It’s also more affordable, though I always caution customers against using it in bathrooms or basements without proper sealing.
“I installed MDF trim throughout my first floor,” one Schiller Park customer told me, “and three years later, it still looks perfect—no cracks at the joints like my old wood trim had.”
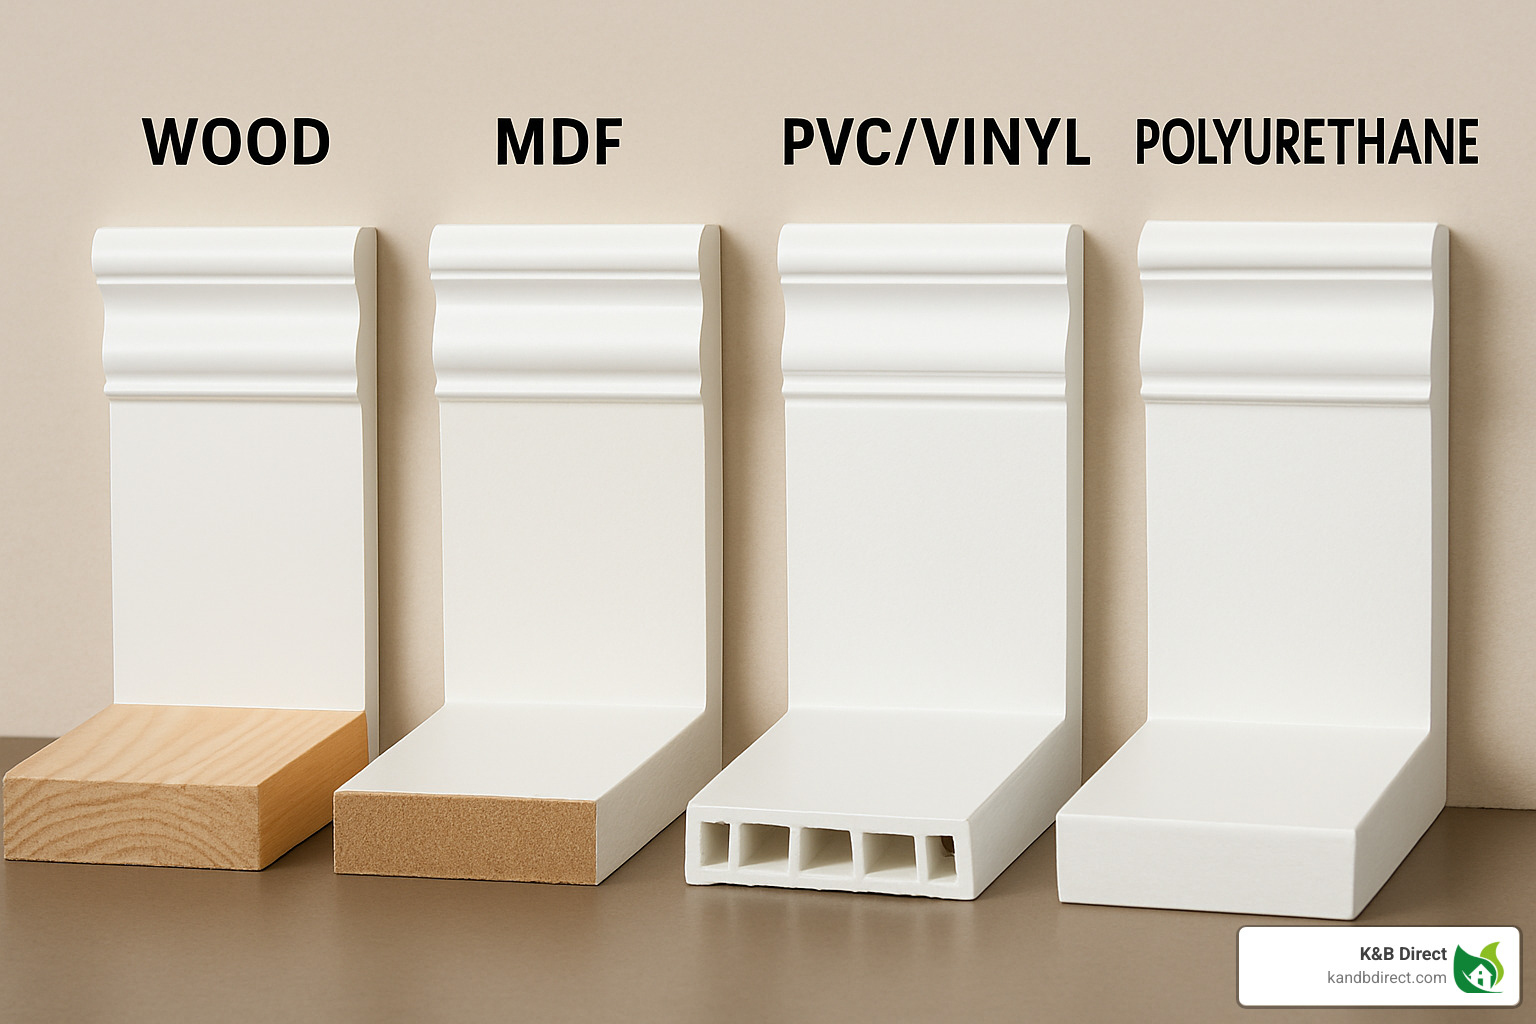
For moisture-prone areas, PVC and vinyl window trim offer complete waterproofing. They’ll never rot or need painting, though they come with a higher initial cost. Meanwhile, polyurethane trim gives you ornate details without the hefty price tag of custom woodwork, perfect for creating that “wow factor” in formal spaces.
The profile you choose speaks volumes about your home’s personality. Our Casing 93112 offers timeless elegance for traditional homes, while the Casing 444 provides cleaner lines for more contemporary spaces. Colonial homes shine with detailed profiles featuring curves and steps, while Craftsman styles prefer simpler, substantial trim with minimal fuss. Modern homes often look best with flat stock trim that creates clean, architectural lines.
Size matters too! The standard widths we stock most often are 2-¼”, 3-¼”, and 3-½”, but choosing the right one depends on your room’s proportions. Taller ceilings can handle wider trim, while smaller rooms might look overwhelmed by anything too substantial.
Calculating Reveal & Horn Projections
The “reveal” is that small gap between your window trim and the window frame that creates a subtle shadow line. It’s one of those small details that separates amateur work from professional installations.
Most traditional installations use a ¼-inch reveal, though modern designs sometimes go wider for dramatic effect. Whatever size you choose, consistency is key—varying reveals throughout your home will catch the eye for all the wrong reasons.
“I’ve been installing trim for twenty years,” our lead installer often says, “and proper reveals are what separate the pros from the DIYers. That little shadow line makes all the difference.”
For window stools (that shelf-like piece at the bottom), you’ll need to calculate horn projections—those decorative extensions that stick out past the side casings. Typically, horns extend 1 to 1½ inches beyond your side casings. To calculate your total stool length:
Take your window opening width + both side casings + ½” for reveals + 2-3″ for the horns.
A customer once showed me photos of her DIY project where she’d cut the stool flush with the casings. “Something looks off,” she said. I explained that without those horn projections, her window looked unfinished—like wearing a belt that’s too small for your pants.
Advanced Profiles & Add-Ons
Ready to take your window trim to the next level? Consider these designer touches that lift ordinary windows to extraordinary focal points.
Backband molding is my favorite recommendation for an instant upgrade. This L-shaped piece attaches to standard casing, adding depth and visual interest without requiring wider trim. It’s an economical way to achieve a custom look, and our customers are always surprised by how much difference it makes.
Double quirk details—those small grooves carved into the profile—create additional shadow lines that catch light beautifully throughout the day. This subtle feature adds sophistication without being overly ornate.
Fillets are those small, flat strips that might seem insignificant, but they create separation between larger molding pieces. I like to think of them as the supporting actors that make the stars shine brighter.
For our modern-minded customers, stepped profiles create contemporary magic. Instead of traditional curves, these designs use multiple flat planes at different depths. A homeowner in Chicago’s Lincoln Park recently combined three thicknesses of flat stock with small reveals between them, creating a window trim profile that looked completely custom.
“Window trim is like the eyebrows of your room,” I often tell customers browsing our Schiller Park showroom. “You might not notice good ones, but you definitely notice when they’re missing or done poorly.” With the right materials, profiles, and sizes, your window trim can frame your view to the outside world while beautifully finishing your interior space.
DIY Window Trim Installation Masterclass
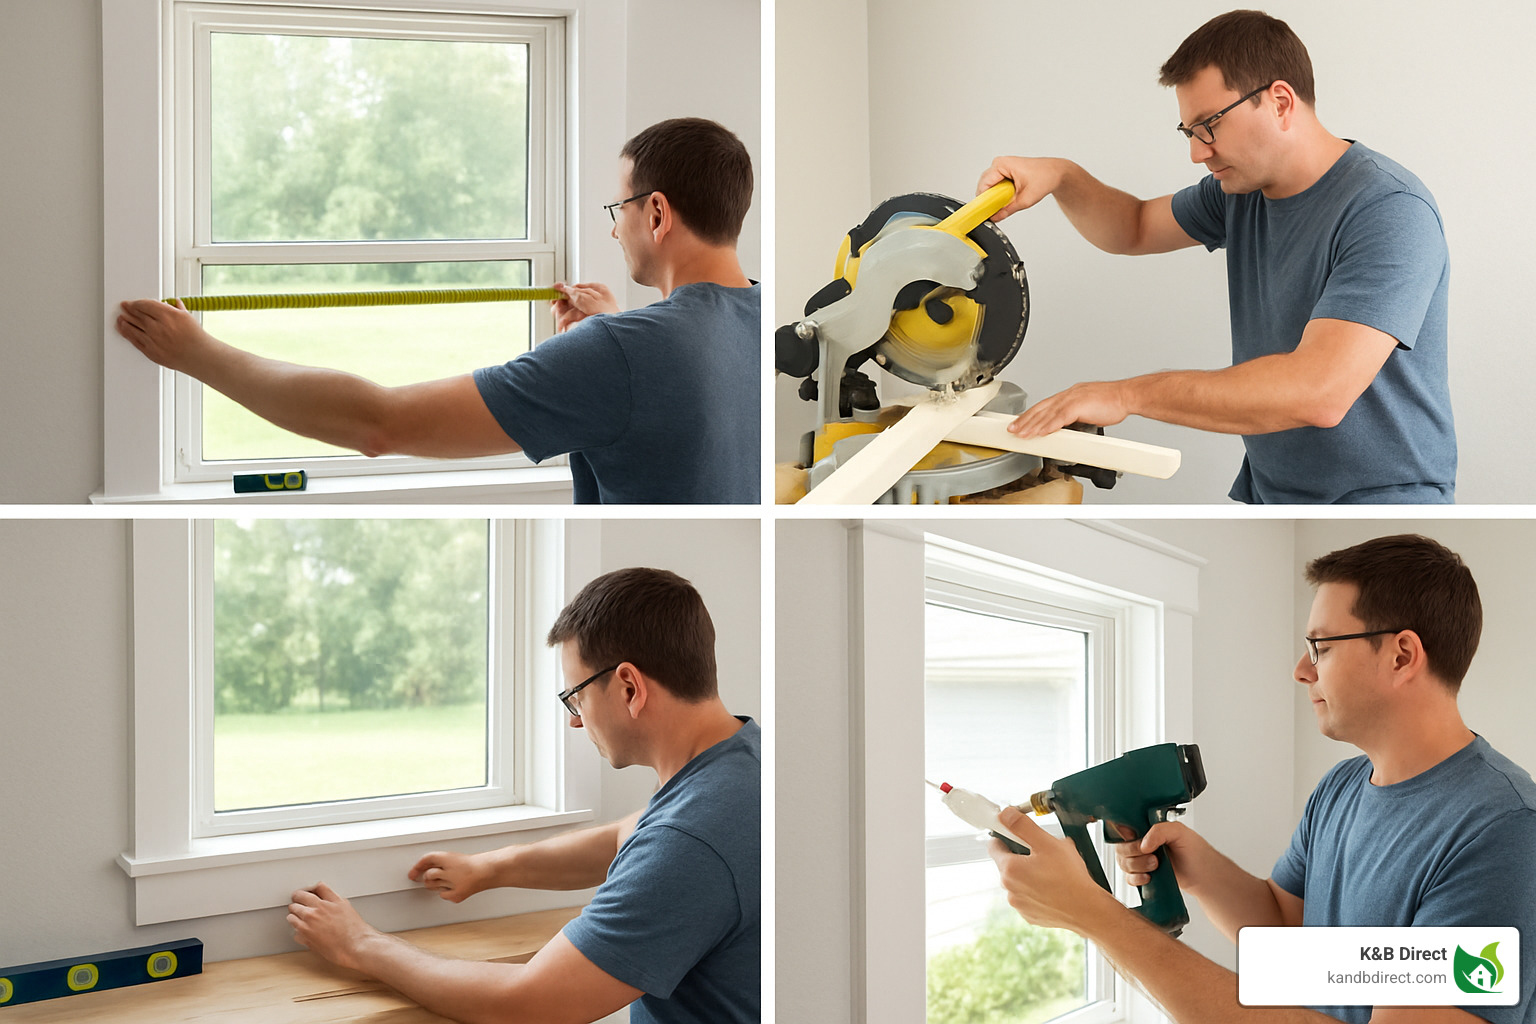
When I’m talking with customers at our Schiller Park showroom, I often hear the same question: “Can I really install window trim myself?” The answer is absolutely yes! With some patience and the right approach, you can achieve professional-looking results that will make you proud every time you glance at your windows.
The secret to successful DIY window trim installation isn’t just in the cutting and nailing—it’s in how you organize your workflow. Professional trim carpenters don’t randomly jump from task to task. They work in “batches,” completing the same step across multiple windows before moving on. This approach maintains consistency and builds momentum as you develop muscle memory for each task.
For instance, measure all your windows at once, then cut all similar pieces together while your saw is set up with the same settings. Pre-assemble components where possible, then install everything in a logical sequence: stool first, then apron, followed by side casings, and finally the head casing.
“I always tell first-timers to resist the urge to complete one window before starting another,” says our installation team leader. “That’s like baking one cookie at a time instead of filling the whole sheet!”
You’ll need some basic tools for your window trim project: a miter saw (ideally a compound sliding one), tape measure, combination square, level, finish nailer, caulk gun, wood glue, sandpaper, putty knife, and wood filler. Don’t worry if you don’t own everything—many of our customers rent the bigger tools for weekend projects.
The installation process begins with proper preparation. Remove any existing trim carefully—you might be surprised how often we see people damage their drywall in haste! Scrape away old caulk and paint to create a clean surface. If you need jamb extensions (more on that later), install those first before moving to the stool.
The stool is that shelf-like piece at the bottom of your window, and it needs to be level and extend beyond where your finished casing will end. After securing it with finish nails, center and install the apron underneath. Then measure, cut, and install your side casings with proper reveals, checking that they’re plumb. The head casing goes on last, followed by any decorative elements you might want to add.
One Chicago homeowner told me, “I thought the hardest part would be the cutting, but it was actually having the patience to get everything aligned perfectly.” She’s right—rushing leads to gaps, uneven reveals, and that dreaded amateur look.
Speaking of amateur looks, let’s talk about caulk. While it’s your friend for sealing small gaps, professionals know its limitations. Any gap larger than 3/16″ should not be filled with caulk alone—that’s asking for cracks down the road. Proper carpentry solutions, like re-cutting pieces or adding shims, are always better than trying to hide problems with excessive caulking.
For more detailed guidance, check out this excellent how-to tutorial on window trim that many of our customers have found helpful.
Measuring for Perfect Window Trim Cuts
The difference between “that looks nice” and “wow, did you hire a professional?” often comes down to precise measurements. Window trim that fits perfectly creates crisp, tight joints that require minimal caulking and filling.
Before you even pick up your saw, verify if your window opening is square by measuring diagonally from corner to corner in both directions. If these measurements differ by more than ¼”, your window isn’t perfectly square—which is completely normal, especially in older Chicago homes. You’ll need to adjust your trim approach accordingly.
“Windows in homes built before 1950 are almost never square,” laughs our trim specialist. “I once measured a window in Lincoln Park where the difference was over an inch! That’s extreme, but it shows why checking is important.”
For accurate width measurements, I recommend the three-point method: measure at the bottom, middle, and top of the opening. For height, measure at the left side, center, and right side. Always use the smallest measurement as your reference point. This approach prevents gaps that would appear at the narrowest points of your window.
Don’t forget to account for reveals—that small setback between the edge of your trim and the window frame that creates an attractive shadow line. For a standard ¼” reveal, add ½” to your window opening measurement (¼” for each side). When calculating the head casing length, add the width of both side casings plus ½” for reveals.
When cutting, always mark which side of the line is “waste” to avoid confusion. For mitered corners, ensure your saw is cutting at exactly 45°—even half a degree off can create visible gaps. I always suggest making test cuts on scrap material first, and cutting slightly long so you can “sneak up” on the perfect fit with small adjustments.
One customer in Schiller Park shared a brilliant tip: “I take a photo of each window with measurements written on painter’s tape right on the wall. Then I can double-check dimensions without running back and forth with my tape measure.”
Troubleshooting Window Trim on Uneven Walls
If houses could talk, they’d probably say, “Sorry about those uneven walls!” It’s one of the most common challenges our customers face when installing window trim, especially in older Chicago neighborhoods.
When your drywall sticks out beyond the window jamb (what we call being “proud”), you have several options. For protrusions of ⅛” to ⅜”, consider installing jamb extensions—thin strips of wood that bring the jamb flush with the drywall. This creates a consistent surface for your trim to rest against, maintaining that all-important ¼” reveal from the new jamb face.
For minor variations (less than ¼”), scribing can work wonders. This old-school technique uses a compass or contour gauge to transfer the wall’s irregular contour to your trim piece. After cutting along this scribed line, your trim will hug the wall perfectly despite its undulations. It takes practice, but the results are worth it.
A third approach uses packers—thin shims placed behind the trim where it meets the wall. This creates a flat mounting surface despite wall irregularities and works well for moderate unevenness.
“Never try to bend trim to follow an uneven wall,” warns our installation team. “I’ve seen too many DIYers attempt this, only to end up with cracked trim or a wavy appearance that catches the eye for all the wrong reasons.”
For supplies that can help with these challenges, browse our accessories page for shims, fasteners, and specialized trim installation tools that make the job easier.
Installing Window Trim When Jambs Are Not Flush
“What’s a jamb extension?” is something I hear almost daily at K&B Direct. Put simply, it’s the solution when your window jambs don’t align with your wall surface—a situation you’ll encounter in both new construction and renovations.
To install extension jambs, first measure the distance from the window jamb to the wall surface at multiple points around the window. Then rip wood strips to the width of the maximum measurement (typically using ¾” material). Cut these strips to length for all sides of the window, and attach them to the existing jamb using wood glue and finish nails.
The key is creating a smooth transition. Sand the joint between the original jamb and your extension until it feels seamless. When you install your casing against this new jamb extension, maintain that consistent ¼” reveal that gives window trim its professional appearance.
For projects with multiple windows needing similar extensions, I recommend creating a template from the first window. This allows you to pre-cut all extension pieces in batches, saving substantial time. Some of our more advanced DIYers even pre-assemble using pocket-hole joinery for stronger corners, then install the entire extension assembly as a unit.
A Chicago homeowner recently shared her experience: “Every window in my 1920s bungalow needed different jamb extensions because the walls varied so much. I created a simple chart with each window’s measurements and labeled the pieces accordingly. That organization saved my sanity!”
For truly professional results where jamb extensions meet, try this micro-pin finishing technique: Apply wood glue to the joint, use 23-gauge micro pins (which are nearly invisible) to secure pieces, wipe away excess glue immediately, and fill any visible pin holes with color-matched filler.
“The difference between good and great trim work often comes down to how you handle transitions,” explains our installation expert. “Anyone can nail up casing, but it’s those careful details that make your friends ask which contractor you hired—when you did it yourself all along!”
Finishing, Repair & Advanced Techniques
The finishing process is where your window trim installation truly comes alive. Here at K&B Direct, we often tell our customers that proper finishing isn’t just about making things pretty—it’s about protecting your investment for years to come.
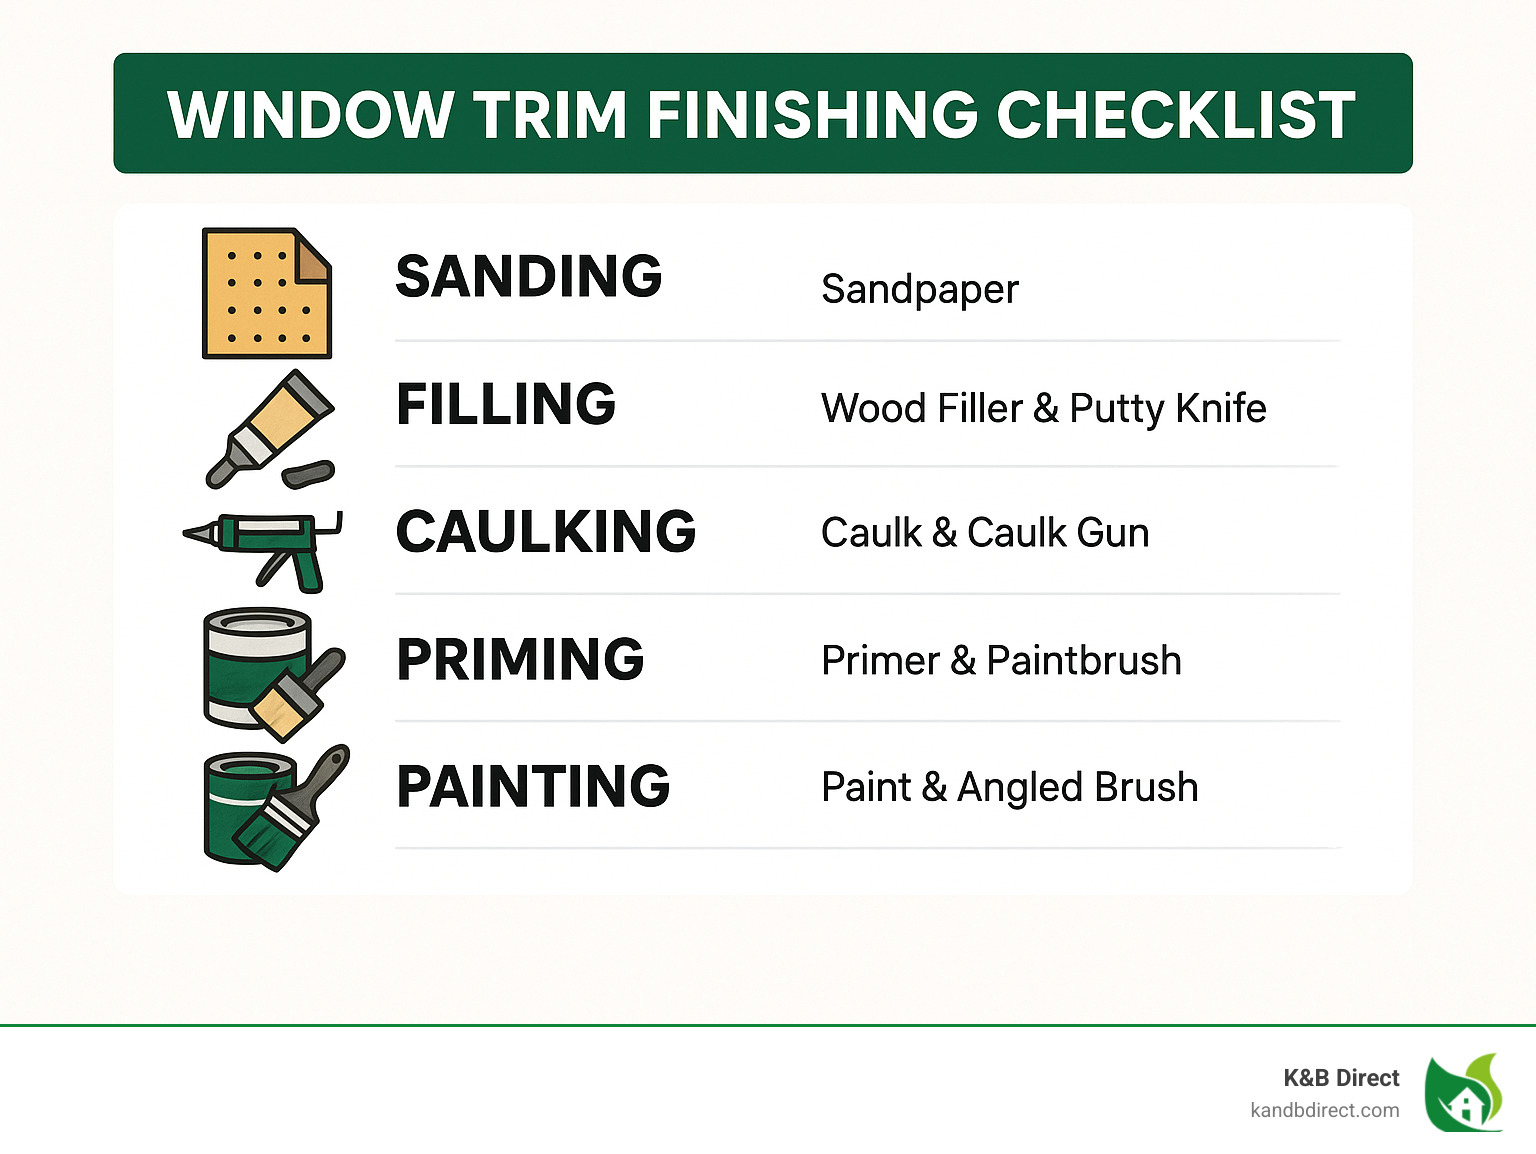
When you’ve nailed that last piece of trim in place, you might be tempted to call it a day, but patience during these final steps makes all the difference. Start by filling those nail holes with wood filler that matches your trim material. I remember a customer who rushed this step using whatever filler was on hand, and those mismatched spots stood out like sore thumbs after painting!
Once your filler has dried completely, sand everything smooth with 220-grit sandpaper. Next comes caulking—apply a thin bead where trim meets walls and at trim joints. For stain-grade trim, skip the caulk and use matching wood putty instead. A light overall sanding removes any mill glaze or rough spots, giving you the perfect canvas for finishing.
“I always tell folks to take their time with prep work,” says our finishing expert. “A rushed prep job means you’ll be staring at those imperfections for years. An extra hour here saves a lifetime of regret.”
Before painting or staining, wipe everything down with a tack cloth to remove dust. Even if your trim came pre-primed, applying a quality primer creates a more uniform base. After the primer dries, another light sanding with 220-grit paper creates the smoothest possible surface.
For painting, semi-gloss or satin finishes work beautifully on window trim. They’re durable and create just enough sheen to highlight your trim work. Always apply two coats for perfect coverage, allowing proper drying time between them.
If you’re staining, don’t skip the pre-stain wood conditioner, especially on pine trim. This prevents the blotchy appearance that can ruin your finish. Apply your stain evenly in small sections, wiping excess after the recommended time. Once dry, protect your work with at least two coats of clear polyurethane.
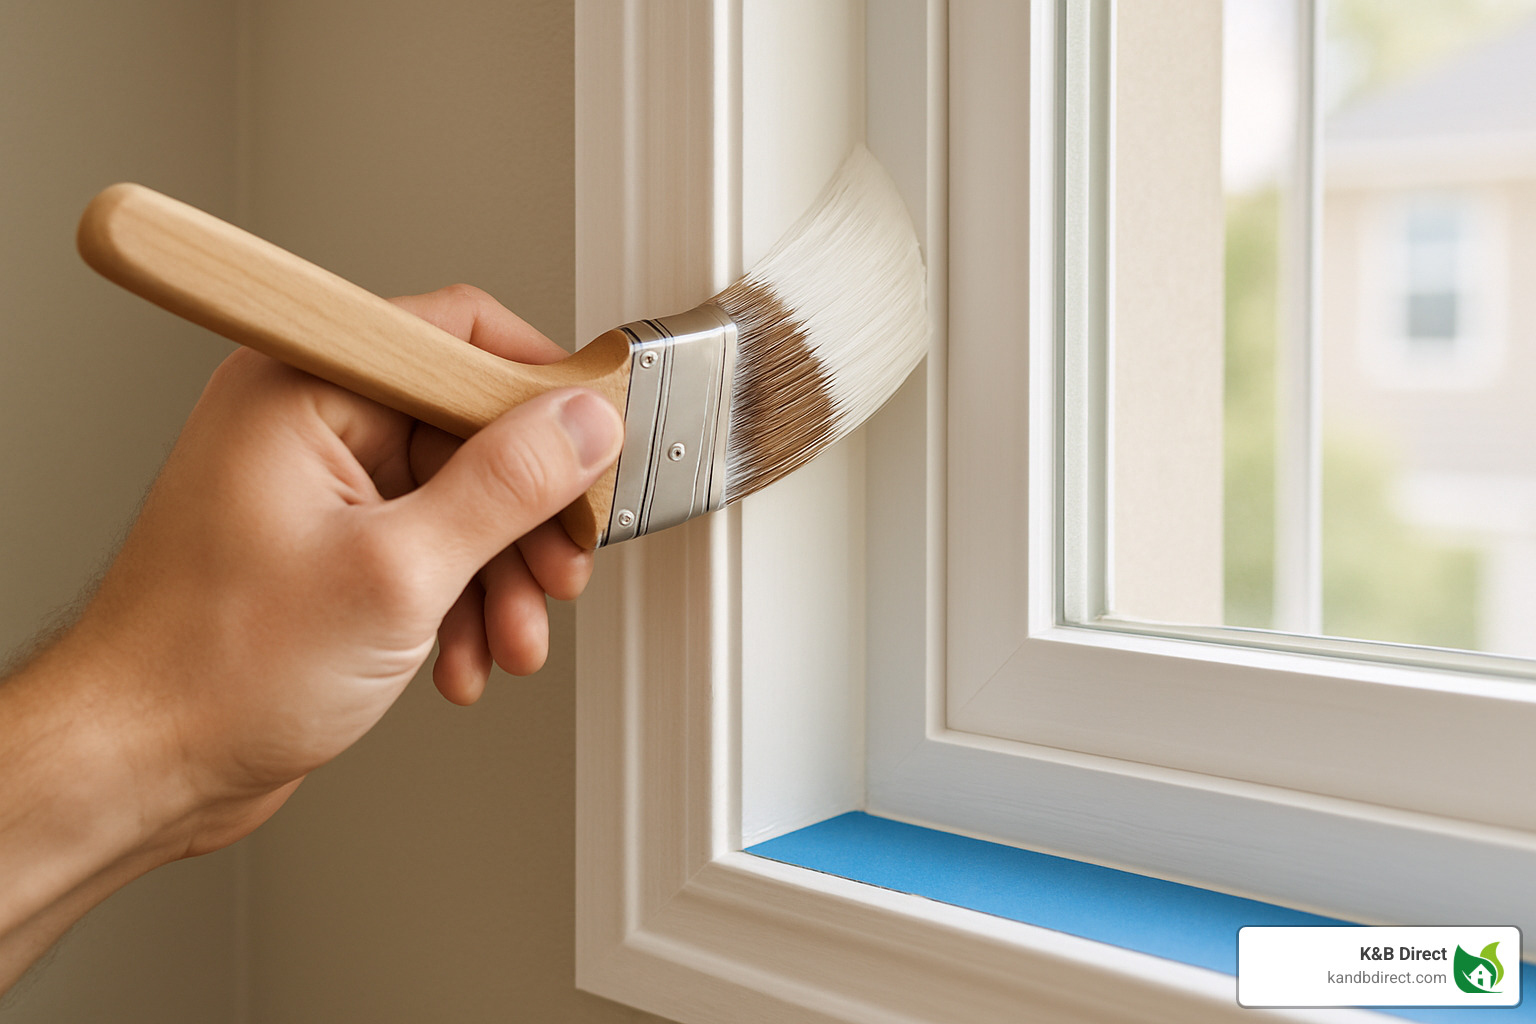
“The brush makes a huge difference in your finish quality,” our finishing specialist always says. “A $5 brush and a $15 brush are worlds apart. That angled sash brush designed specifically for trim is worth every penny—it’ll give you cleaner lines and a smoother finish.”
When choosing colors, consider how your window trim will interact with the rest of your room. White trim creates a classic, bright look that works with virtually any wall color. For a more sophisticated, modern approach, try painting trim the same color as your walls but in a different sheen. Contrasting dark trim adds drama and definition to a space, while wood-toned trim brings warmth and natural character.
Reviving Damaged Window Trim
Even the most beautiful window trim can fall victim to damage over time. Whether it’s water damage near a leaky window, a child’s toy leaving a gouge, or simply the effects of aging, knowing how to make repairs can save you considerable money and hassle.
For rot or significant damage, wood epoxy becomes your best friend. Start by removing loose or rotted wood with a chisel—you need to get down to solid material. Apply wood hardener to stabilize what remains, then mix your two-part wood epoxy according to the manufacturer’s instructions. The beauty of epoxy is that you can shape it to match the original profile of your trim. After it cures completely, sand it smooth and finish to match the surrounding trim.
“Last winter, we had a customer in Schiller Park with beautiful oak trim that had water damage under one window,” our repair specialist told me recently. “The thought of replacing all the trim in that room nearly brought her to tears—the matching would have been impossible. Instead, we carefully spliced in a new section of matching oak, stained it to blend perfectly, and even she had trouble spotting which part we’d repaired.”
For splice repairs like this, precision is key. Remove the damaged portion with clean, square cuts. Then cut a replacement piece from matching trim stock, ensuring the profile lines up perfectly. Install with glue and finish nails, then fill the joints, sand everything smooth, and apply finish to match.
For those smaller everyday dings and scratches, the fix is even simpler. On painted trim, a little spackling, light sanding, and touch-up paint works wonders. For stained trim, matching stain markers or touch-up pens can make scratches virtually disappear. Deeper gouges might need wood filler shaped to match the surrounding profile before finishing.
How do you decide whether to repair or replace? Generally, if more than 30% of the trim is damaged, replacement might be more efficient. The same applies if damage extends into the structural framing behind the trim. For localized damage with otherwise sound trim, repair is usually the way to go. And don’t forget to factor in your time—sometimes a complete replacement is more efficient than painstaking repairs, especially if finding an exact match for older trim isn’t an issue.
“The most satisfying part of trim repair,” one of our specialists likes to say, “is stepping back when you’re finished and not being able to tell where the repair was made. That’s craftsmanship.”
Frequently Asked Questions about Window Trim Installation
What are jamb extensions and when do I need them?
If you’ve ever wondered why some windows look like they’re sitting in a “tunnel” in your wall, you’re noticing the absence of jamb extensions. These helpful pieces of wood bridge the gap when your window doesn’t sit flush with your finished wall surface.
“Jamb extensions are like the bridge between your window and your wall,” explains our installation expert at K&B Direct. “Without them, your casing would have nothing proper to attach to and would look awkward with a deep reveal.”
You’ll likely need jamb extensions in several common scenarios: when your window is recessed deeper than your drywall thickness, after adding new insulation that makes walls thicker, or when installing windows in unusually thick wall construction. Many homeowners don’t realize they need jamb extensions until they’ve already purchased their window trim and find it won’t sit properly.
Here at K&B Direct, we can save you the headache of ripping these pieces yourself by providing custom-cut jamb extensions that perfectly match your specific window depths. This small addition makes a world of difference in your final installation quality.
How do I choose the right size window trim for my project?
Selecting properly sized window trim is a bit like choosing the right frame for artwork—it needs to complement, not overwhelm or underwhelm what it surrounds.
In our Schiller Park showroom, we guide customers through four key considerations. First, think about your home’s architectural style. Traditional homes typically accept wider trim (3-½” or more), while contemporary styles often feature narrower, cleaner profiles (2-¼”).
Next, consider your room proportions. Those gorgeous high ceilings in your living room can handle substantial trim that might look overwhelming in your cozy home office. The window size itself matters too—large picture windows generally look best with wider trim, while smaller windows can be dwarfed by too-wide casing.
Finally, look at your existing trim. One Chicago homeowner called us in a panic after installing new window casings that clashed dramatically with her doorways and baseboards.
“A good rule of thumb is that your window casing should be the same width as or slightly narrower than your baseboards,” our design consultant often advises. “This creates a harmonious visual hierarchy throughout your home that feels intentional rather than haphazard.”
What common mistakes should I avoid for a pro-level finish?
After helping countless homeowners with their window trim projects, we’ve seen some recurring issues that separate amateur-looking installations from professional ones.
Inconsistent reveals top our list of common mistakes. When the distance between your window frame and the inside edge of your casing varies around the window, it immediately signals “DIY project.” Maintain that consistent ¼” reveal throughout for a crisp, professional look.
Many homeowners develop an over-reliance on caulk, trying to fill large gaps that really indicate poor fitting. As one of our installers likes to say, “Caulk should hide the seam, not become the seam.” Address underlying fit issues instead of trying to fill a ¼” gap with caulk that will eventually crack and pull away.
Improper nailing is another telltale sign of amateur work. Placing nails too close to edges often splits the trim. Follow the rule of keeping fasteners at least ½” from any edge. And speaking of preparation, rushing the prep work by not checking for square or addressing uneven walls almost guarantees disappointing results.
Those beautiful mitered corners require precision. When they don’t align perfectly, the entire installation looks off. Take time to cut precise 45° angles and test-fit before nailing. If you’re staining rather than painting, neglecting wood conditioning on pine or other soft woods leads to blotchy, uneven color that no amount of technique can fix later.
“One customer tried to rush through their installation and ended up with gaps at every miter joint,” recalls our trim specialist with a sympathetic smile. “They had to remove everything and start over. ‘Measure twice, cut once’ is more than just a saying—it’s the difference between professional and amateur results.”
Conclusion
Window trim isn’t just about looks—it’s the finishing touch that transforms ordinary windows into stunning focal points while serving critical functional purposes. When properly installed, window trim seals your home against drafts, protects walls from moisture damage, and defines your home’s architectural character—all while looking absolutely beautiful.
Throughout this guide, we’ve walked through everything from basic trim anatomy to advanced installation techniques. Whether you’re drawn to ornate colonial profiles with decorative headers or prefer the clean lines of modern trim with precise reveals, the fundamentals remain consistent: measure carefully, cut precisely, attach securely, and finish carefully.
I’ve seen countless Chicago homeowners transform their spaces with properly installed window trim. One customer recently told me, “I didn’t realize how naked my windows looked until I added trim. Now the whole room feels finished!” That’s the magic of good trim work—it completes a space in a way that’s both subtle and dramatic.
At K&B Direct, we take pride in being your comprehensive resource for all window trim needs in Chicago and Schiller Park. Our showroom features an extensive selection of profiles, materials, and accessories to match any style or budget. From traditional oak casings that showcase natural wood grain to modern PVC options that stand up to moisture, we’ve curated quality products that deliver lasting value.
The investment in proper window trim pays dividends in both comfort and curb appeal. Energy efficiency improves, drafts disappear, and your home gains architectural definition that catches the eye and warms the heart.
For more information about our complete selection of mouldings and millwork, visit our Mouldings & Millwork page. Whether you’re tackling a single window or renovating your entire home, we’re here to help you achieve results that will stand the test of time in both durability and style.
When it comes to window trim, there’s no pane, no gain! (Sorry, I couldn’t resist a little trim humor.)