how to paint an interior door: 8 Powerful Steps for Stunning Results 2025
Transform Your Home with a Fresh Door Color
Ever wondered what a simple coat of paint could do for your home? Learning how to paint an interior door is one of those magical weekend projects that delivers serious wow-factor without breaking the bank. For about $30 and a day’s effort, you can completely refresh your space.
Here’s the quick answer to get you started: First, prep your door by removing hardware, cleaning thoroughly, filling any holes, and sanding to a smooth finish. Next, prime if necessary (especially important for bare wood or when switching from oil to latex paint). Then comes the fun part – painting in the proper order using an angled brush for panels and edges, and a mini roller for flat surfaces. Be patient and apply 2-3 thin coats, allowing about 4 hours between each with a light 320-grit sanding in between. Finally, let it dry completely for at least 24 hours before rehanging or closing the door.
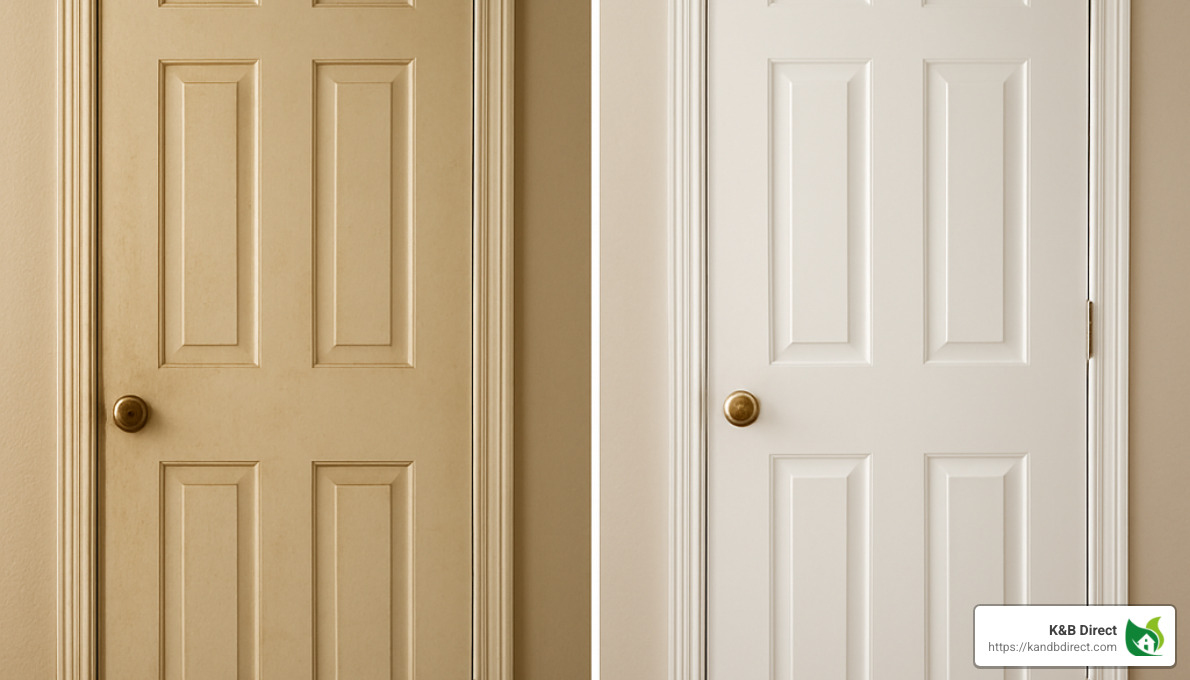
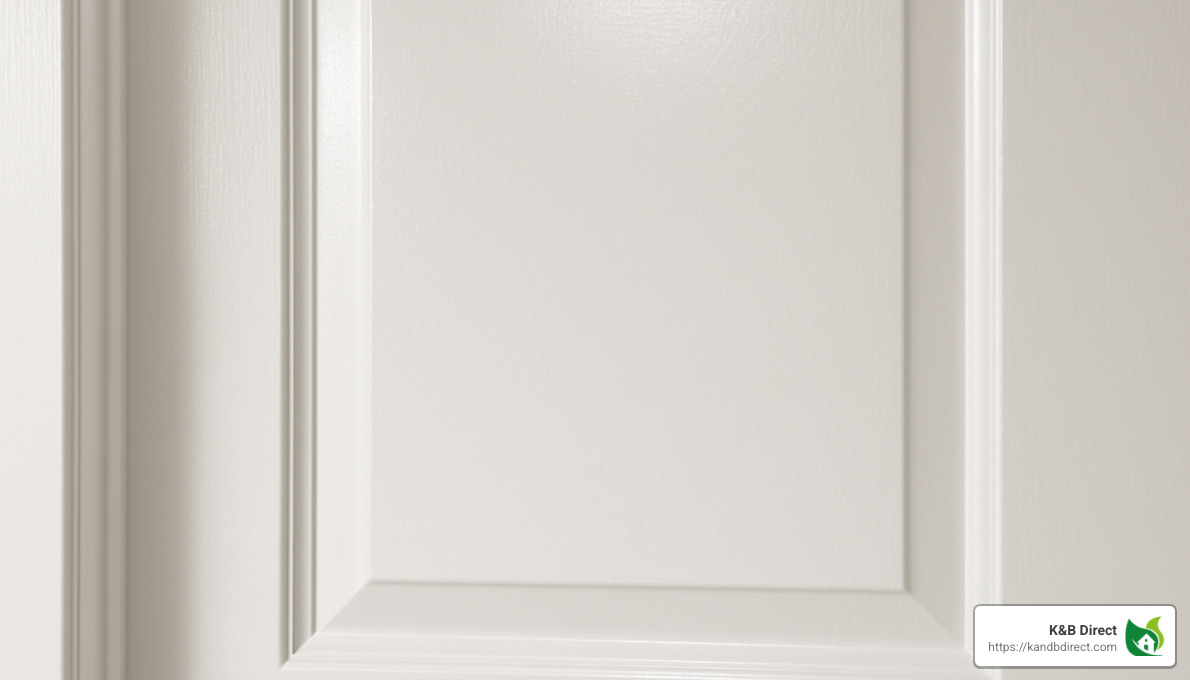
You’d be surprised how much freshly-painted interior doors can lift your home’s overall appearance. They do more than just separate rooms – they define spaces, add personality, and create visual flow throughout your home. Whether you’re brightening up yellowed doors in an older house or adding a bold pop of color to create visual interest, this project delivers incredible bang for your buck.
For durability and cleanability, I always recommend a semi-gloss or gloss finish on doors. These sheens stand up to fingerprints, bumps, and occasional cleaning much better than matte finishes. You’ve got options too – paint your door while it’s still hanging for convenience, or remove it completely for the absolute smoothest finish possible.
I’m Eryk Piatkowski, and at K&B Direct, I’ve guided countless homeowners through the door change process. I’ve seen how mastering how to paint an interior door with proper techniques can achieve professional-quality results that make homeowners fall in love with their spaces all over again.
Looking to take your door project even further? Check out our resources on how to replace an interior door or browse our selection of beautiful interior doors to complement your freshly painted ones.
Why Paint an Interior Door? (Color, Value & Mood)
Ever walked into a room and felt something was “off” but couldn’t quite put your finger on it? Often, it’s those interior doors – silently collecting fingerprints, scuffs, and years of wear while we focus on wall colors and furniture.
At K&B Direct, we’ve seen countless homeowners surprised by how dramatically a freshly painted door can transform a space. As DIY blogger Diane Henkler notes, “Freshly-painted doors and trim can make a huge difference in bringing your home’s color scheme together.” This simple weekend project delivers impressive bang for your buck.
Beyond just looking pretty, painting your interior doors offers practical benefits that make this project worth your time. For around $30 in supplies, you’ll get a budget-friendly facelift that can completely refresh a room. The new paint also provides a durability boost, protecting your door from daily wear and tear with a tougher, more scrubbable surface.
If you’re thinking about selling, don’t underestimate the power of details. Updated interior doors contribute to increased home value by creating that “well-maintained” impression buyers love. One real estate agent we work with tells clients that freshly painted doors signal “this home has been cared for” to potential buyers.
Perhaps most importantly, door colors actually affect how you feel in your space. This mood improvement isn’t just designer talk – color psychology studies show that our surroundings genuinely impact our emotions and energy levels.
I remember working with a homeowner in Chicago whose 1970s home had yellowed doors throughout. After painting them crisp white to match her updated trim, she couldn’t believe the difference: “I can’t believe I lived with those dingy doors for so long. The whole house feels cleaner and more modern now.”
Choosing the Right Color
Selecting the perfect door color might seem simple, but it’s worth giving it some thought. While white remains the classic choice for interior doors, we’re seeing more homeowners get creative with their selections.
Bold vs. Neutral
White doors offer timeless appeal and flexibility as your decor changes. However, design professionals are increasingly recommending darker statement colors like charcoal gray, navy blue, or even black, especially in homes with neutral walls. These bolder choices create architectural interest without the commitment of an accent wall.
Matching vs. Contrasting
When coordinating with your existing decor, you have several approaches. Matching your door to your trim creates a classic, cohesive look that never goes out of style. For subtle definition, try painting doors a shade darker than your walls. Or make a statement by using a completely contrasting color that turns your doors into focal points.
The layout of your home should influence your color strategy too. In open floor plans, consistent door colors help create visual flow between spaces. In traditional homes with distinct rooms, you might choose different door colors to define each space’s purpose or mood.
Before making your final decision, we always recommend bringing home color samples and testing them in your actual lighting conditions. The color that looked perfect in the store might read completely differently in your home’s natural light. At K&B Direct’s Interior Doors Category, we’re happy to help you steer these choices to find the perfect color for your space.
Tools & Materials You’ll Need
Having the right supplies ready before you begin will make your door painting project go much more smoothly. Here’s a comprehensive list of what you’ll need:
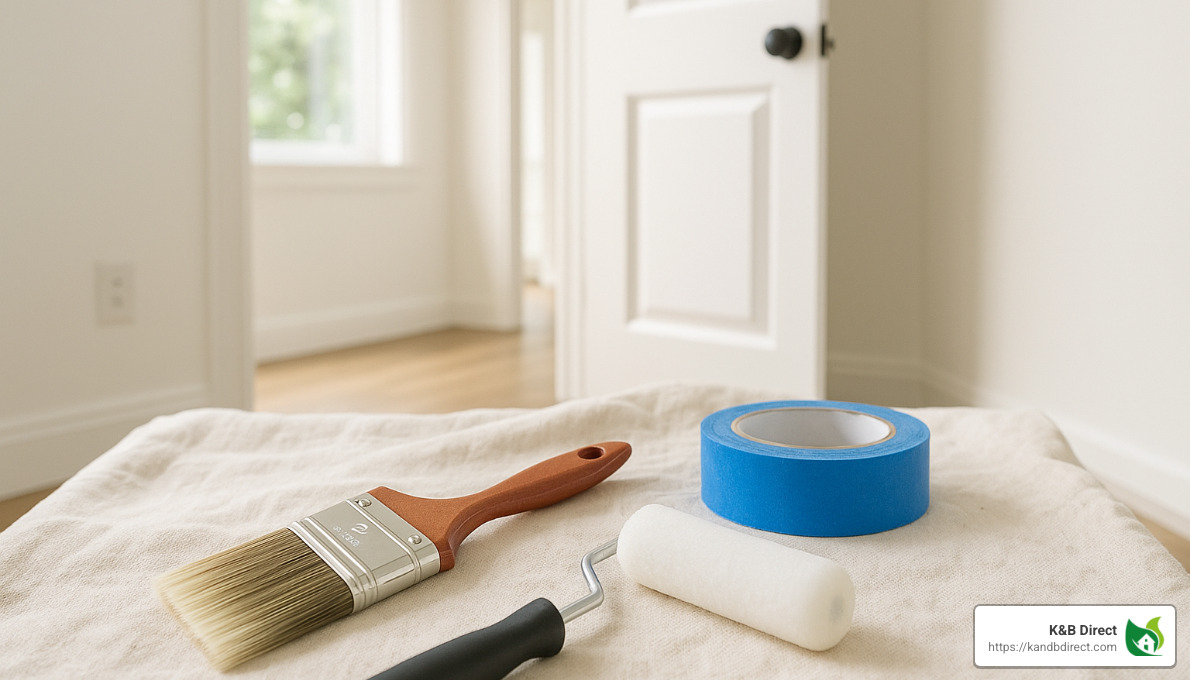
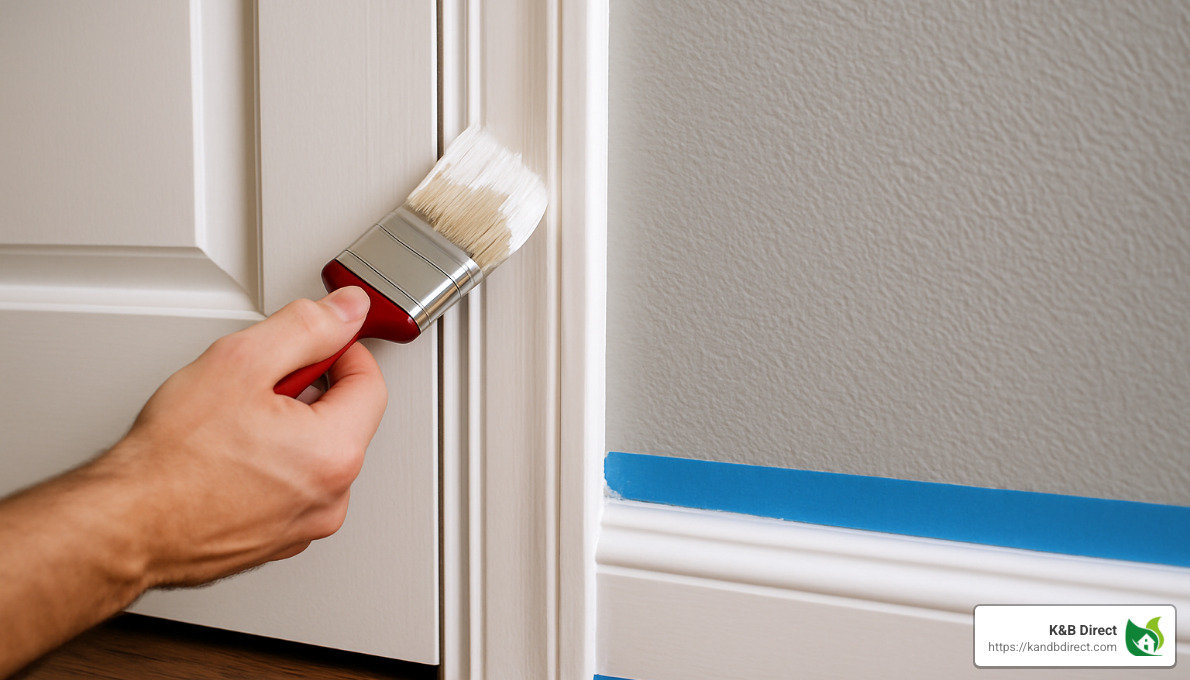
When I first painted my own interior doors, I learned the hard way that preparation is half the battle. Walking back and forth to the hardware store isn’t how anyone wants to spend their weekend! You’ll need drop cloths (I recommend cloth over plastic since they won’t slip), painter’s tape for clean edges, and a quality 2″ angled brush that will help you get into those panel details.
For the flat surfaces, grab a mini foam roller and frame (4″ with ¼” nap works best). You’ll also need various grits of sandpaper – 180-grit for initial preparation, 220-grit for smoothing, and 320-grit for between coats. A sanding block or electric sander makes the job easier on your hands.
Don’t forget repair supplies like wood filler or spackle and a putty knife to fix any holes or dents. You’ll need a screwdriver for removing hardware, and a tack cloth is essential for wiping away dust before painting.
For materials, pick up a degreasing cleaner (TSP is my go-to), primer if needed, and your chosen paint (more on that below). Round out your supplies with a paint tray, stir stick, respirator or mask for those sanding sessions, and latex gloves to keep your hands clean.
“One small-town painter who painted most of the buildings in his area showed me a trick,” shares one of our Chicago customers. “He drills a small drain hole in the paint can groove to prevent drips down the side of the can and reduce waste. It’s brilliant!”
Paint Types & Ideal Sheens
The right paint makes all the difference between a door that looks professionally finished and one that screams “DIY gone wrong.” Let’s break down your options:
Water-based latex paint dries quickly and cleans up with water, but it’s not as durable as other options and may raise the wood grain. If you’re looking for something more robust, water-based enamel combines easy cleanup with improved durability, though it costs a bit more.
I’ve had several customers rave about Dulux Aquanamel, with one painting professional noting, “Water-based enamel paints like Dulux Aquanamel are perfectly fine for painting doors and architraves; it’s what I use myself.” You can find quality options at Bunnings.
For the ultimate in durability, oil-based paint creates a beautifully smooth finish, but comes with strong odors, longer dry times, and requires mineral spirits for cleanup. A great compromise is acrylic alkyd hybrid paint, which offers water cleanup with oil-based durability and excellent leveling.
As for sheen, this table breaks down your options:
| Sheen | Durability | Cleaning Ease | Hides Imperfections | Best For |
|---|---|---|---|---|
| Flat | Low | Poor | Excellent | Not recommended for doors |
| Eggshell | Medium | Fair | Good | Low-traffic doors |
| Satin | Medium-High | Good | Fair | Most interior doors |
| Semi-Gloss | High | Very Good | Poor | Highly recommended for doors |
| Gloss | Highest | Excellent | Poor | High-traffic or kitchen/bathroom doors |
Semi-gloss is typically the sweet spot for interior doors – durable enough for daily use but not so shiny that every imperfection stands out.
As one expert bluntly put it, “The truth is that primer is engineered to prime and paint is engineered to paint!” Don’t skip primer when it’s needed, as it creates the foundation for a lasting finish.
Finish & Quantity Calculator
“How much paint do I actually need?” is probably the most common question I hear when helping customers plan their how to paint an interior door projects.
For most standard interior doors (about 80″ x 32″), you’ll need approximately one quart of paint for two coats. A standard door uses about 1/2 quart per coat, so a single quart should cover your project nicely. If you’re planning to paint multiple doors the same color, a gallon will be more economical.
The exact amount can vary based on several factors: panel doors use slightly more paint than flat doors, darker colors often require extra coats for even coverage, and unprimed surfaces will soak up more paint than properly prepared ones.
One homeowner shared her experience: “I used approximately 1½ jars of Fusion Mineral Paint to cover all my first-floor doors with two coats,” showing that quality paint can stretch surprisingly far.
Most paint manufacturers offer online calculators to help you determine exact quantities, which can save you both money and trips to the store. And while it might be tempting to stretch your paint by thinning it, I strongly advise against this practice – it reduces both coverage and durability, often leading to a disappointing finish.
How to Paint an Interior Door: Two Proven Methods
There are two main approaches to painting an interior door, each with its own advantages. Your choice will depend on your timeline, workspace, and desired finish quality.

Method 1: How to Paint an Interior Door After Removing It
For the absolute best finish, removing the door from its hinges is the professional painter’s secret weapon. I’ve found this approach gives you complete access to all edges and eliminates those frustrating drip marks that can ruin your hard work.
When my neighbor Mark decided to refresh his 1990s oak doors, he was hesitant about taking them down. “Won’t that be a huge hassle?” he asked. But after seeing the flawless finish on his first door, he quickly changed his tune.
To remove your door, start by placing a folded towel underneath to protect your floors. Then, use a hammer and nail to tap the hinge pins upward until you can pull them out. If possible, grab a friend to help lift the door out of the frame – these things can be surprisingly heavy! Before setting the hardware aside, label everything and store the pieces in a plastic bag. Trust me, your future self will thank you when it’s time to put everything back together.
Set up your workspace by placing the door horizontally on padded sawhorses. This position gives gravity a chance to work in your favor, helping the paint level out beautifully. Make sure you have good lighting and ventilation, and protect your floor with drop cloths – paint has an uncanny ability to find its way onto surfaces you didn’t think needed protection.
When painting, always tackle the edges first, then flip the door to paint each side. Allow each side to dry completely before flipping to avoid smudges or fingerprints in your fresh paint. Yes, this method takes a bit longer, but the professional-quality finish is worth the wait.
Method 2: How to Paint an Interior Door Without Taking It Off Hinges
If you’re short on time, workspace, or simply don’t want to deal with removing a heavy door, you can still achieve excellent results while the door remains hung. This is my go-to method for quick refreshes in homes with multiple doors.
One homeowner in Chicago told me, “I was dreading painting all six interior doors in my condo until I realized I could do it without taking them down. I finished the whole project in a weekend instead of spreading it over a week!”
Begin by protecting your floors with drop cloths or cardboard. The key to success with this method is stabilizing the door so it doesn’t swing while you’re painting. Use wood shims on each side to hold the door steady – this simple trick prevents those annoying little movements that can lead to uneven coverage or smudges.
Be sure to tape off hinges and hardware carefully. While some painters prefer to remove hardware even when painting in place, taping can save time if you’re in a hurry.
When painting a hung door, work from top to bottom in sections. If possible, paint both sides on the same day to maintain your momentum. The biggest advantage here? No waiting for one side to dry before you can flip the door over. Just keep the door ajar while drying to prevent sticking.
As one of our K&B Direct customers humorously shared, “If I’m feeling lazy, I’ll just squish the roller into the corners to paint them.” While not the most precise technique, it shows how forgiving this method can be for quick touch-ups or casual DIYers.
Whichever method you choose, how to paint an interior door doesn’t have to be complicated. With a little preparation and the right technique, you’ll transform your doors and refresh your entire home’s appearance.
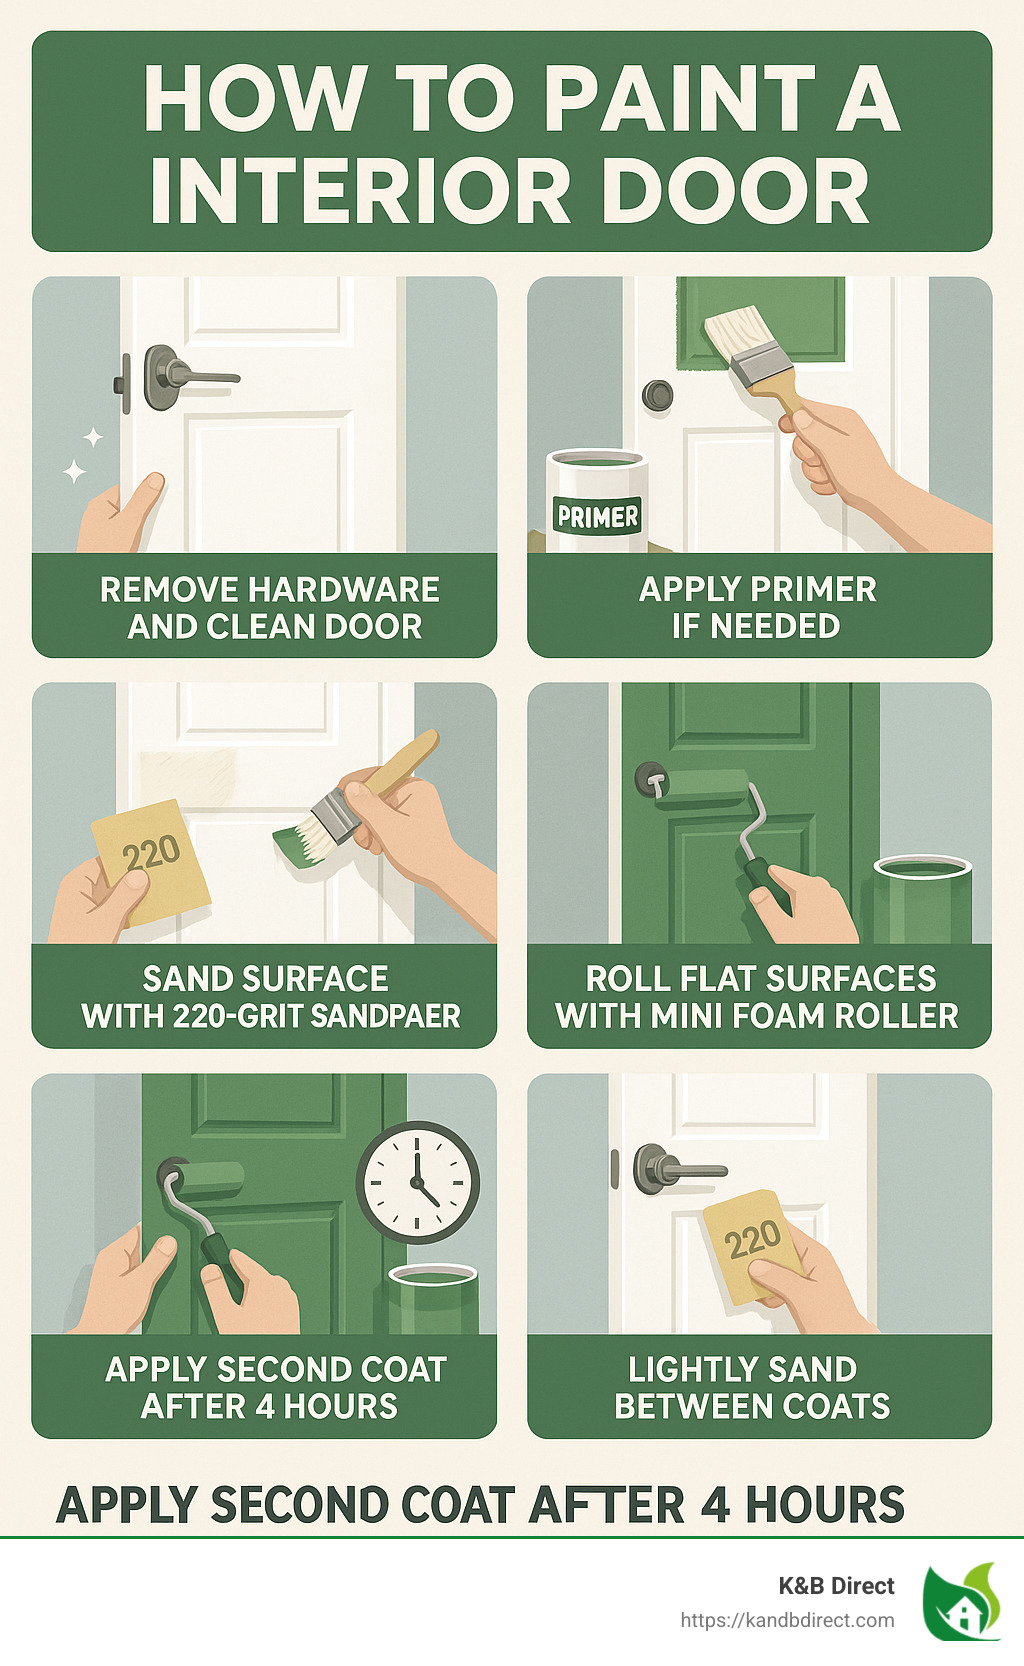
Step-by-Step Surface Preparation
Proper preparation is the foundation of a professional-looking paint job. Skipping these steps almost always leads to disappointing results.
Think of preparing your door like getting ready for a first date – a little extra effort upfront makes all the difference in the final impression. Let’s walk through this crucial process together.
First, you’ll want to determine what you’re working with. Rub a cotton ball soaked in rubbing alcohol on an inconspicuous spot of your door. If paint comes off, you’ve got latex paint; if not, it’s likely oil-based. This simple test helps you decide whether primer is in your future.
Now for the hardware decision. Whenever possible, I recommend removing knobs, locks, and hinges completely. Place all these small parts in a labeled bag so you don’t lose track of them. If removal isn’t practical, carefully mask them with painter’s tape, using a utility knife to trim the tape precisely around hinges.
“Clean with a degreasing cleaner,” advises one of our professional painter friends. “Doors collect oils from hands, especially around knobs.” This is absolutely true! Use TSP (trisodium phosphate) or a mild degreasing cleaner to wash away years of fingerprints, dust, and grime. Rinse thoroughly afterward and give the door time to dry completely.
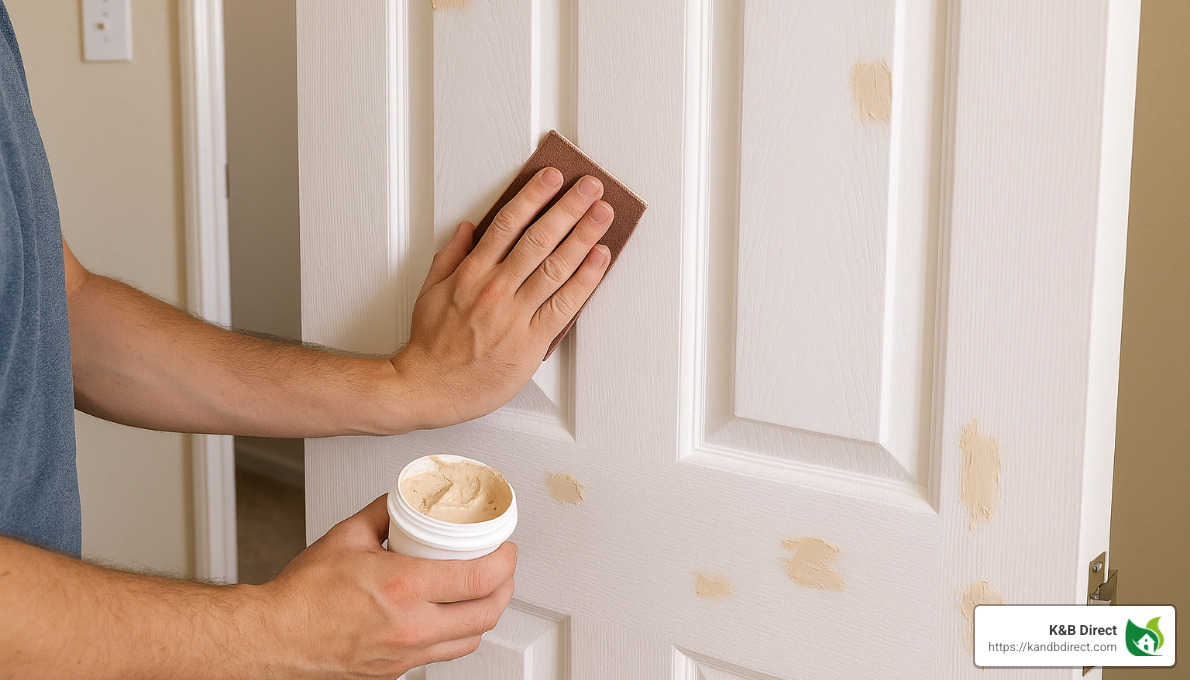
Next comes the repair work. Those little dings and dents that you’ve stopped noticing? Now’s the time to address them. Fill holes and gouges with wood filler or spackle, then allow it to dry completely. Your door deserves this fresh start!
Sanding is where the magic begins to happen. Take your 220-grit sandpaper and gently sand the entire door surface. Move with the wood grain when possible. You’re not trying to remove all the existing paint – just creating a slightly rough surface that gives the new paint something to grip onto.
After sanding, dust removal is critical. Wipe everything down with a tack cloth to capture all sanding dust. I also recommend vacuuming the surrounding area to prevent dust from settling into your wet paint later. This small step makes a huge difference in your final finish.
Now for the primer question. You’ll definitely need primer if any of these apply:
– You’ve sanded down to bare wood in spots
– You’re switching from oil-based to latex paint
– You’re making a dramatic color change
– You’re covering stains or water damage
As one painting expert wisely notes, “The truth is that primer is engineered to prime and paint is engineered to paint!” Never try to substitute extra coats of paint for primer – they serve different purposes.
Safety Note: If your home was built before 1978, please test for lead paint before sanding. Lead dust is toxic and requires special handling procedures. Your family’s health is worth the extra precaution.
Special Prep for Paneled vs Flat Doors
Different door styles need slightly different approaches – like how you’d dress differently for a beach wedding versus a formal evening affair.
Panel Doors require a bit more attention to detail. Use a small brush to clean dirt from those recessed areas where grime loves to hide. Pay special attention to the seams between panels and rails – dirt lurking here can ruin your paint job. When sanding, a flexible sanding sponge works wonders for getting into those curved recesses.
One of our customers learned this lesson the hard way: “I didn’t properly clean the recessed areas of my paneled door, and the paint bubbled where it hit the grime. I had to sand it all off and start over.” A little extra cleaning time saves a lot of frustration later!
Flat Doors present different challenges. Check carefully for veneer issues – any loose veneer should be glued down before painting to prevent future bubbling. For hollow-core doors, make sure to seal all edges to prevent moisture absorption that could warp your door over time. When sanding flat doors, use straight, even strokes following the direction of the grain or texture for the smoothest result.
At K&B Direct, we’ve seen countless door changes, and proper prep is always the difference between a door that looks “freshly painted” and one that looks professionally finished. The time you invest in preparation will pay off in a smooth, durable finish that makes you smile every time you walk through that door.
Painting Technique for a Flawless Finish
Now comes the fun part—applying paint to achieve that smooth, professional finish. I’ve seen how using the right tools and techniques can make all the difference between an amateur-looking job and one that looks like you hired a pro.
When I painted my first door years ago, I just slapped on the paint any which way. Big mistake! I ended up with drips, uneven coverage, and a finish that looked, well… homemade (and not in a good way). Now I know better.
Step 1: Apply Paint in the Correct Order
For paneled doors, there’s actually a specific sequence that works best. Start with the recessed panels using your angled brush, then move to the center vertical stiles. Next, tackle the horizontal rails before finishing with the outer vertical stiles. Save the edges for last.
With flat doors, it’s simpler but still requires method. Paint those edges first, then use vertical strokes with your mini roller for the main surfaces. For an extra-smooth finish, follow up with light, vertical brush strokes while the paint is still wet.
A customer from Milwaukee told me, “I never knew there was a ‘correct order’ to paint a door until I talked to the folks at K&B Direct. Following their advice made such a difference in my final result!”
Step 2: Use the Right Tools for Each Area
Your tools can make or break your finish. I always reach for a high-quality 2″ angled brush for edges, corners, and those tricky recessed areas. For flat surfaces, nothing beats a 4″ mini foam roller for speed and smoothness.
Want to know a pro secret? Use both! Cut in with your brush, then immediately follow with the roller while the paint is still wet. This “brush-and-roll combo” gives you precision where you need it and that smooth, almost sprayed-on look everywhere else.
“Using a foam roller yields a finish almost as smooth as a sprayer but with far less setup and cleanup,” one of our DIY-savvy customers shared after completing her project. She was right—why make things complicated when simple works so well?
Step 3: Apply Thin, Even Coats
I can’t stress this enough: thin coats are always better than thick ones. It might seem like you’re saving time with one thick coat, but you’ll actually create more work for yourself dealing with drips, longer drying times, and a less durable finish.
Keep a “wet edge” as you work—this means always painting into your previous stroke while it’s still wet. This technique helps avoid those dreaded lap marks that scream “amateur job.”
Step 4: Allow Proper Drying Time
Patience pays off when painting doors. Give each coat at least 4 hours to dry (more if it’s humid). Before applying your next coat, lightly sand with 320-grit sandpaper—not to remove the paint, but just to knock down any little bumps or dust particles that settled in the wet paint.
Always wipe with a tack cloth after sanding. This simple step removes dust that could otherwise create a gritty texture in your final finish.
Step 5: Apply a Second (and Possibly Third) Coat
Most doors need at least two coats for even coverage. If you’re using darker colors, you might need a third. Allow the final coat to dry for at least 24 hours before closing the door to prevent sticking.
One Chicago homeowner shared: “I was tempted to rush and rehang my door the same day, but waiting the full 24 hours as recommended by K&B Direct made all the difference. No sticking, no paint transfer—just a perfect finish.”
For full curing, most paints need 7-14 days, though you can use the door normally after 24 hours. Just be gentle with it during those first couple of weeks.
Pro Tip: Between coats, you don’t need to clean your brush and roller. Just wrap them tightly in plastic wrap and store in the refrigerator. They’ll stay fresh and ready for your next coat!
Edges, Hardware & Glass Inserts
These special areas of your door deserve special attention:
When it comes to door edges, remember to paint all six sides of a wood door. This includes the top, bottom and all four edges. This complete coverage prevents moisture absorption and warping. If your door remains hung, you might not be able to reach the bottom edge—that’s one advantage of removing the door completely.
For hardware areas, careful painting around masked hardware takes a steady hand. Pull tape away while paint is still slightly wet to get the cleanest edge. I like to use a utility knife to score along the edge of hardware before removing tape—this prevents any paint from peeling away with the tape.
Glass inserts require extra attention. “Using masking liquid on glass is faster and more complete than taping with strips,” one of our professional painter friends told me. Apply the masking liquid (or tape if you prefer), paint carefully up to the edge, then remove the masking when paint is nearly dry. For any overflow, a razor blade is your best friend for cleanup.
Troubleshooting & Pro Touch-Ups
Even the pros run into problems sometimes. Here’s how to handle the most common issues:
Caught a drip while it’s still wet? Smooth it out with your brush right away. If it’s already dry, sand it smooth with 220-grit sandpaper and touch up with paint.
Brush marks driving you crazy? Try using a higher-quality brush, don’t press too hard, and consider adding a paint conditioner to slow drying time. This gives the paint more time to level out and eliminate those marks.
Dealing with sticky edges where the door meets the frame? A thin coat of petroleum jelly works wonders. For persistent sticking, lightly sand the edge and reapply a thin coat of paint.
Got paint on hardware? Don’t panic! Use a cotton swab dipped in rubbing alcohol for latex paint removal. For stubborn spots, carefully scrape with a plastic putty knife to avoid scratching.
“In high humidity, paint takes longer to cure,” a K&B Direct customer from Florida reminded us. “I learned to leave doors ajar for at least 24 hours in our humid conditions to prevent sticking. Such a simple tip that saved me so much frustration!”
For more detailed guidance on interior doors, the Home Depot tutorial on interior doors offers additional tips and techniques.
How to paint an interior door isn’t just about slapping on some color—it’s about creating a smooth, durable finish that improves your home for years to come. With these techniques, you’ll achieve results that look professionally done, even on your first try.
Maintaining Your Newly Painted Door
That beautiful fresh coat of paint on your door deserves some care to keep it looking its best for years to come. With just a little attention, your newly painted door will continue making a great impression on everyone who enters your home.
The first thing to remember is patience – your door needs time to fully cure. Even though it feels dry to the touch within hours, the paint continues to harden for weeks afterward.
“I always tell my clients to wait at least two weeks after painting before doing any serious cleaning,” shares a painting contractor who works with K&B Direct customers. “Being gentle with your door during this time really pays off in long-term durability.”
When it is time to clean your door, keep it simple. Use a soft cloth dampened with mild soapy water and gentle strokes. Avoid harsh chemicals that can damage the finish – particularly anything with ammonia, abrasives, or citrus-based solvents. After cleaning, pat the door dry with a soft cloth rather than rubbing, which can create a burnished look on some finishes.
Those inevitable nicks and scratches don’t have to be permanent eyesores. Smart touch-up strategies can keep your door looking fresh between full paint jobs. Save leftover paint in a small, airtight container clearly labeled with the color name, room, and date. For tiny chips, a fine artist’s brush gives you the precision needed to apply paint just where it’s needed. Some homeowners even keep touch-up pens in matching colors for quick fixes.
“My kids’ backpacks were constantly hitting our hallway door,” one Chicago homeowner told us. “I kept a small container of matching paint in the junk drawer, and every few months I’d touch up those little dings. Five years later, the door still looks freshly painted to visitors!”
Preventative maintenance goes a long way toward extending the life of your painted doors. Periodically check and tighten loose hardware, as wobbly handles or hinges can cause damage to the painted surface. Apply a silicone lubricant to hinges if they begin to squeak – but be careful to protect the painted surface with masking tape before spraying. And don’t forget about humidity levels in your home, as excessive moisture or dryness can cause wood doors to swell or contract, potentially cracking the paint.
Painted doors have a remarkable ability to self-heal from minor imperfections. Small scratches often become less noticeable over time as the paint settles and tiny air bubbles escape from the finish. What looks like a glaring flaw today may be nearly invisible in a few weeks.
One Schiller Park homeowner noted: “My doors were painted three years ago, and they still look fresh with just occasional gentle cleaning. The semi-gloss finish really does make maintenance easier.” This experience highlights why many experts recommend semi-gloss for doors – it truly does stand up better to daily life.
At K&B Direct, we’ve seen how well-maintained painted doors become a point of pride for homeowners who took the time to learn how to paint an interior door properly. Your effort creates lasting beauty that improves your home for years to come.
Frequently Asked Questions about How to Paint an Interior Door
How long should I wait between coats of door paint?
Patience is truly a virtue when it comes to painting doors. For most latex and water-based enamel paints, you’ll want to wait at least 4 hours between coats. This timing isn’t just a suggestion—it’s essential for a professional-looking finish.
“Allow the first coat to dry completely, then apply a second coat,” a painting professional once told me. “Rushing this step is where most DIYers go wrong, and it almost always leads to peeling and an uneven finish.”
Your waiting time might need to be adjusted based on a few factors. In my humid Chicago summers, I’ve found paint takes significantly longer to dry than the can suggests. Cool, damp days might require 6-8 hours between coats. If you’re using oil-based paints, plan for at least 24 hours of drying time. And specialty paints like Benjamin Moore Advance, while beautiful, need at least 16 hours between coats.
When in doubt, give it more time. A door that takes an extra day to complete but looks flawless is always better than one finished quickly but looking amateur.
Do I need to prime if I’m using the same paint type?
This is probably the most common question we hear at K&B Direct, and the answer is: it depends. You can often skip priming if you’re applying latex over existing latex paint, the current finish is in good condition (not peeling or chalking), and you’re not making a dramatic color change.
However, there are several situations where primer isn’t optional—it’s essential:
– Painting bare wood or drywall
– Covering stains or water damage
– Changing from oil to latex paint
– Making a significant color change (especially to white)
Not sure what type of paint is currently on your door? Here’s a simple test from one of our painting experts: “Rub a rag with rubbing alcohol on the surface—if paint comes off, it’s latex; if not, it’s likely oil based.” This five-second test can save you from the heartbreak of watching your beautiful new paint job peel off in sheets.
Primer is specifically engineered to create adhesion, while paint is designed for color and protection. They have different jobs, and sometimes you need both to get the best results.
Can I use the same semi-gloss paint on the frame and baseboards?
Absolutely! In fact, I strongly recommend it. Using the same paint on doors, trim, and baseboards creates a cohesive, professionally-designed look throughout your home. Semi-gloss is an excellent choice for all these surfaces because it provides a unified appearance, shares the same durability and cleanability benefits, and simplifies your painting project by reducing the number of products needed.
“It’s best to use the same paint color and finish for doors as you do for trim — especially with whites,” recommends one interior designer we work with at K&B Direct. White colors in particular can have subtle undertones that become noticeable when placed side by side, so using the same product throughout ensures perfect matching.
This approach also makes touch-ups much easier down the road. Instead of hunting down three different paint cans, you’ll have one product that works for all your trim surfaces.
Conclusion
There’s something deeply satisfying about changing an interior door with a fresh coat of paint. In just a single weekend with around $30 in supplies, you can completely revitalize your living space. I’ve seen the difference this simple project makes in countless homes, and it never fails to impress.
The secret to a professional-looking finish isn’t complicated – it’s all about taking your time with preparation, investing in quality materials, and applying paint with patience. Those three elements make all the difference between a door that looks professionally painted and one that screams “DIY gone wrong.”
Whether you chose to remove your door or paint it in place, the techniques we’ve covered will help you achieve that smooth, durable finish that will stand up to daily use while looking beautiful for years to come.
If you’re feeling a bit nervous about your first door painting project, here’s a tip I share with all my customers: start with a closet door or another less visible door in your home. This gives you a chance to practice your technique before tackling the more prominent doors in your living spaces.
“After painting my first door, I was hooked,” one of our Chicago customers told me recently. “The change was so dramatic that I ended up painting every interior door in my house!” This kind of enthusiasm is common once homeowners see how dramatically a freshly painted door can transform a room.
At K&B Direct, we love helping homeowners in Chicago and Schiller Park create spaces they truly love. If you’ve caught the home improvement bug after your painting project, you might want to explore our Interior Doors Category for stylish new options that can complement your freshly painted existing doors.
Happy painting from all of us at K&B Direct!