Why Bending MDF Baseboard on Curved Walls Is Trickier Than It Looks
Bending MDF baseboard around a curved wall is one of those tasks that looks simple until you actually try it — and then it fights back.
Here’s a quick answer to what actually works:
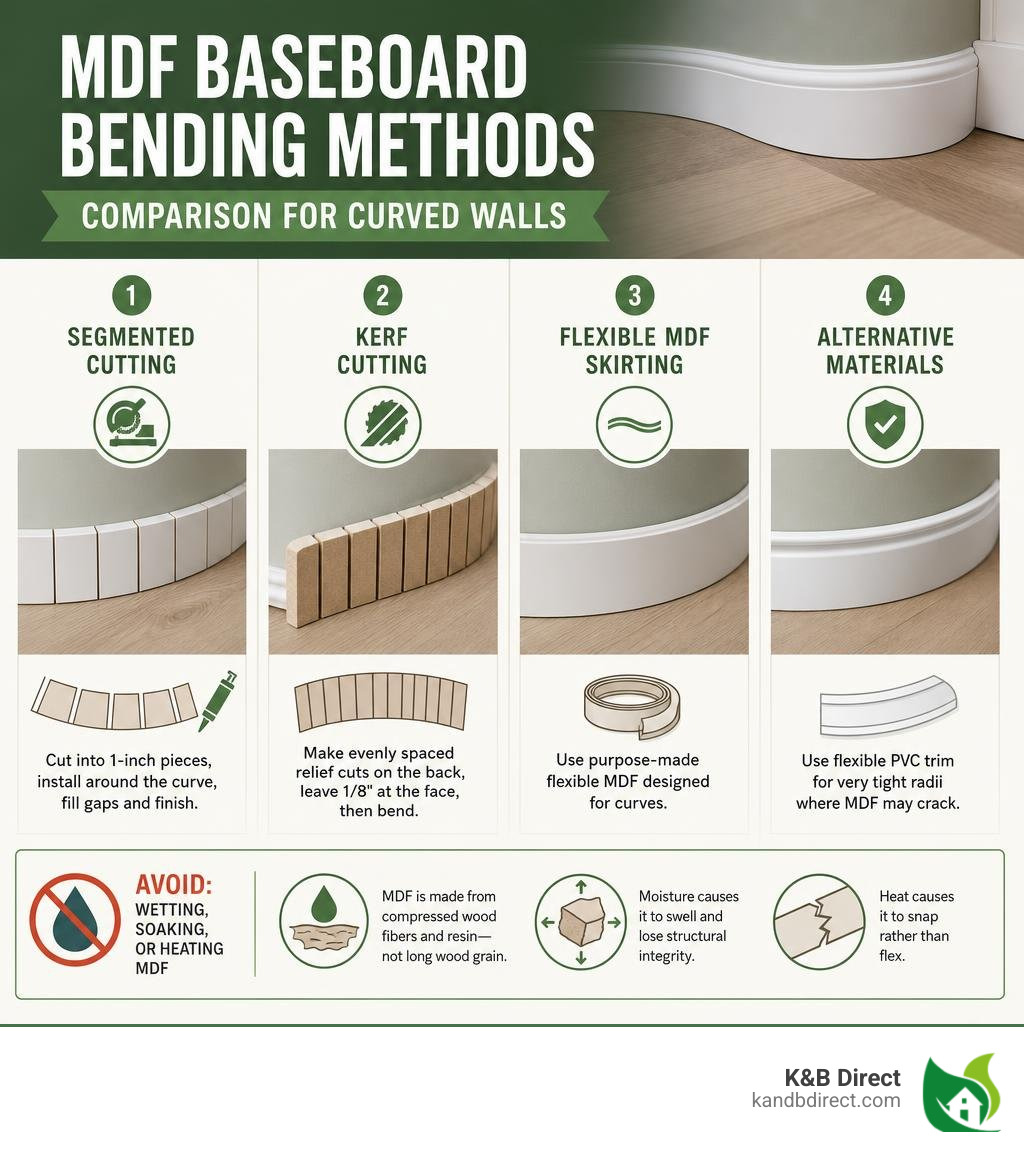
The fastest, most reliable methods for bending MDF baseboard:
- Segmented cutting — Cut the baseboard into 1-inch pieces with a miter saw, nail each piece sequentially around the curve, then fill gaps with a patching compound like 3M Patch Plus Primer.
- Kerf cutting — Make evenly spaced relief cuts on the back of the board, leaving roughly 1/8 inch at the face, so the board flexes without snapping.
- Flexible MDF skirting — Use purpose-made flexi MDF products designed for curved walls, bay windows, and staircases.
- Alternative materials — Switch to flexible PVC trim for very tight radii where MDF is likely to crack or crease.
Avoid: wetting, soaking, or heating standard MDF. Because MDF is made from compressed wood fibers and resin — not long wood grain — moisture causes it to swell and lose structural integrity, and heat causes it to snap rather than flex.
Unlike solid wood, MDF has no continuous fiber structure running along its length. That’s what makes it so smooth and consistent for straight runs — and so stubborn on curves.
I’m Eryk Piatkowski, owner of K&B Direct, and over more than a decade of helping homeowners and renovation professionals select and install quality trim, bending MDF baseboard on curved architectural features is one of the most common challenges I’ve seen trip up even experienced installers. In this guide, I’ll walk you through what actually works, step by step.
Quick look at bending mdf baseboard:
Material Comparison: MDF vs. Solid Wood and Flexible Trim
When selecting materials for curved surfaces in Chicago-area homes—whether in Park Ridge, Glenview, or Elmhurst—understanding material properties is essential. Every material behaves differently under tension.
MDF (Medium Density Fiberboard) is manufactured from fine wood fibers mixed with synthetic resin binders and wax, compressed under high pressure and heat. This process results in a highly consistent, homogeneous board with a smooth surface that lacks natural grain or knots. This makes it exceptional for painted trim packages because there are no natural defects to telegraph through the paint.
Solid wood, on the other hand, consists of long, continuous natural cellulose fibers. These fibers provide natural tensile strength, allowing the wood to bend to a moderate degree before splitting. However, solid wood is prone to warping, cupping, and seasonal movement as humidity levels shift in northern Illinois.
Flexible PVC and polyurethane trim products are engineered specifically for curved architectural elements. These synthetic materials flex effortlessly around tight radii without the need for mechanical modification.
To help you decide which material suits your curved wall project, we have compiled a comparison of their performance characteristics:
| Feature / Property | MDF Baseboard | Solid Wood Baseboard | Flexible PVC / Polyurethane |
|---|---|---|---|
| Inherent Flexibility | Low (requires modification for tight curves) | Moderate (can bend slightly, needs relief cuts) | Extremely High (bends easily without cutting) |
| Surface Smoothness | Ultra-smooth, uniform, paint-ready | Natural grain texture, requires sanding | Smooth, synthetic surface |
| Moisture Resistance | Low (swells and expands if exposed to liquid) | Moderate (seasonal expansion/contraction) | High (waterproof, stable) |
| Best Application | Straight walls, wide sweeps, painted trim | Traditional stain-grade profiles, high-traffic zones | Round columns, tight staircases, bay windows |
For a deeper dive into choosing the right profile and material for your home, review our comprehensive baseboard moulding guide. If you are deciding between wood and engineered options, you can read more about the differences in this guide on MDF vs Wood Baseboards.
The Science and Limitations of Bending MDF Baseboard
The reason standard MDF reacts poorly to traditional bending methods lies in its chemical composition. The wood fibers in MDF are bonded together using urea-formaldehyde or other synthetic resin adhesives. These binders create a rigid, stable matrix that excels at resisting warping under normal conditions.
However, this structure lacks the long, interlocking fibers found in natural timber. When you apply tension to a standard piece of MDF, there are no continuous fibers to distribute the stress. Instead, the material concentrates the force at a single point, leading to a sudden snap or a visible crease on the face of the board.
Some installers attempt to use steam or water to soften MDF, drawing on traditional woodworking techniques. This is a critical mistake. Introducing moisture to standard MDF causes the synthetic binders to break down. The compressed wood fibers absorb water rapidly, leading to permanent swelling, fiber raise, and a complete loss of structural integrity.
While specialized industrial processes can use controlled atomized steam to temporarily plasticize urea-formaldehyde bonds in manufacturing facilities, this is not achievable on a residential job site in Des Plaines or Schaumburg. For home installations, we must rely on physical, mechanical modifications to achieve the desired curve.
To understand the structural limits of different profiles, refer to our 5 inch mdf baseboard complete guide to see how height and thickness impact material behavior.
Effective Methods for Bending MDF Baseboard on Curved Walls
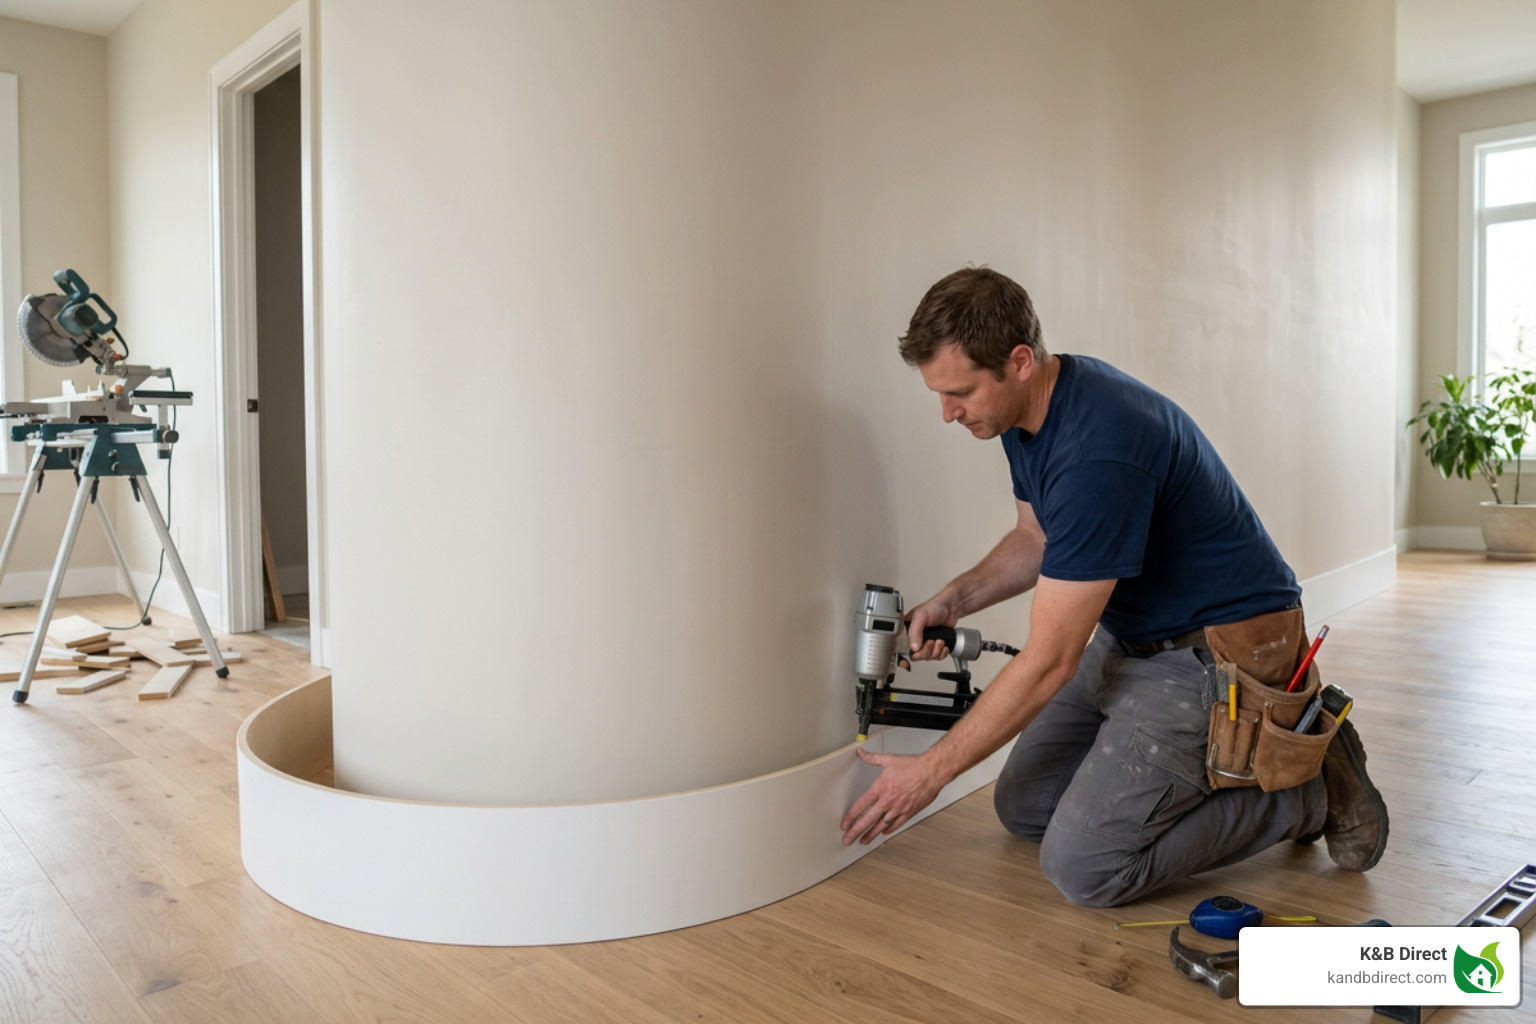
When faced with a curved wall, the first step is to measure the radius of the curve. A wide, sweeping curve—such as a twelve-foot radius—can often accommodate standard MDF baseboards without any structural modification. In these scenarios, you can gently flex the board against the wall and secure it directly to the wall studs using a pneumatic nailer.
For tighter curves, such as an eighteen-inch radius around a staircase in an Oak Park home, the material requires mechanical alteration to prevent snapping. In these situations, installers generally use one of two primary mechanical methods: the segmented cutting method or the kerf cutting method.
Each approach has distinct advantages depending on the sharpness of the curve and the desired final appearance. For further discussion on handling curved installations, you can explore the insights shared in this forum thread on Bending Baseboard on Curved wall.
The Segmented Cutting Method for Bending MDF Baseboard
The segmented cutting method is highly effective for extremely tight curves where traditional bending is impossible. Instead of attempting to flex a solid board, you divide the baseboard into short, manageable segments that follow the contour of the wall.
- The Process: Using a miter saw, cut the baseboard into uniform one-inch pieces.
- Installation: Position the pieces sequentially along the curved wall. Keep the top edges aligned and level with one another. Secure each segment to the wall using a pneumatic nailer, driving nails into the wall studs or bottom plate.
- The Result: This process creates a series of small, angled joints that approximate the curve. While it looks segmented initially, filling the gaps with a high-quality compound like 3M Patch Plus Primer and sanding it smooth creates a seamless, perfectly curved appearance once painted.
This technique is detailed further in this step-by-step tutorial on bending a baseboard around a tight curve.
The Kerf Cutting Method for Bending MDF Baseboard
The kerf cutting method involves making a series of vertical relief cuts (kerfs) on the back of the baseboard. This removes material and allows the remaining face of the board to flex without snapping.
- The Process: Set your miter saw or table saw blade depth so that it cuts through the backside of the board, leaving roughly one-eighth of an inch of material intact on the finished front face.
- Spacing: Make these cuts parallel to one another, spaced approximately one-half inch to one inch apart along the section of the board that will cover the curve. Tighter curves require closer spacing.
- Installation: Gently flex the board. The kerfs will close up on an inside curve or open up on an outside curve. Secure the board to the studs with finish nails, ensuring the face remains smooth and free of creases.
Step-by-Step Installation and Finishing Guide

Achieving a professional, paint-ready finish on a curved wall requires patience and precise execution. Follow these steps to complete your installation:
- Preparation and Safety: Always wear a half-mask respirator with a HEPA filter and safety glasses. MDF produces extremely fine dust when cut, which can irritate the lungs and eyes. Work in a well-ventilated area, preferably outdoors or with a vacuum-assisted saw.
- Dry Fitting: Place your modified baseboard (either kerfed or segmented) against the curved wall to verify the fit. Mark the stud locations on the floor or wall so you know exactly where to place your fasteners.
- Fastening: Using a pneumatic finish nailer, secure the baseboard to the wall studs. Place nails approximately one-quarter inch from the edges and one inch from the ends to prevent splitting. For extra holding power, use ring shank nails. Ensure the baseboard remains tight against both the wall and the flooring.
- Filling and Patching: Use a putty knife to apply 3M Patch Plus Primer or a high-quality acrylic wood filler into all nail holes, segment seams, or kerf gaps. Press the compound firmly into the voids. Apply slightly more than necessary, as some shrinkage may occur as it dries.
- Sanding: Once the patching compound is completely dry, sand the area smooth using 120-grit sandpaper, followed by 220-grit sandpaper for a polished finish. Wipe away all fine dust with a tack cloth.
- Second Coat: Inspect the surface. If any seams or imperfections remain visible, apply a thin second coat of the patching compound, let it dry, and sand it smooth.
- Priming and Painting: Apply a high-quality primer to any bare MDF or sanded areas. Finish with two coats of premium trim paint to match the rest of your room.
For more information on handling standard cuts and joints, see our guide on baseboard trim.
Moisture Protection and Long-Term Durability
Because MDF is highly sensitive to moisture, taking precautions during installation ensures your curved baseboards remain durable for years to come. Chicago-area homes experience significant humidity fluctuations between humid summers and dry winters, making proper sealing critical.
Before installing your baseboards, allow the material to acclimate to the room’s environment for at least twenty-four hours. Store the boards horizontally in a dry space.
Every cut end and bottom edge of the MDF board must be sealed. Unsealed edges act like a sponge, drawing in moisture from damp air or floor cleaning, which leads to swelling and “mushrooming” edges. Apply a coat of primer or paint to these raw edges before nailing them in place.
Once the baseboard is installed, apply a neat bead of flexible acrylic sealant along the joint where the baseboard meets the floor. This prevents water from mopping or minor spills from seeping under the trim. For additional tips on selecting profiles that stand up to daily wear, read the flat truth is flat mdf baseboard right for your walls and review our MDF Baseboard Profile and Joint Guide.
Frequently Asked Questions about Curved Trim Installation
Can you steam bend standard MDF?
No, standard MDF cannot be steam bent. The steam introduces heat and moisture that break down the synthetic resin binders holding the wood fibers together. This causes the fibers to swell, expand, and lose all structural integrity, resulting in a ruined board that will crumble or warp permanently.
What is the minimum radius for bending MDF?
Without mechanical modification, standard MDF baseboards can only handle very wide curves, typically with a radius of twelve feet or greater. For tighter curves down to an eighteen-inch or twelve-inch radius, you must use the segmented cutting or kerf cutting methods to allow the material to follow the contour without breaking.
Is flexible PVC trim better than MDF for tight curves?
Yes, for extremely tight curves, flexible PVC or polyurethane trim is often a superior choice. It bends smoothly without requiring relief cuts or segmenting, saving installation time. However, because it is a different material, you must ensure the profile matches your straight MDF runs perfectly, and you must use appropriate primers to ensure proper paint adhesion.
Conclusion
Bending MDF baseboards around curved walls is a challenging but highly rewarding task that adds exceptional architectural character to your home. By utilizing the segmented cutting or kerf cutting methods, sealing all raw edges against moisture, and taking your time with patching and sanding, you can achieve a flawless, professional finish.
At K&B Direct, we are dedicated to helping homeowners across Schiller Park, Chicago, Franklin Park, and the surrounding suburbs realize their dream home aesthetics. We offer top-quality kitchen and bathroom cabinets, doors, windows, and mouldings at unbeatable, lowest possible rates, paired with friendly, expert service.
Explore our baseboard selection today to find the perfect profile for your next home improvement project!