Build a Cabinet Face Frame That Stays Flush
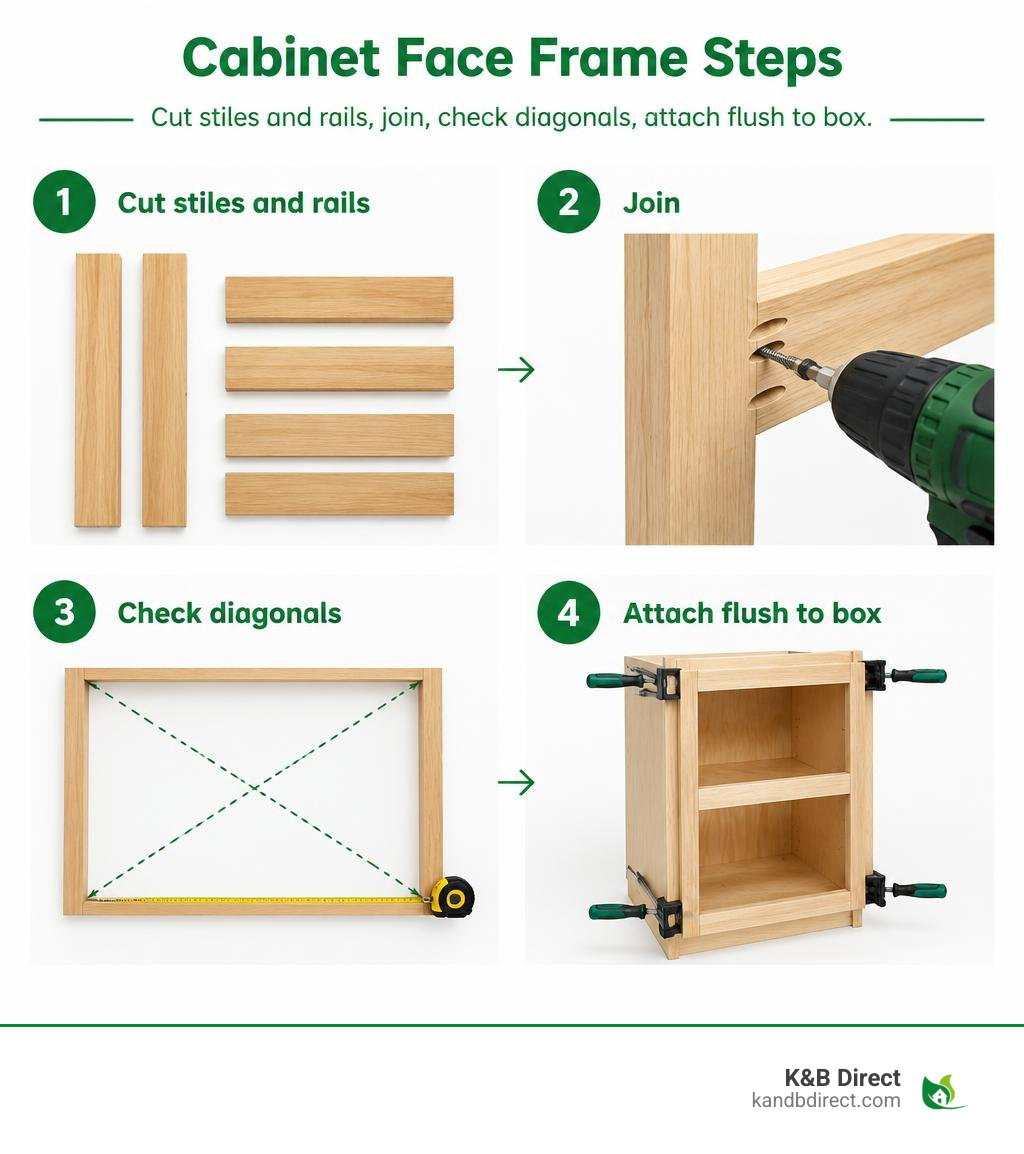
To build a sturdy cabinet face frame, cut straight, dry 3/4-inch stock for the vertical stiles and horizontal rails. Join the rails between the stiles with glue and pocket screws. Check that both diagonals match, then glue and clamp the frame to the cabinet box so it sits flush. The frame covers plywood edges, stiffens the cabinet, and gives doors a firm mounting surface.
I’m Eryk Piatkowski, owner of K&B Direct. Since 2011, we’ve helped homeowners and professionals choose kitchen and bath cabinets, and I’ll use that experience to guide you through each cabinet face frame choice, from wood and joints to fit and finish.
Discover more about cabinet face frame:
- best wood for cabinet doors
- where to buy cabinet doors for kitchen renovations
- choosing kitchen cabinets and doors
Anatomy and Sizing for a Cabinet Face Frame
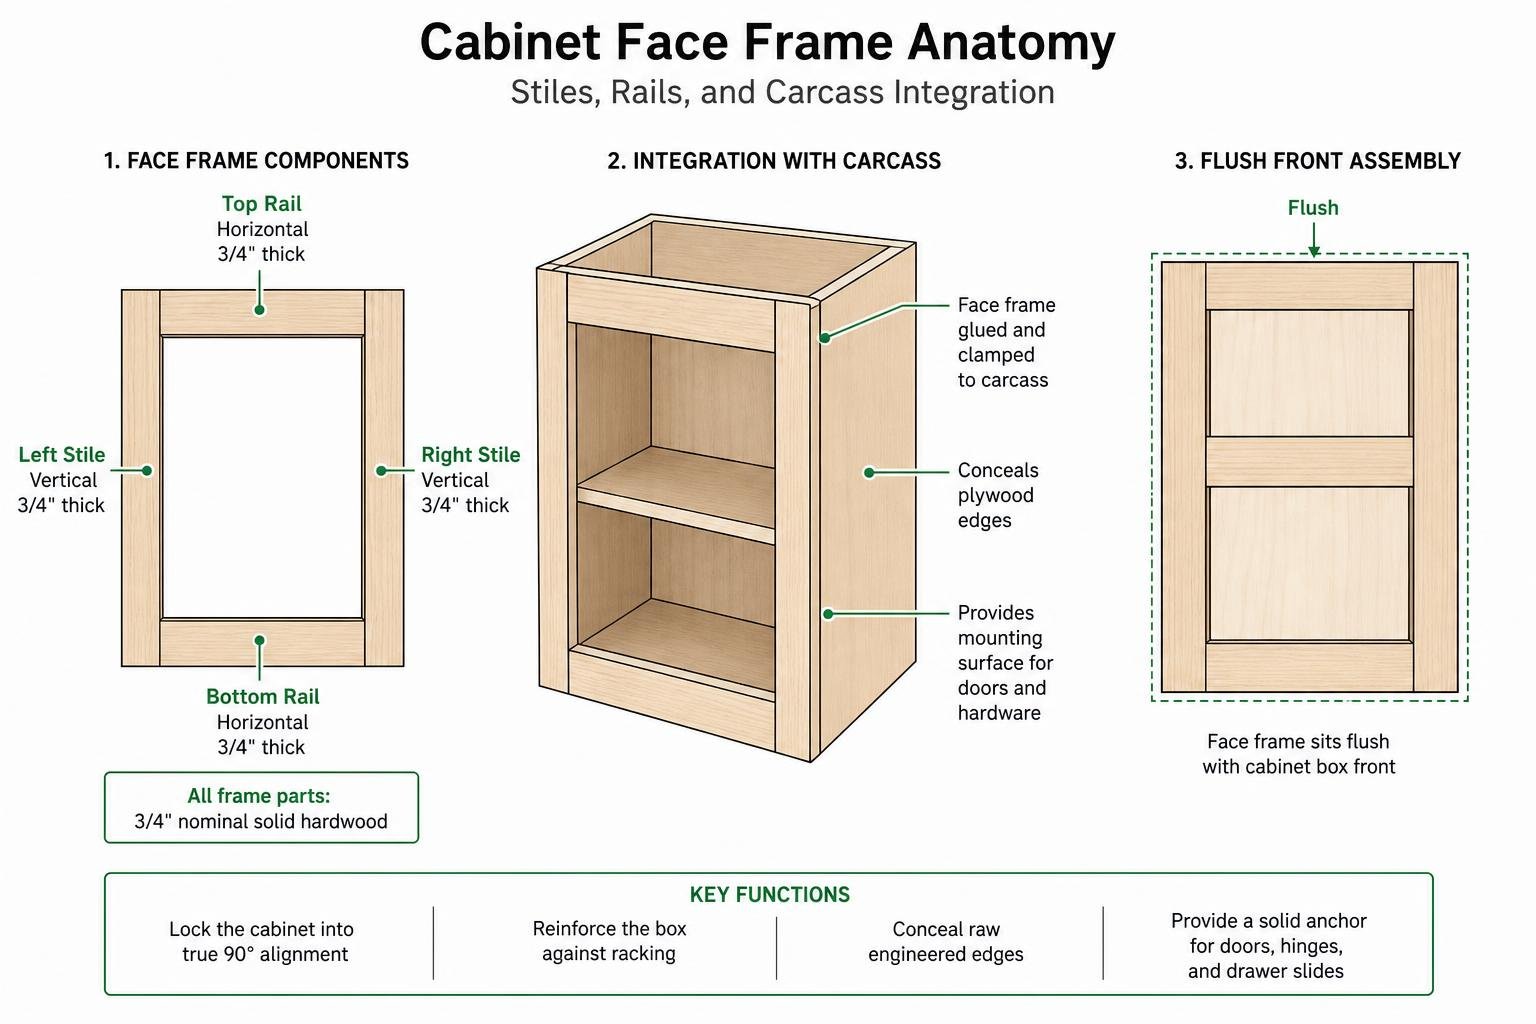
A carefully crafted front frame acts as the structural skeleton of traditional cabinetry. It locks the assembly into true 90-degree alignment, reinforces the box against diagonal racking forces, and conceals raw engineered edges. When we fabricate or assemble cabinet boxes, the solid hardwood front serves as the critical anchor for heavy doors, drawer slides, and interior accessories. Adhering to standard woodworking best practices guarantees that the completed piece conforms to rigid KCMA structural performance benchmarks.
The horizontal pieces are rails, and the vertical pieces are stiles. Every standard build utilizes 3/4-inch nominal solid hardwood stock. This 3/4-inch thickness provides the exact mass needed to accept screw threads from concealed European or traditional face-mount hinges without splitting.
Sizing Stiles and Rails for Overlay and Inset Doors
Choosing the proper widths for stiles and rails depends on your chosen door profile. A mismatch here leads to hinge binding, compromised clearances, or visible hardware plates that detract from clean lines.
- Overlay Configurations: When doors rest over the front surface, stiles and rails are traditionally milled to 2 inches or 2-1/4 inches wide. This width provides adequate clearance for overlay mounting plates while maintaining substantial border visibility around the perimeter.
- Inset Configurations: When doors sit flush inside the openings, stiles and rails are sized narrower, between 1-1/2 inches and 1-3/4 inches wide. This slimmer profile keeps the surrounding woodwork looking balanced rather than bulky.
- Mid-Stiles and Mullions: Vertical dividers between dual-door sections are typically sized to 1-1/2 inches wide to maximize opening access.
- Perimeter Overhang: In standard cabinetry, the frame overhangs the exterior plywood box by 1/4 inch (with an acceptable range of 1/8 inch to 3/8 inch). This slight projection provides crucial scribing material to fit walls that deviate from plumb.
Properly calculated framing widths also create uniform reveals when adding exterior details like upper crown or base cabinet trim.
Paint-Grade Versus Stain-Grade Hardwood Selection
Selecting the right lumber grade dictates the finished surface’s acceptance of paint or stain over decades of seasonal cycles. Never substitute manufactured core boards like medium-density fiberboard (MDF) for primary frames; MDF lacks the long-grain shear strength to retain hinge screws under repeated dynamic loads.
| Wood Species | Structural Density | Grain Stability | Optimal Application | Finish Compatibility |
|---|---|---|---|---|
| Poplar | Medium-Hard | High (Low Movement) | Paint-Grade | Primers & Enamels |
| Soft Maple | High | Exceptional | Paint-Grade / Tinted Stains | Ultra-Smooth Enamels |
| Red Oak | High | Moderate (Open Grain) | Stain-Grade | Deep Penetrating Stains |
| White Oak | Very High | High (Rot-Resistant) | Stain-Grade / Cerused | Clear Poly & Hardwax |
| Cherry | Medium-High | High | Stain-Grade | Natural Oils & Wiping Varnishes |
| Black Walnut | High | Exceptional | Luxury Stain-Grade | Clear Matte Finishes |
For painted finishes, poplar and soft maple stand out because their tight, diffuse-porous cell structures absorb primers uniformly without telegraphing wild grain textures through the topcoat. For stained showcases, matching the frame species to the door species ensures identical grain absorption and tone aging.
Joinery Methods for Stronger Cabinet Frames
The joints connecting horizontal rails to vertical stiles absorb dynamic stresses whenever heavy pantry doors swing open. Choosing dependable joinery prevents loose seams and uneven seams over years of daily kitchen activity. Exploring advanced hardwood joinery techniques gives woodworkers multiple pathways to achieve exceptional frame strength.

Pocket Screw Joinery in a Cabinet Face Frame
Pocket screw joinery remains an exceptionally reliable method for modern shops. When combined with PVA wood adhesive, a pocket hole joint provides approximately 1500 PSI of assembly holding strength.
To execute this joint correctly on standard 3/4-inch hardwood:
- Adjust your drill guide jig setting to exactly 3/4-inch.
- Set the stepped drill bit’s depth collar to the 3/4-inch mark.
- Drill two pocket holes on the rear face of each rail end, spacing them roughly 5/8-inch from the outer edges.
- Apply adhesive across the mating end grain.
- Clamp the joint using a specialized flat face clamp to prevent the screw threads from shifting the pieces out of flush alignment.
- Drive 1-1/4-inch coarse-thread washer-head screws into softwood or medium hardwoods (use fine-thread screws for ultra-dense hardwoods like hard maple).
Mortise and Tenon Versus Dowels and Loose Tenons
For traditionalists seeking the highest possible tensile strength, mortise and tenon joinery delivers 2500 to 4000 PSI of shear resistance when paired with high-performance adhesives like Titebond III.
| Joinery Method | Relative Assembly Speed | Joint Shear Strength | Tooling Investment | Primary Advantage |
|---|---|---|---|---|
| Pocket Screws | Fast | ~1,500 PSI | Accessible | Immediate mechanical hold without long clamp waits |
| Hardwood Dowels | Moderate | ~2,200 PSI | Moderate | Hidden alignment with solid internal shear pins |
| Loose Tenons (Domino) | Fast to Moderate | ~3,200 PSI | Advanced | Exceptional strength with rapid mortise plunging |
| Traditional Mortise & Tenon | Deliberate | ~4,000 PSI | Traditional | Maximum surface area for adhesive bonding |
Dowels (typically 3/8-inch diameter fluted beech) and loose tenons offer outstanding intermediate choices, providing complete joint concealment on open cabinet edges while retaining remarkable racking resistance.
Step-by-Step Construction and Carcass Attachment
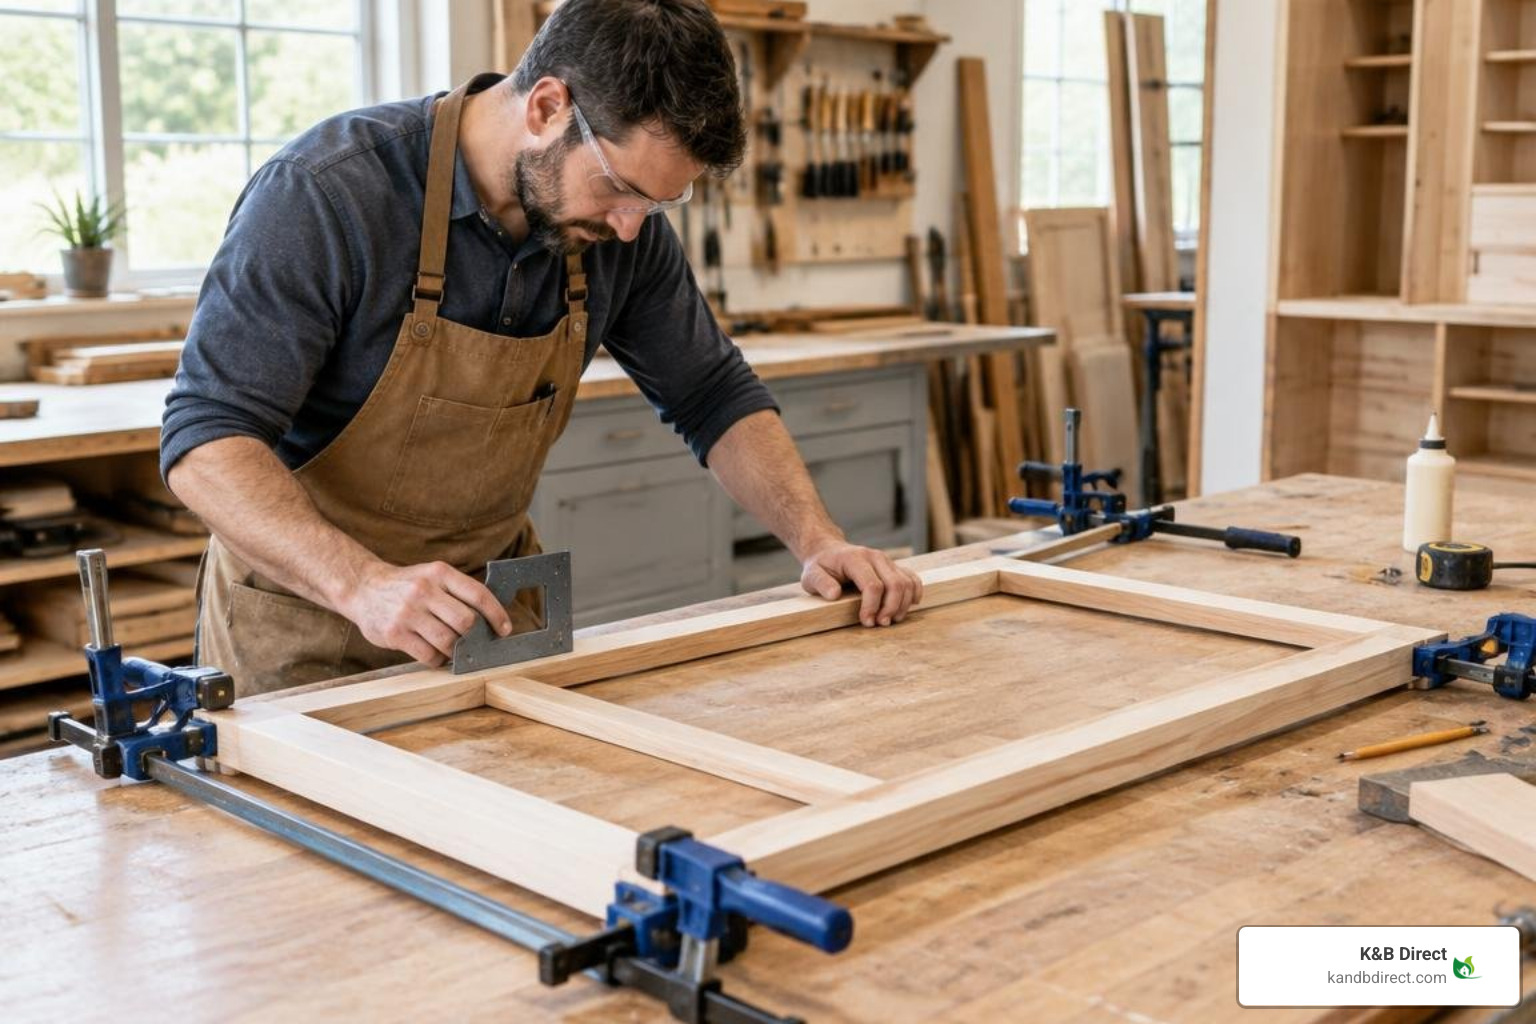
Assembling the frame flat on a stable workbench prevents hidden twists that make final installation difficult.
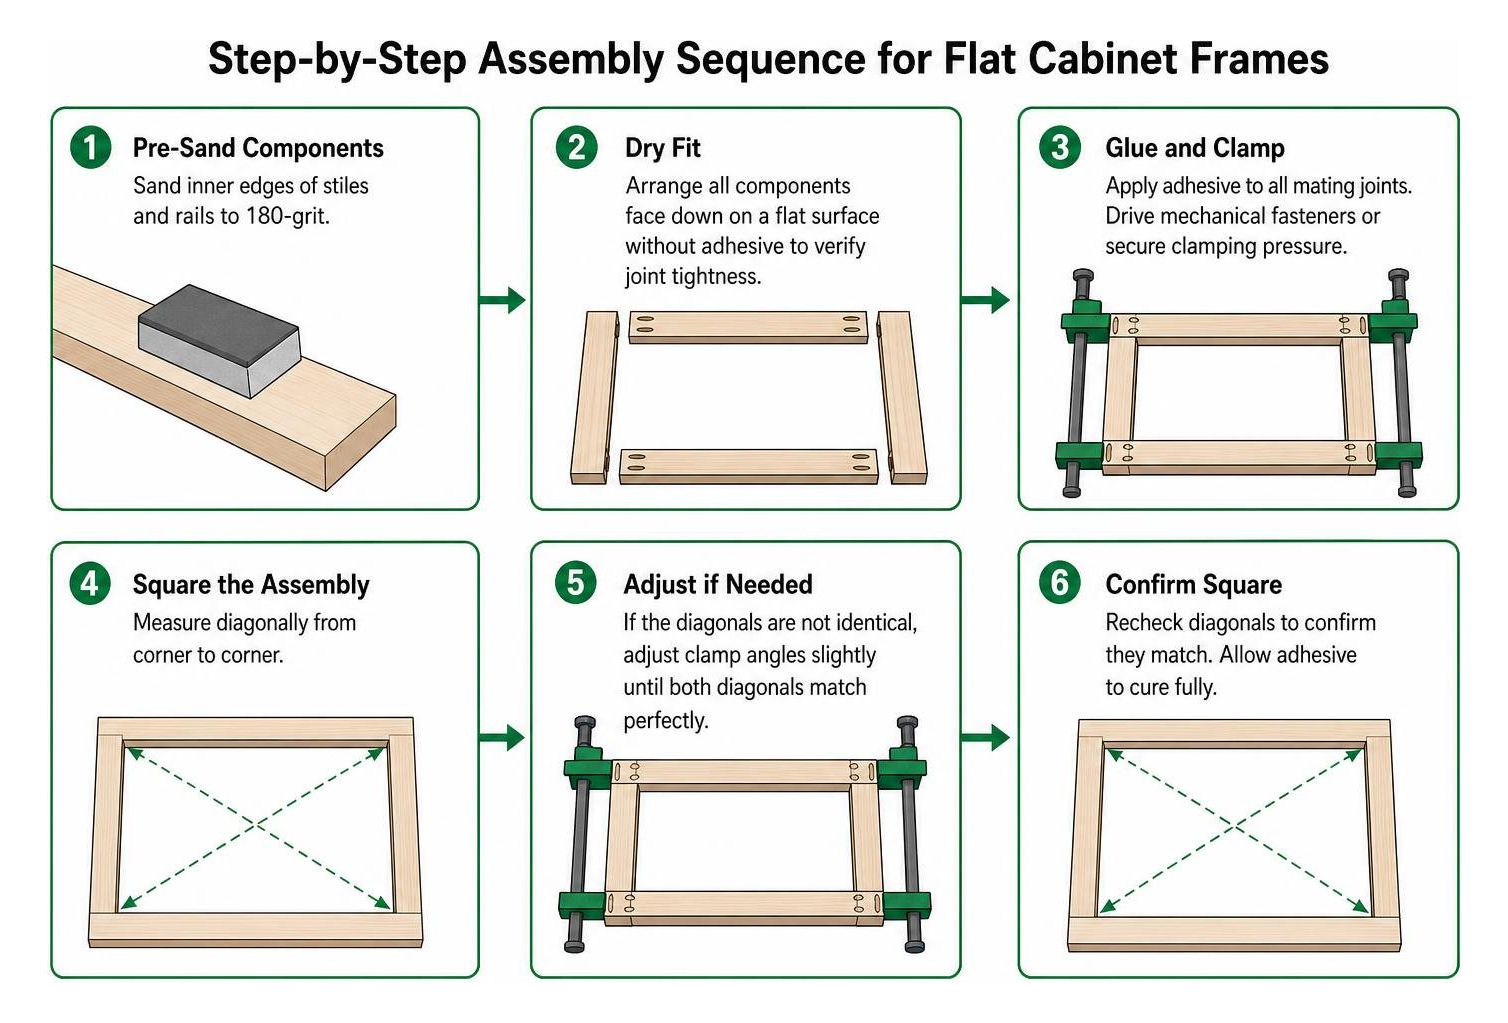
- Pre-Sand Components: Sand the inner edges of stiles and rails to 180-grit before assembly to avoid cross-grain scratches inside tight corners later.
- Dry Fit: Arrange all components face down on a flat surface without adhesive to verify joint tightness.
- Glue and Clamp: Apply adhesive to all mating joints. Drive mechanical fasteners or secure clamping pressure.
- Check Assembly Alignment: Measure diagonally from the top left corner to the bottom right corner, and from top right to bottom left. If the two measurements are not identical, adjust clamp angles slightly until both diagonals match perfectly.
Calculating Rail Dimensions from Carcass Width
Calculating part dimensions with accuracy prevents unnecessary material waste. Always verify the exterior dimensions of your assembled box at three separate locations (top, middle, and bottom) before cutting wood.
- Stile Length: Equals the total exterior height of the carcass (plus any intentional floor or ceiling overhang allowances).
- Rail Length: Equals the total exterior width of the carcass minus the combined width of both outer stiles, plus any intended exterior side overhangs (typically 1/4 inch per side).
- Example Calculation: For a 36-inch-wide cabinet box using 2-inch stiles with a 1/4-inch exterior reveal on both sides: $$text{Total Frame Width} = 36” + 0.25” + 0.25” = 36.5”$$ $$text{Rail Length} = 36.5” – (2” + 2”) = 32.5”$$
Maintaining consistent calculations across multiple boxes ensures smooth runs when installing finished cabinet casing.
Securing the Cabinet Face Frame to the Box
Once cured and flat, secure the front frame to the carcass box using high-strength wood glue along the entire front plywood edge. The glue line delivers long-term structural bonding; fasteners serve primarily to hold parts motionless while the adhesive sets.
- Glue + Clamps (Cleanest Look): Apply glue to the front edges of the box, position the frame with your calculated reveals, and secure with bar clamps cushioned by scrap wood cauls. This leaves the hardwood surface without nail holes.
- Glue + Brad Nails: Secure the frame with 18-gauge 1-1/2-inch brad nails driven into inconspicuous grain lines or future hinge locations, spaced every 8 to 10 inches.
- Interior Pocket Screws: Drive 1-1/4-inch pocket screws through pre-drilled holes in the top and side panels of the carcass directly into the rear face of the hardwood frame.
For expansive multi-cabinet projects, professional cabinet installation services can simplify large-scale layouts and ensure precise alignment throughout the room.
Wood Movement Management and Precision Finishing Schedules
Solid wood expands and contracts across its grain in response to changing ambient relative humidity. Overlooking equilibrium moisture content leads to cracked joints, warped stiles, and binding doors.
Moisture Content Control and Grain Orientation
Lumber must acclimate inside a conditioned indoor environment for at least 7 to 14 days before milling.
- Target Moisture Content: Maintain an interior equilibrium moisture content between 6% and 8% (matching a standard indoor relative humidity of 40% to 60%).
- Shrinkage Characteristics: Tangential shrinkage across flat-sawn boards can reach 8% to 10%, whereas radial shrinkage in quartersawn stock is roughly 5% to 6%. Utilizing quartersawn or rift-sawn stock for wide rails reduces seasonal joint movement by up to 50%.
- Balanced Sealing: Always apply finish coats evenly to both the front face and back edges of the hardwood frame to prevent uneven moisture absorption that leads to cupping.
Understanding these wood movement dynamics helps homeowners choose matching cabinet trim options that stay stable through seasonal humidity changes.
Multi-Step Sanding Progression for Mirror-Smooth Surfaces
A flawless topcoat starts with systematic surface preparation. Skipping grits leaves sanding swirls that become glaringly visible under bright kitchen lighting.
- Initial Leveling (120-Grit): Use a random orbital sander to level all rail-to-stile seam intersections flat.
- Intermediate Smoothing (180-Grit): Sand the entire front surface to remove 120-grit micro-scratches.
- Final Surface Prep (220-Grit): Complete a light pass over all faces with 220-grit paper.
- Hand Sanding with the Grain: Finish with a light hand-sanding pass using 220-grit paper attached to a firm sanding pad, moving strictly parallel to the wood grain to clear any lingering orbital marks.
- Finishing Coats: Apply your chosen stain, high-solids primer, or durable conversion varnish, lightly scuffing with 320-grit abrasive between coats for a perfectly smooth finish.
Frequently Asked Questions About Cabinet Framing
Which wood species offers optimal stability for painted frames?
Poplar and soft maple provide the best performance for painted frames. Both feature closed, uniform grain patterns that absorb primers evenly without grain raise, maintaining exceptional dimensional stability in conditioned living spaces.
What screw size secures three-quarter-inch hardwood joints?
Use 1-1/4-inch pocket hole screws when joining 3/4-inch stock. Select coarse-thread screws for softer hardwoods like poplar or alder, and fine-thread screws for dense hardwoods like hard maple or white oak to prevent splitting.
What is the standard reveal spacing for inset cabinet doors?
The standard reveal spacing around an inset door is a uniform 1/8-inch gap on all four sides. This provides adequate clearance for seasonal wood expansion while preserving a refined, tight margin.
Conclusion
A carefully constructed solid wood front frame transforms standard cabinetry into durable architectural furniture. By selecting stable hardwood species, cutting accurate rails, verifying matching diagonals, and applying dependable joinery, you build cabinets that maintain smooth door reveals and solid structural strength for decades. At K&B Direct, we are dedicated to helping you achieve premium home aesthetics across all our service areas throughout the greater Chicagoland region—including Schiller Park, Rosemont, Park Ridge, Des Plaines, Schaumburg, and Elmhurst. Explore our wide collection of high-caliber kitchen cabinets to find the ideal match for your next home improvement project.