A Smooth Baseboard Finish for Bullnose Corners
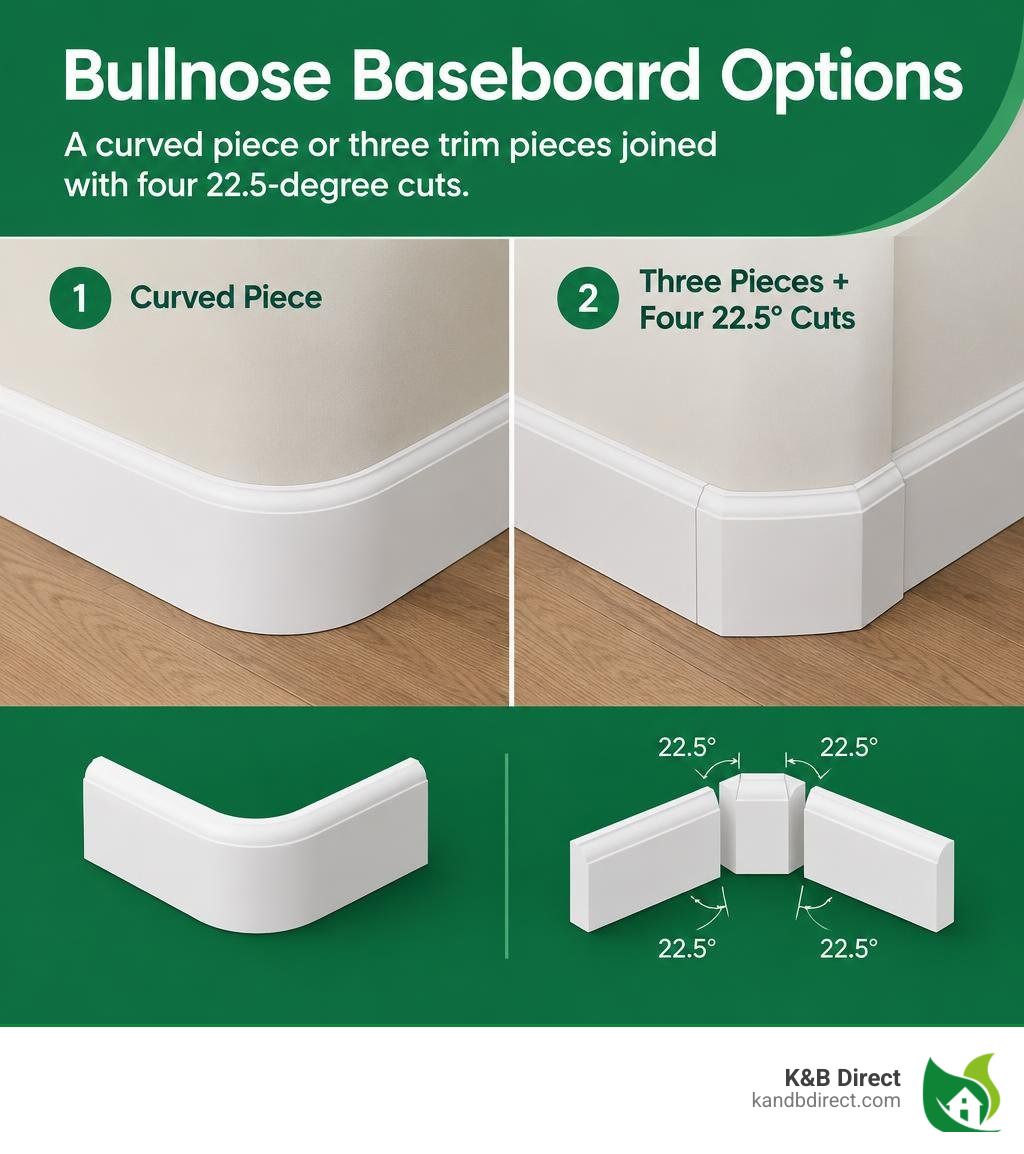
For a baseboard corner round on a bullnose wall, use a curved corner piece that matches your trim, or make a faceted turn with three pieces of baseboard. For the faceted turn, cut the four joining ends at 22.5 degrees. Test-fit the short center piece against the curve, then glue and fasten the trim. Use wood filler on trim joints and caulk where the trim meets the wall.
I’m Eryk Piatkowski, owner of K&B Direct, where I’ve helped homeowners choose mouldings and home finishes since 2011. I’ll help you plan a baseboard corner round that fits your walls and keeps the trim looking consistent.
Important baseboard corner round terms:
Choosing the Right Baseboard Corner Round Method for Your Walls
When homes feature rounded drywall corners, standard trim techniques can leave open gaps or awkward overhangs. A standard wall creates an abrupt 90-degree angle, but a bullnose profile softens the room with a gentle curve, typically with a 3/4-inch radius. Standard 90-degree corners use simple 45-degree cuts, but wrapping molding around a radius requires a deliberate strategy to maintain continuous trim profiles.
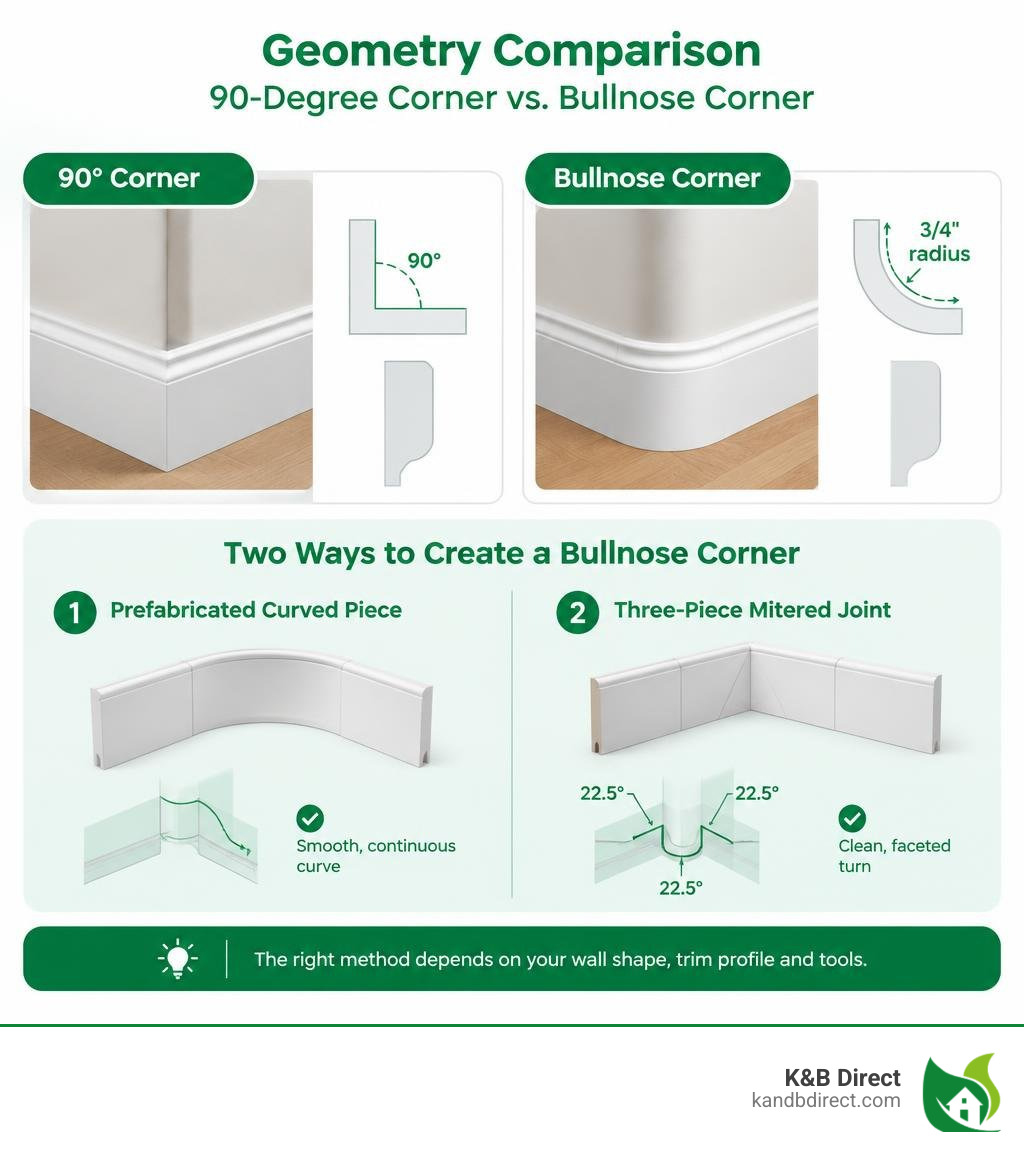
Homeowners and trim carpenters generally choose between two primary methods: installing prefabricated curved pieces or crafting custom mitered joints on-site. Choosing the right approach depends on the room layout, trim profiles, and carpentry tools available. Reviewing a comprehensive baseboard moulding guide helps identify which profiles pair best with your home design.
| Method | Best Application | Key Benefit | Considerations |
|---|---|---|---|
| Prefabricated Radius Piece | Continuous standard profiles | Smooth continuous curve; fast placement | Requires matching profile dimensions |
| Multi-Piece Miter Cut | Custom heights or unique moldings | Adaptable to any profile; uses standard stock | Requires precise angle cuts and joint assembly |
| Two-Piece Base + Cap | High-end architectural trim | Offsets joints for stronger seams | Multiple components to align |
Prefabricated Radius Pieces and Corner Components
Prefabricated corner components provide a smooth, factory-molded curve that mirrors the drywall radius. Top-tier radius mouldings are constructed from solid poplar or primed medium-density fiberboard (MDF). Poplar offers durability and accepts paint or stain cleanly, while primed MDF provides a uniform surface that takes finish paint evenly.
High-grade prefabricated corner pieces feature integrated tangent straight legs that extend at least 3/4 inch down the adjoining walls. These extended legs ensure that joints sit on flat drywall rather than on the curve, which significantly improves connection strength and prevents the piece from loosening over time.
Custom Multi-Piece Bullnose Corners
When pre-molded components do not match your architectural base profile, building a faceted multi-piece corner provides complete creative control. This technique uses small segments of standard baseboard trim cut at matching angles to hug the curve cleanly.
A custom multi-piece wrap maintains identical wood grain, height, and profile contours across the entire room run. While this approach requires measured saw adjustments, it delivers seamless visual continuity across complex wall layouts.
Executing the 22.5-Degree Miter Technique for Rounded Corners
The multi-piece corner technique replaces a single 90-degree turn with two progressive 45-degree turns. Cutting four joining edges at 22.5 degrees creates a smooth transition that hugs the wall radius neatly.

Understanding the geometry makes mastering cutting baseboard corners straightforward. Instead of two boards meeting at 45 degrees (45 + 45 = 90), the faceted corner uses three distinct pieces: the left main run, a small center transition piece, and the right main run.
Geometry and Sizing for a Baseboard Corner Round
A smooth corner requires four 22.5-degree cuts across the assembly:
- The right end of the left baseboard has an outside 22.5-degree miter.
- The center filler piece has an outside 22.5-degree miter on both its left and right ends.
- The left end of the right baseboard has an outside 22.5-degree miter.

When these four cuts meet, the combined angles equal 90 degrees ([22.5 + 22.5] + [22.5 + 22.5] = 90). The center filler piece bridges the wall curve. For a standard 3/4-inch drywall radius, the outer face of this small center piece usually measures between 5/8 inch and 3/4 inch wide.
To find the exact width, place the left and right baseboard runs on the wall, extending them slightly toward the corner until their back edges meet the straight portion of the drywall. Measure the remaining gap along the outer points of the miters to determine the exact length of the center segment before learning cutting baseboard pieces in volume.
Assembling and Securing the Baseboard Corner Round Pieces
Handling small wooden components near high-speed saw blades requires careful technique. To cut the small center segment safely, cut the 22.5-degree miter on the end of a longer board first, flip the saw angle, and complete the second cut so the tiny piece separates cleanly without placing fingers near the blade.
Follow these steps to assemble the corner:
- Dry-Fit the Pieces: Set the left baseboard, center segment, and right baseboard against the wall to verify tight seams.
- Apply Painter’s Tape: Lay the three pieces face-down on a flat surface, aligned edge-to-edge, and stretch high-tack painter’s tape across the back of the seams.
- Add Adhesive: Apply a thin bead of wood glue between the mitered edges and fold the assembly around the corner. The tape acts as a flexible clamp, keeping the faces aligned.
- Fasten to Studs: Position the assembly on the wall. Drive 18-gauge brad nails through the main runs into wall studs. Use small pin nails or headless pins to secure the center piece into the adjoining baseboard edges, avoiding empty drywall hollows.
- Let the Glue Cure: Allow the adhesive to set before removing the painter’s tape to prevent the seams from shifting.
For extra visual help on assembling tricky joints, review this video demonstration on installing trim around rounded wall corners before beginning.
Seamless Finishing: Wood Filler, Caulk, and Base Details
Even precise cuts benefit from careful joint preparation before the final coats of paint go on.
Knowing when to apply filler versus flexible sealant ensures clean lines and prevents premature cracking:
- Wood-to-Wood Seams: Use sandable wood filler or interior wood paste on miter joints where wood touches wood. Once dried, sand it flush with 150-grit to 220-grit sandpaper for an invisible seam.
- Wood-to-Wall Seams: Use an acrylic latex caulk with silicone where the top edge of the baseboard meets the drywall. Caulk remains flexible, accommodating seasonal expansion and contraction without cracking.
Avoid filling wood-to-wood miter joints with standard caulk. Over time, caulk shrinks slightly, creating subtle dips that collect dust along corner seams.
Base Cap and Profile Adjustments
Tall or intricate architectural moldings often use a two-piece system: a flat baseboard topped with a decorative cap profile. A two-piece assembly allows you to offset the seams between the lower board and the upper cap, significantly increasing overall joint rigidity.
Explore different decorative upper shapes in this base cap moulding profiles guide to find options that complement your room styling. For detailed millwork profiles, pairing a tailored base cap moulding with smooth lower runs elevates interior trim throughout the home.
Integrating Quarter Round and Shoe Moulding
When installing new hardwood, luxury vinyl plank, or tile, flooring manufacturers require an expansion perimeter along walls. Baseboards cover most of this space, but slight floor level variations can leave tiny visible openings beneath the baseboard.
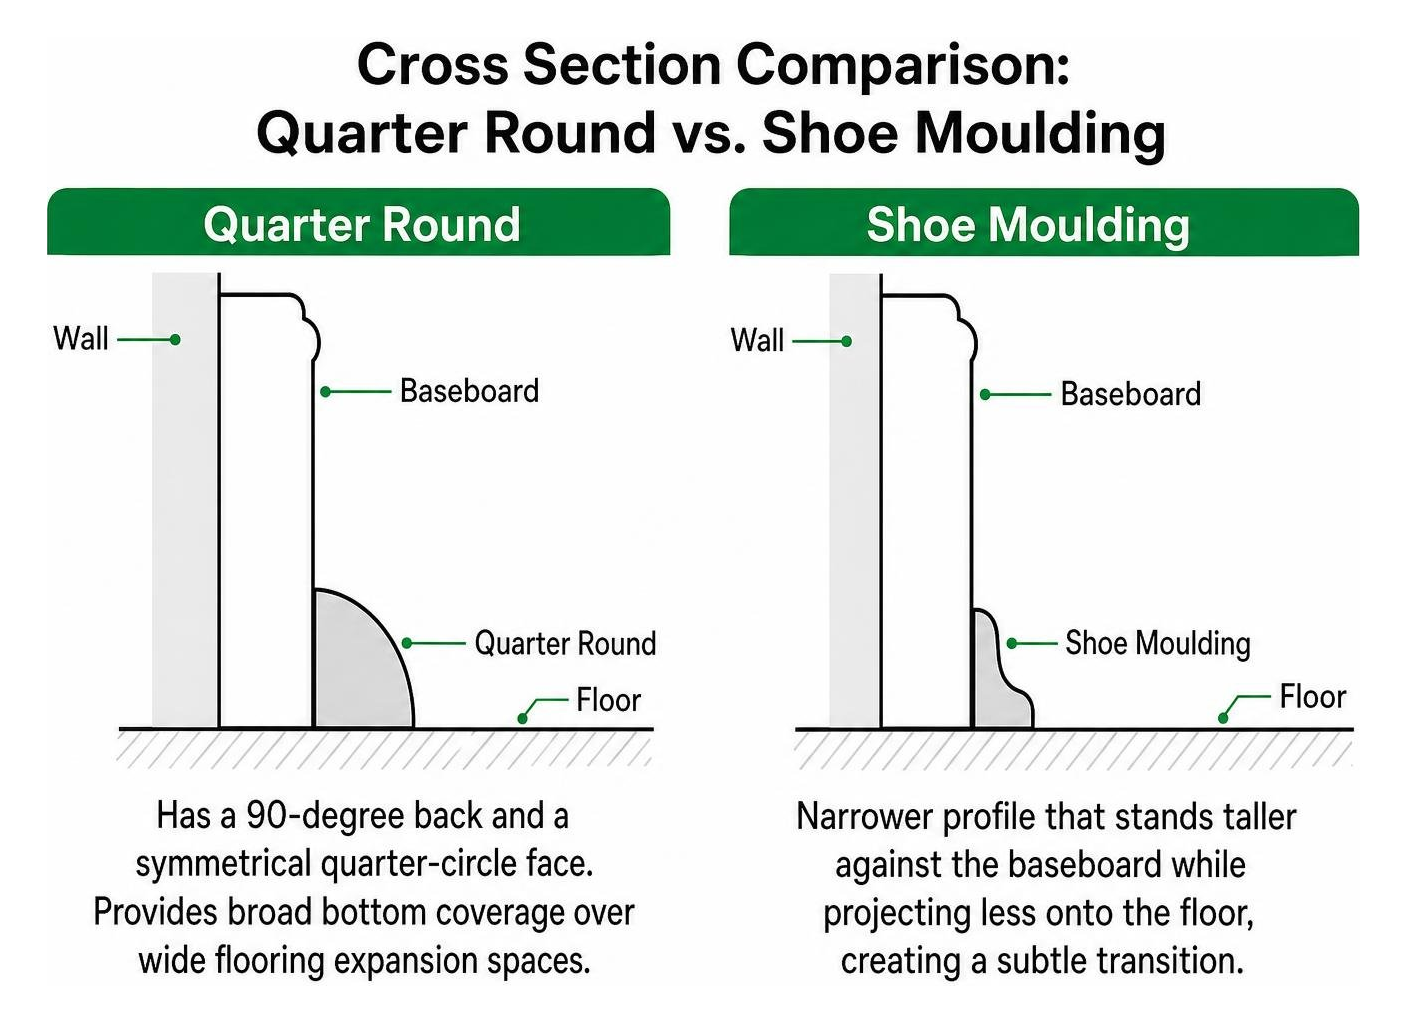
Adding narrow floor trim conceals these gaps:
- Quarter Round: Features a profile with a 90-degree back and a symmetrical quarter-circle face. Utilizing quarter round moulding for flooring gaps provides broad bottom coverage over wide flooring expansion spaces.
- Shoe Moulding: A narrower profile that stands taller against the baseboard while projecting less onto the floor, creating a subtle transition.
When wrapping shoe trim or quarter round around a bullnose corner, repeat the 22.5-degree three-piece miter method on a smaller scale, or use matched prefabricated transition returns to cap the profile cleanly.
Transitioning Unequal Moulding Profiles Around Curved Corners
Connecting different molding profiles—such as transitioning from a tall living room baseboard to a shorter hallway profile around a curved corner—requires careful planning. When baseboards of unequal thickness or height meet at a radius, an unmodified miter joint leaves exposed end grain.
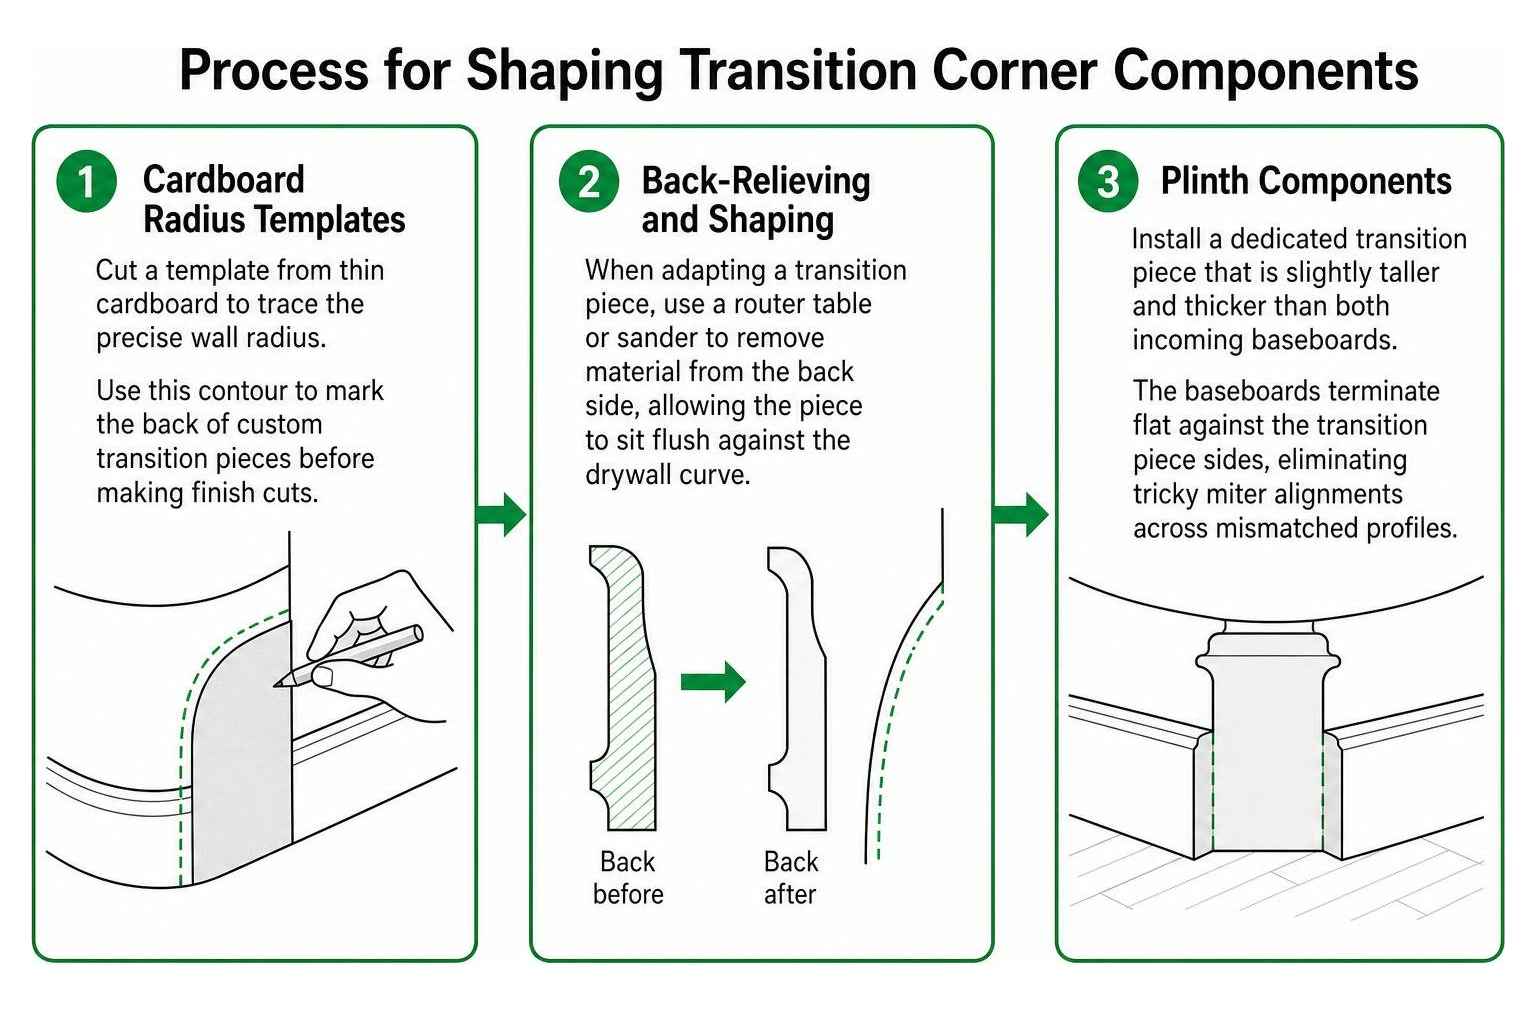
You can manage unequal profile transitions around curves using several practical approaches:
- Cardboard Radius Templates: Cut a template from thin cardboard to trace the precise wall radius. Use this contour to mark the back of custom transition pieces before making finish cuts.
- Back-Relieving and Shaping: When adapting a transition piece, use a router table or sander to remove material from the back side, allowing the piece to sit flush against the drywall curve.
- Plinth Components: Install a dedicated transition piece that is slightly taller and thicker than both incoming baseboards. The baseboards terminate flat against the transition piece sides, eliminating tricky miter alignments across mismatched profiles.
- Coped Profile Returns: If a profile must end at an outside corner, use a coping saw to cut a self-returning profile that cleanly turns the molding profile back into the wall.
Frequently Asked Questions About Bullnose Trim Installation
What angle is needed for rounded trim corners?
To wrap a standard 90-degree rounded wall corner using the multi-piece method, make four 22.5-degree miter cuts. Cutting both ends of a center filler piece and the mating ends of the two main baseboards at 22.5 degrees creates two 45-degree transitions that equal the full 90-degree turn.
When should wood filler be chosen over caulk?
Use sandable wood filler on wood-to-wood seams, including angled miter joints and nail holes. Wood filler hardens completely and sands flat, creating invisible seams under paint. Use flexible acrylic caulk only along the perimeter joints where the baseboard touches the drywall or flooring.
Can standard quarter round bend around bullnose corners?
Standard solid wood or MDF quarter round cannot bend around a tight 3/4-inch drywall radius without snapping. Instead, cut the quarter round into three small pieces using 22.5-degree miters, matching the baseboard geometry below. For continuous runs without miters, flexible polyurethane trim can be used to wrap tight curves.
Conclusion
Creating clean, elegant baseboard corners around rounded drywall adds immediate polish and architectural balance to any living space. Whether you install prefabricated radius components or cut custom multi-piece miters, careful measurements and the right adhesives ensure tight, long-lasting seams. Homeowners throughout Chicago, Rosemont, Des Plaines, Schaumburg, and Oak Brook can achieve refined results on every room update. To upgrade your home with high-quality interior mouldings, explore premium baseboard collections from K&B Direct and discover durable options for your next project.