A Simple Plan for Installing Baseboards and Trim
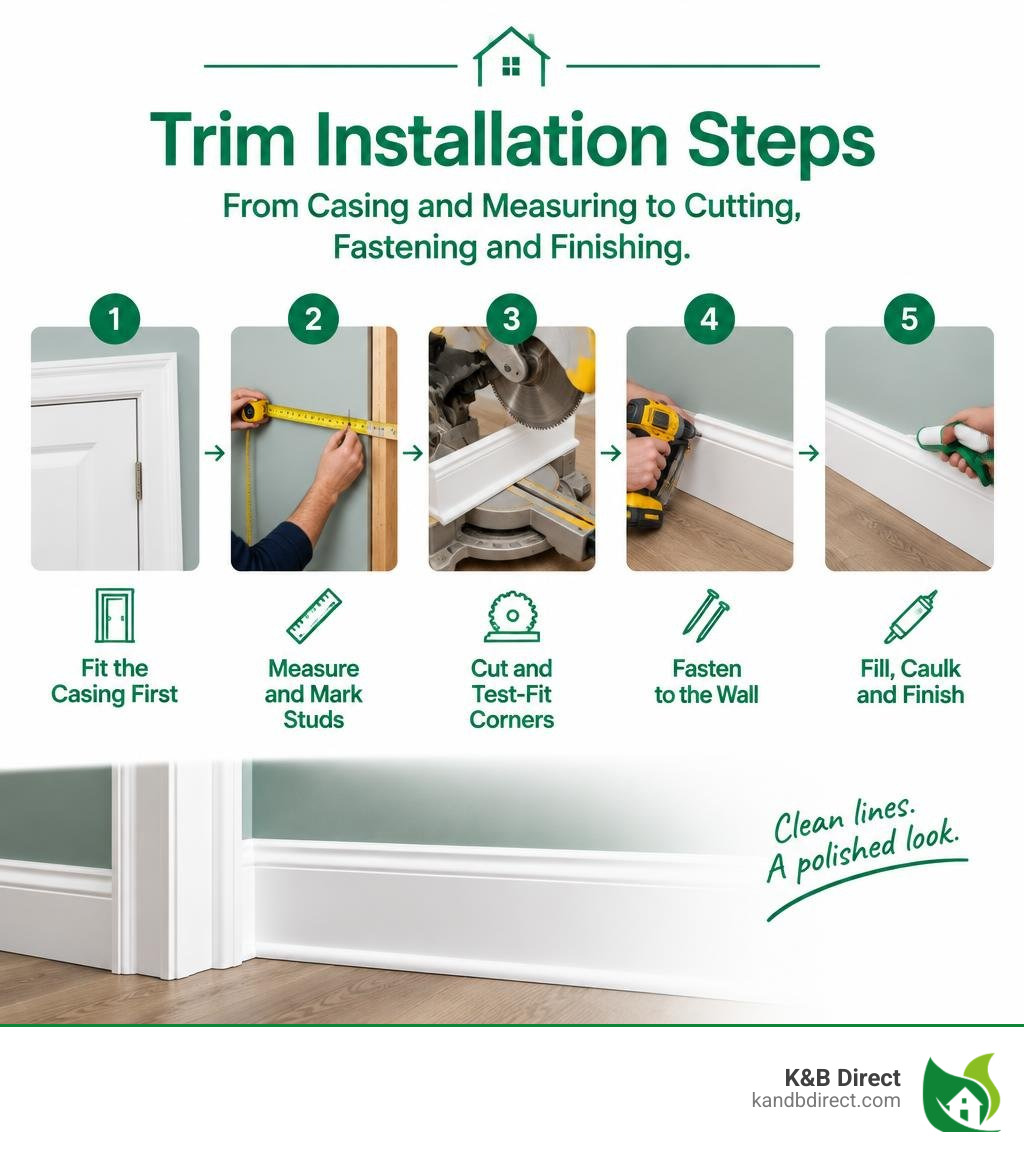
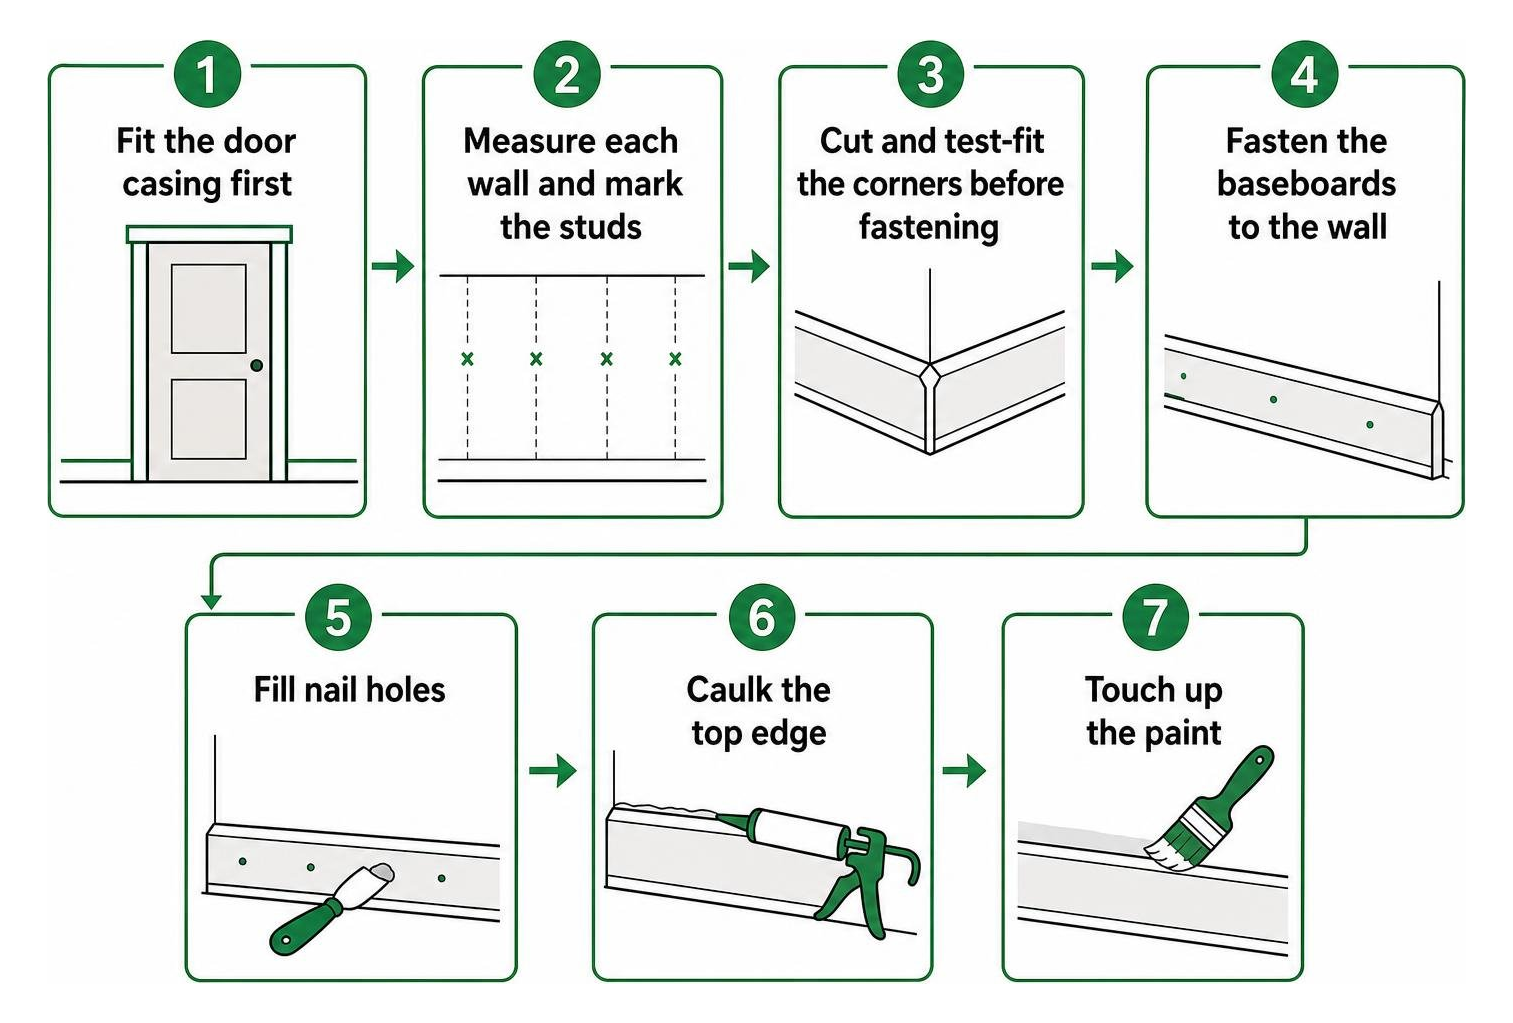
When installing baseboards and trim, fit the door casing first, then measure each wall and mark the studs. Cut and test-fit the corners before fastening the baseboards to the wall. Finish by filling nail holes, caulking the top edge, and touching up the paint.
That order helps the baseboard meet the casing cleanly and cover the gap at the edge of the floor. Check each joint before you nail it in place; a small cut adjustment is easier than hiding a large gap later.
I’m Eryk Piatkowski, owner of K&B Direct since 2011. My experience helping homeowners choose mouldings, doors, and windows informs this guide to installing baseboards and trim.
Installing baseboards and trim terms made easy:
Essential Preparation and Sequence for Installing Baseboards and Trim

A successful carpentry project starts long before you drive the first fastener into the wall. Setting up a dedicated cutting station in a central space saves time and prevents unnecessary back-and-forth trips across the home. When you establish your workstation, pair a sharp compound miter saw with sturdy outfeed supports so long lengths of trim do not sag or crack during cuts.
Acclimating your materials inside the home for at least forty-eight hours is crucial. Natural wood and composite products expand or shrink based on ambient indoor humidity and temperature. Skipping this acclimatization period leads to shrinking seams, popped joints, and cracked caulking months down the road. While your materials acclimate, evaluate your wall substrates for moisture and flatness using professional Finish & Trim Carpentry guidelines.
| Moulding Material | Primary Benefits | Best Applications | Finishing Requirement |
|---|---|---|---|
| MDF (Medium Density Fiberboard) | Uniform surface, budget-friendly, zero grain defects | Living rooms, bedrooms, dry hallways | Factory primed; paint only |
| Solid Pine / Poplar | Crisp edge definition, strong nail-holding strength | High-traffic zones, whole-home upgrades | Paint or stain |
| PVC / Composite | 100% moisture-proof, rot-resistant | Bathrooms, basements, laundry spaces | Pre-finished or acrylic paint |
| Hardwood (Oak / Alder) | Rich wood grain patterns, exceptional impact resistance | Custom architectural accents | Stain and clear protective topcoat |
Planning Layout and Wall Prep for Installing Baseboards and Trim
Before touching a saw, remove any old, battered trim carefully. Score the paint seam along the top of existing boards using a sharp utility knife to prevent tearing the drywall paper. Slide a wide pry bar behind the trim, using a wooden shim against the drywall to distribute pressure evenly without punching holes in the wall.
Once the perimeter is clean, grab an electronic stud finder and locate the framing members along the bottom of the wall. In standard residential framing throughout Chicago, IL and surrounding suburbs like Norridge, IL and Elmhurst, IL, wall studs sit sixteen inches apart on center. Mark each stud location on the wall with light pencil marks about two inches higher than your trim height. Snap a level reference chalk line to check the consistency of your floor plane.
When calculating material needs, measure the complete room perimeter, account for door openings, and select your preferred baseboard trim profiles. Always add a ten percent allowance to your total measurements. This buffer ensures you have plenty of continuous material for cutting mistakes, pattern matching, and joint overlap.
Installation Order for Doors, Windows, and Moulding
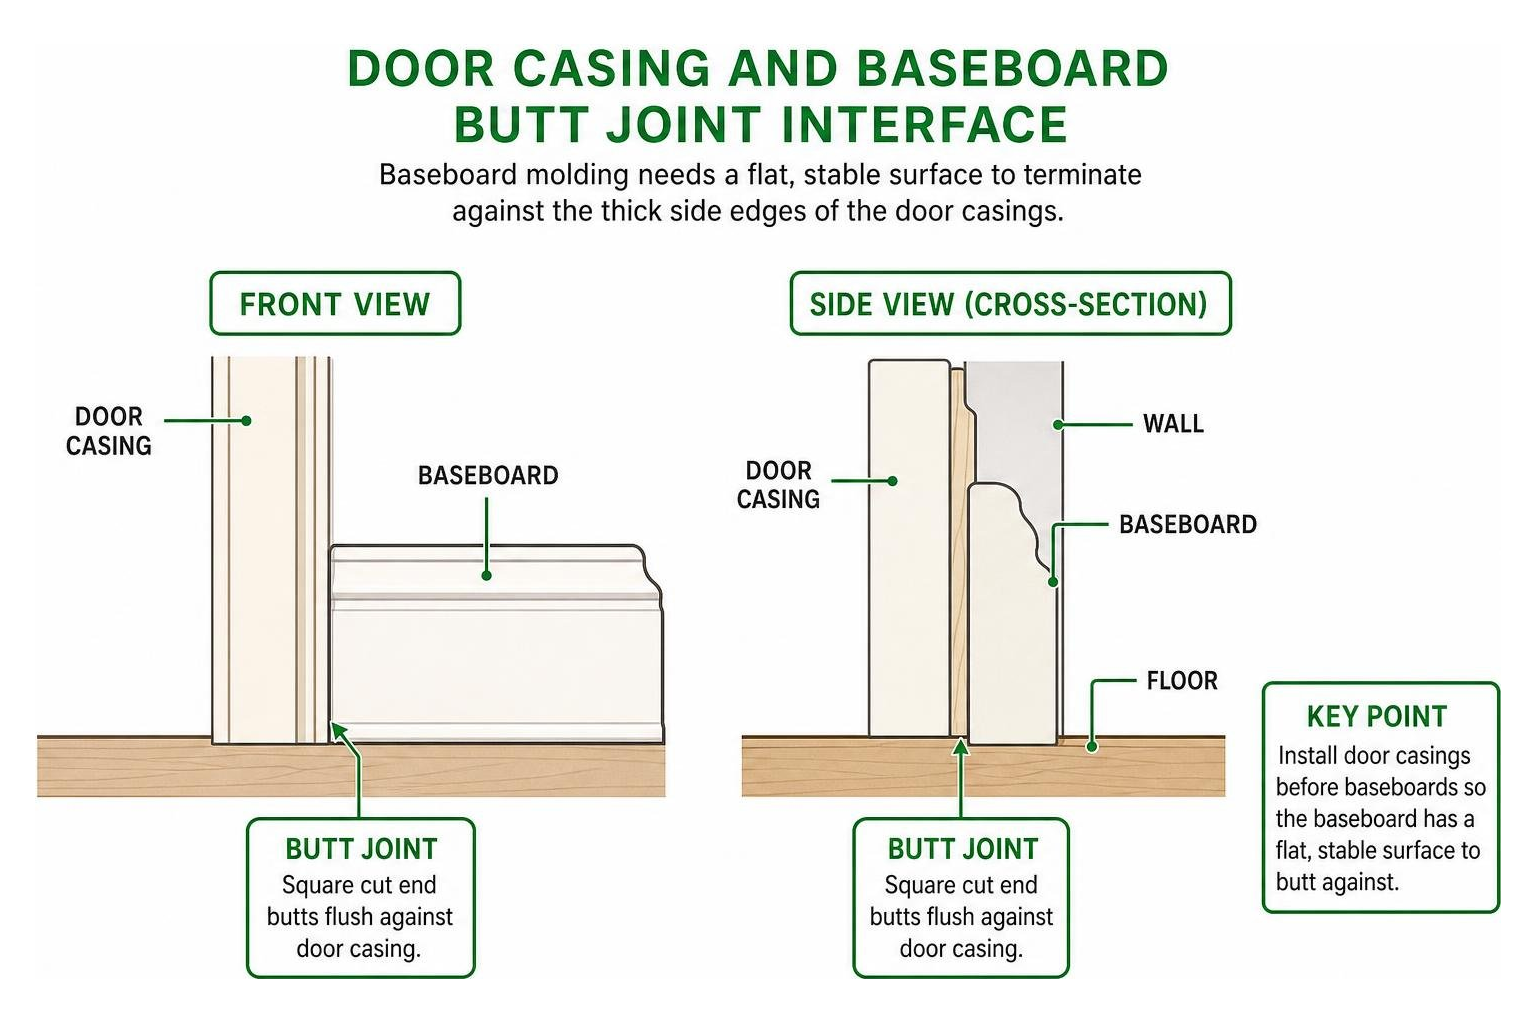
A common issue among newcomers to trim carpentry is working in the wrong order. You should always install your vertical framing elements before running horizontal profiles along the floor. Baseboard molding needs a flat, stable surface to terminate against; if you install baseboards first, you will find it nearly impossible to make clean, flush transitions at door openings.
- Hang and case interior doors: Secure your door jambs and install the door casing alignment with an even reveal around the jamb edges.
- Trim window openings: Complete your window frame moulding integration, including the stool, apron, and side casings.
- Run primary baseboards: Measure and fit the baseboards, butting straight cut ends flush against the thick side edges of the door casings.
- Attach secondary profiles: Add base cap or shoe moulding as the final step to bridge remaining floor transitions.
Precision Cutting and Joint Assembly Methods

Achieving tight joints requires understanding techniques to adapt standard angles to real-world walls. Drywall compound buildup at corners means inside angles are rarely a clean ninety degrees. By adopting practical interior trim techniques, you can create durable corner joints that resist temperature fluctuations and natural settling.
Mastering Coped Joints and Outside Miters
For inside corners, professional carpenters prefer a coped joint over a standard miter. A coped joint consists of one board running straight into the corner, while the intersecting board is contoured along its face to nest over the first piece.
To create a coped joint:
- Cut the receiving board at a straight ninety-degree angle and install it tight against the adjoining wall.
- Cut the overlapping board on your miter saw at a forty-five-degree inside bevel, exposing the profile contour.
- Follow the exposed edge line with a manual coping saw, tilting the blade backward slightly to create a back-bevel angle. This relief cut removes rear material so only the crisp front edge touches the first board.
- Test-fit the joint and smooth any tight spots using a wood rasp or fine sandpaper.
For outside corners, measure the angle using a dedicated miter gauge or sliding T-bevel. When mastering cutting baseboard corners, dividing the measured angle equally across both pieces creates a balanced seam. Apply cyanoacrylate (CA) adhesive and an activator spray to the mitered faces before fastening them to lock the joint tightly.
When a single wall run exceeds the length of your stock moulding, do not use a standard straight butt joint. Instead, create a thirty-degree or forty-five-degree scarf joint directly over a wall stud. Overlapping the beveled ends with a dab of wood glue ensures the seam remains invisible after sanding and painting.
Scribing Boards for Uneven Floors and Curved Walls
Hardwood, tile, and concrete floors often feature minor dips, high spots, and slopes. If you press a rigid board down over an uneven floor, the top line will dip out of level. You can adapt modern base moulding to irregular contours using a technique called scribing.
Set your baseboard in place against the wall, resting its lowest edge on the highest point of the floor. Level the top edge using a long spirit level. Set a drafting compass to match the widest gap between the bottom of the board and the floor. Slide the compass point along the floor while the pencil traces the matching contour onto the face of the baseboard.
Trim the waste material along your pencil line using a jigsaw or circular saw set to a five-degree bevel. The back bevel ensures the front visible face meets the flooring surface snugly.
Fastening and Flooring Transition Strategies
Securing your trim properly prevents boards from bowing away from the drywall or splitting near the ends. While older methods relied on hand hammers and finish nails, a pneumatic or cordless 18-gauge brad nailer provides superior control, leaving tiny nail holes that require minimal filling.
Fastening Guidelines When Installing Baseboards and Trim
When anchoring baseboards, drive fasteners directly into the studs located earlier. For baseboards under four inches tall, drive two 18-gauge brad nails vertically aligned every sixteen inches: one nail into the bottom wall plate approximately one-half inch above the floor, and one nail near the top edge driven directly into the stud.
For taller profiles, stagger your fasteners to maintain strong clamping pressure against uneven drywall surfaces. Set your compressor or battery nailer depth so nail heads sit roughly one-sixteenth of an inch beneath the surface of the moulding. If you must fasten within two inches of a board’s edge, pre-drill a small pilot hole to eliminate the risk of split wood fibers. On stubborn, warped walls, applying a serpentine bead of construction adhesive to the back of the trim provides extra holding power between stud bays.
Integrating Shoe Moulding and Base Caps
A multi-piece assembly offers both architectural depth and functional flexibility. A classic 3-piece baseboard setup consists of a flat baseboard, a decorative top cap, and a flexible bottom shoe moulding.
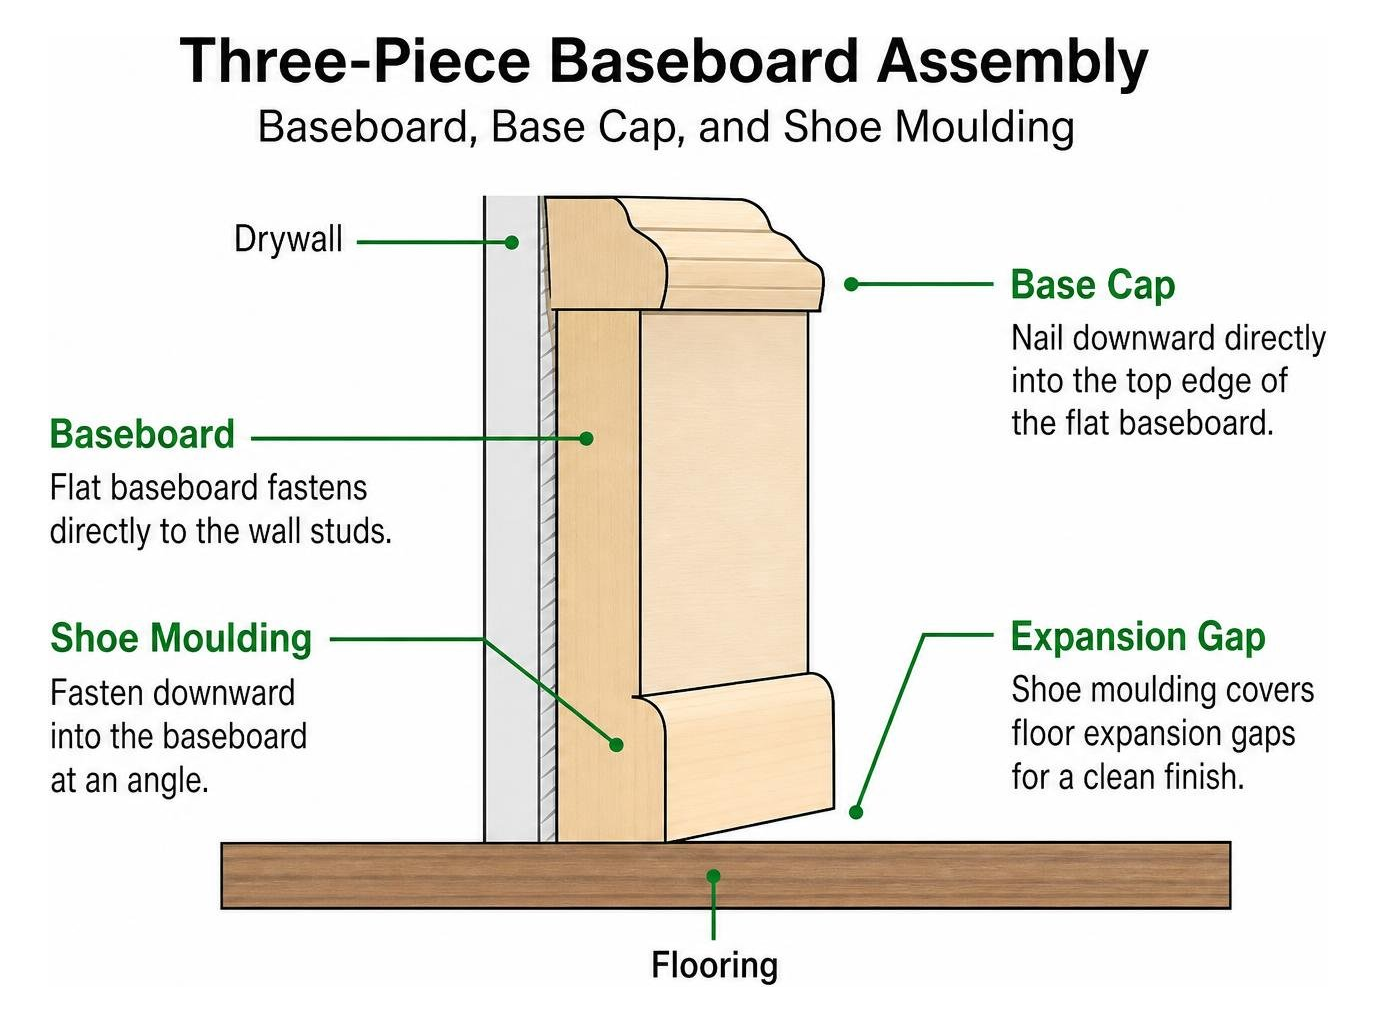
When adding decorative height, learn the proper technique for installing base cap moulding by nailing the cap downward directly into the top edge of the flat baseboard.
At the bottom of the wall, quarter round moulding or shoe trim provides crucial coverage over floor expansion gaps. Always fasten shoe moulding directly into the baseboard at a downward angle rather than into the flooring. Fastening to the baseboard allows floating floors, such as luxury vinyl plank or engineered hardwood, to expand and shrink without restriction underneath without popping the trim loose.
Professional Finishing and Gap Solutions
Finishing touches transform an average trim project into a clean, seamless architectural feature. Even with precise cuts, subtle gaps can appear along the top edge of the board where drywall bows. Caulking, patching, and smooth painting bridge these gaps effectively.
Seamless Caulking and Surface Refinement
Apply a high-quality, paintable acrylic latex caulk along the top junction between the baseboard and the wall. Cut the caulk tube nozzle at a forty-five-degree angle to create a small opening roughly one-eighth of an inch wide.
Run a continuous, steady bead of caulk along the seam, then smooth the line using a damp finger or a flexible silicone profiling tool. Keep a clean damp sponge and a bucket of water nearby to wipe away excess material before it skins over. When working with wood moulding, avoid letting wet caulk build up on the flat wood face, as dried caulk residue creates uneven textures beneath semi-gloss topcoats.
Correcting Joint Mismatches and Wall Imperfections
If an outside miter joint shows a slight gap at the front corner, burnish the seam by rubbing the round shaft of a screwdriver along the corner at a forty-five-degree angle. This technique rolls the wood fibers together to close hairline gaps before you apply paint.
For paint-grade trim:
- Fill all countersunk nail holes using a premium wood filler or spackling paste, mounding the filler slightly above the surface to compensate for shrinkage.
- Once completely dry, sand the filled spots flush using 220-grit sandpaper wrapped around a flat sanding pad.
- For stain-grade natural wood trim, avoid standard caulk; use color-matched wax filler sticks to conceal nail holes and subtle joint seams.
To explore a wider variety of architectural profiles and design options for your home, review The Ultimate Guide to Molding and Baseboards.
Frequently Asked Questions About Trim Installation
Should trim receive paint before or after installation?
Pre-finishing your trim boards before fastening them to the wall provides the cleanest results. Laying boards flat across saw horses allows you to roll or spray primer and a primary coat of paint smoothly without bending over or risking paint drips on new flooring. Once the trim is nailed, coped, and caulked, you only need to fill nail holes and apply a quick final touch-up coat along the face and caulk lines.
What fastener gauge works best for interior moulding?
An 18-gauge brad nailer is the ideal tool for roughly ninety-five percent of interior baseboard and casing installations. The 18-gauge brad provides ample holding strength when anchored into solid framing while leaving a tiny entry hole that is simple to patch. For exceptionally thick, dense hardwood profiles exceeding three-quarters of an inch in thickness, a 15-gauge or 16-gauge finish nailer provides added penetration strength.
Can shoe moulding conceal uneven flooring gaps?
Yes, shoe moulding is designed specifically for this purpose. Because shoe moulding is narrower and significantly more flexible than the main baseboard, it bends to follow minor subfloor dips and high spots. Nailing it tight against the floor line hides irregular gaps and covers perimeter expansion margins left for hardwood and floating floors.
Conclusion
Mastering trim carpentry comes down to steady patience, proper sequencing, and the right cutting techniques. By measuring carefully, coping inside corners, and fastening into solid wall framing, you create durable, beautiful room transitions that elevate the interior aesthetics of your home.
Whether you are updating a single room in Park Ridge, IL or renovating an entire residence in Des Plaines, IL or Rosemont, IL, our team at K&B Direct provides high-quality doors, windows, cabinets, and mouldings backed by friendly service to help you realize your ideal home vision. Explore our comprehensive selection of baseboard moulding options to find the perfect profile for your next interior upgrade.